MakerGram Logo

    MakerGram

    • Register
    • Login
    • Search
    • Categories
    • Recent
    • Popular
    • Tags
    • Users
    • Groups

    how did sudo command solved can't open device "/dev/ttyUSB0": Permission denied?

    General Discussion
    arduino linux nodemcu
    2
    7
    2272
    Loading More Posts
    • Oldest to Newest
    • Newest to Oldest
    • Most Votes
    Reply
    • Reply as topic
    Log in to reply
    This topic has been deleted. Only users with topic management privileges can see it.
    • A
      arunksoman last edited by arunksoman

      1. Go to Arduino software
      2. Download Linnux 64-bit or 32-bit software
      3. Extract the Downloaded tar.xz file on your home directory.
      4. Navigate to your extracted file using cd command:
        cd arduino-1.8.12-linux64
      5. Make the install.sh file executable:
        sudo chmod +x install.sh
      6. Install arduino using shell script
        sudo ./install.sh
      7. Open Terminal and type:
        ls -l /dev/ttyACM*
        you will get something like:
        crw-rw---- 1 root dialout 188, 0 5 apr 23.01 ttyACM0
        The "0" at the end of ACM might be a different number, or multiple entries might be returned. The data we need is "dialout" (is the group owner of the file).
        Now we just need to add our user to the group:
        sudo usermod -a -G dialout <username>

      I believes it is a better way to solve your problem. Other way you to try to solve problem is install arduino via:
      sudo apt-get install arduino-core

      Abhay 1 Reply Last reply Reply Quote 2
      • Abhay
        Abhay @arunksoman last edited by

        @arunksoman thanks for the steps
        but the thing is I don't have issues with port now, I was curious how it got resolved without going through the usual steps but by using sudo command.

        A 1 Reply Last reply Reply Quote 0
        • A
          arunksoman @Abhay last edited by arunksoman

          @Abhay What did you mean by usual steps?

          Abhay 1 Reply Last reply Reply Quote 0
          • Abhay
            Abhay @arunksoman last edited by

            @arunksoman by usual steps I meant adding our user to the group.
            ie the step
            sudo usermod -a -G dialout <username>

            A 1 Reply Last reply Reply Quote 0
            • A
              arunksoman @Abhay last edited by

              @Abhay I think most probably you might have done this earlier while installing Arduino.

              Abhay 1 Reply Last reply Reply Quote 0
              • Abhay
                Abhay @arunksoman last edited by

                @arunksoman thanks,
                I will look more into it. Thanks again

                1 Reply Last reply Reply Quote 0
                • First post
                  Last post

                Recent Posts

                • S

                  In the world of advanced optics and laser technology, Optical Grade diamonds are the new standard. Made with CVD (chemical vapor deposition) technology, these lab grown diamonds have high clarity, thermal conductivity and light transfer. The USA is leading the way with these diamonds, where industries from aviation to telecom have already used them. Not like mined diamonds, Optical Grade CVD diamonds are engineered for perfection, for high-tech applications across industries.

                  What Are Optical Grade Diamonds?

                  Optical Grade diamonds are CVD diamonds For very high precision and very pure materials.

                  Ultra-High Transparency – Near perfect light transmission across UV, visible and IR spectra. Superior Thermal Conductivity – Fast heat dissipation for high power lasers. Minimal Inclusions & Defects – Critical for optical clarity and performance.

                  In the USA, industries are moving fast to Optical Grade lab grown diamonds for their reliability and performance. Interested in Optical Grade diamonds for your application? Learn how CVD technology is changing the face of optics in the USA!

                  • read more
                • D

                  Signal Hunt: An ESP-NOW Workshop & Treasure Hunt

                  Hello everyone! We’re planning on organizing a two-phase event that explores device-to-device communication using ESP-NOW protocol :

                  Workshop: Participants learn to build and program ESP32-based receivers with a web interface that directly exchange signal data using ESP-NOW for RSSI-based distance approximation.

                  Signal Hunt Competition: Equipped with these receivers, participants will track hidden ESP32 transmitters scattered around the campus, each with distinct point values.

                  Current hardware setup:
                  Reciever(one per team):
                  Esp32 ~ 360rs
                  9v battery = 20rs
                  9v battery clip= 5rs
                  buck converter (MP1584 or LM2596) ~ 45rs
                  Perfboard + male to female berg strip ~30rs
                  Total per reciever ~ 460rs
                  Transmitters :6
                  Components same as recievers = 460*6~2760rs

                  (using non-rechargeable batteries to reduce cost,
                  will using a 7805 voltage regulator IC be a viable way to reduce cost further?)

                  We’d love your suggestions on ways to simplify hardware, reducing the cost, secure partnerships and funding, or enhance the interactive elements. Thank you, looking forward to any ideas that can help make the event engaging and successful!

                  • read more
                • R

                  I am trying to set up a janus webrtc to stream an RTSP to an HTML page.
                  I have followed the getting-started steps by Janus-gateway official github repo.

                  Since I am new to web development. I do not understand how to host the Webrtc server. can anyone guide me to set up an HTML page that can display a video stream from an RTSP server using janus webrtc?

                  • read more
                • @zainmuhammed Can try capturing the GPS when the device is starting the loop instead after joining the LoRaWAN and see?

                  You can put the GPS value on top of the loop or setup function.

                  Also, what kind of gateway are you using? Is it configured okay, OTA is done?

                  • read more
                • @salmanfaris Today I tried after connecting a 18650 cell,
                  WhatsApp Image 2024-04-12 at 10.40.06_c7d1947e.jpg WhatsApp Image 2024-04-12 at 10.40.05_897b8bb6.jpg
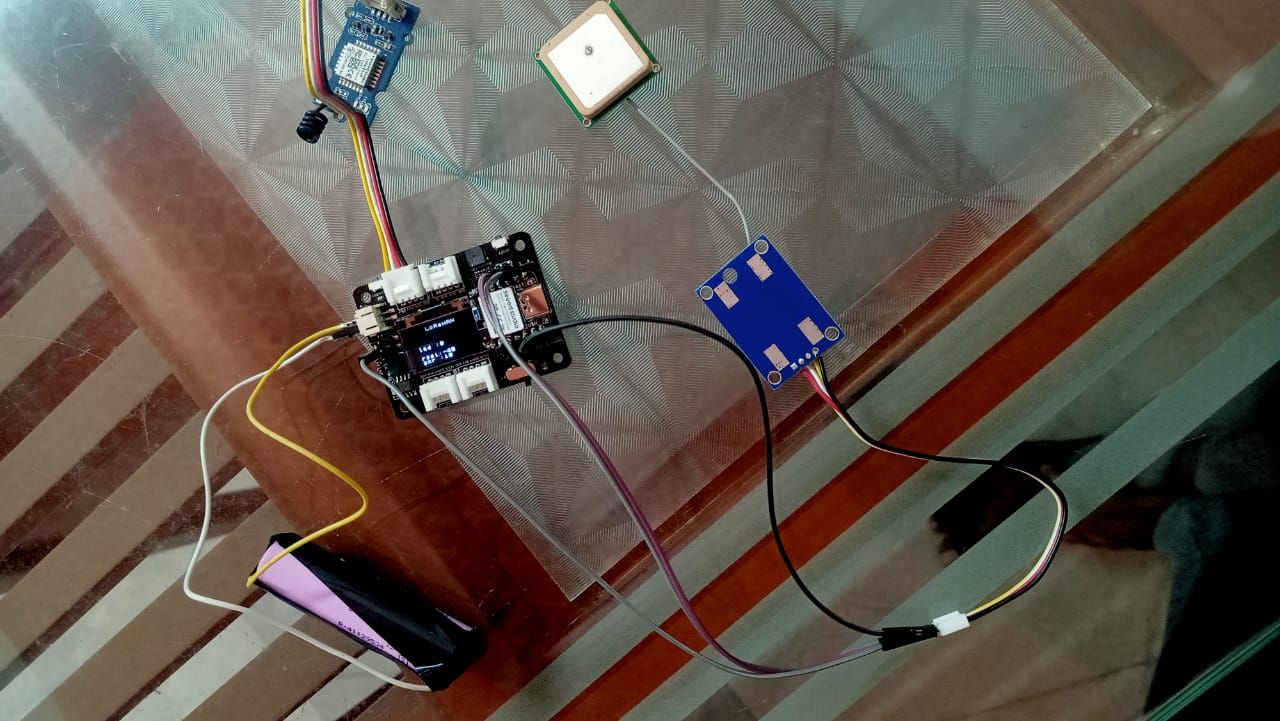
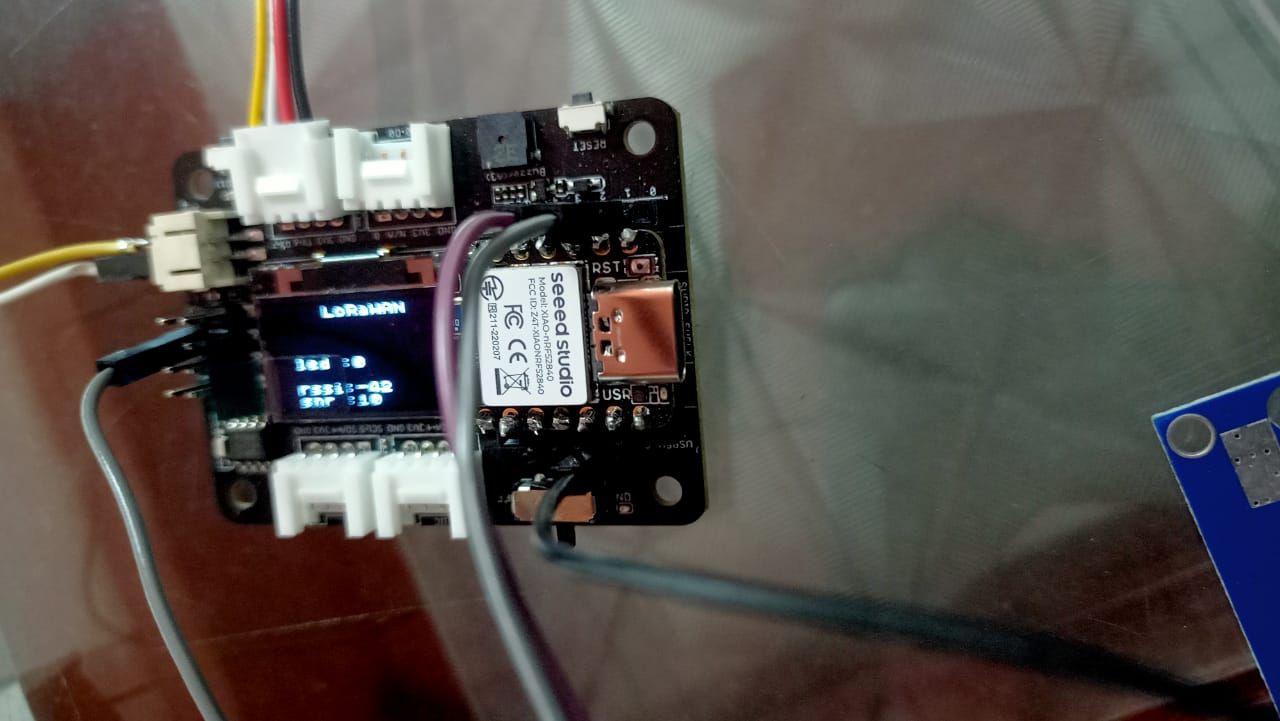
                  Data getting in console after integration of both lora and gps.
                  3f45cfe7-0061-4328-8c55-ef0a73385203-image.png
                  here you can see that GPS value is 0,0. also in my previous post you can see that GPS value is not reading.
                  Also the status LED is active after it is connected to the satellite.

                  • read more
                By MakerGram | A XiStart Initiative | Built with ♥ NodeBB
                Copyright © 2023 MakerGram, All rights reserved.
                Privacy Policy | Terms & Conditions | Disclaimer | Code of Conduct