MakerGram Logo

    MakerGram

    • Register
    • Login
    • Search
    • Categories
    • Recent
    • Popular
    • Tags
    • Users
    • Groups
    1. Home
    2. salmanfaris
    3. Best
    • Profile
    • Following 0
    • Followers 29
    • Topics 75
    • Posts 333
    • Best 102
    • Controversial 0
    • Groups 3

    Best posts made by salmanfaris

    • RE: What's your favorite embedded/prototyping development board?

      Maker Perspective

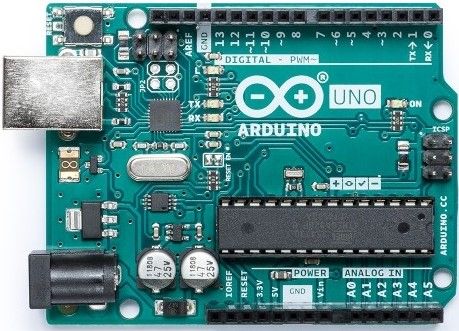
      For Beginners/ Aspiring Makers Arduino UNO is my recommendation, very straight forward and very easy to get started.

      Arduino-Uno-Rev3-2.jpg

      Tech Specifications

      • Powerd by ATmega328P
      • 14 Digital I/O Pin, which 6 provide PWM output
      • 6 Analog Input Pins
      • 16 MHz Clock
      • 32 KB (ATmega328P) Flash Memory
      • 2 KB SRAM
      • 1KB EEPROM

      The Arduino Uno is an open-source microcontroller board based on the Microchip ATmega328P microcontroller and developed by Arduino.cc. The board is equipped with sets of digital and analogue input/output pins that may be interfaced to various expansion boards and other circuits.

      alt text

      The main thing I loved Arduino is the community and peripherals That supported, also the Shields. these are boards that can be plugged on top of the Arduino PCB extending its capabilities. The different shields follow the same philosophy as the original toolkit: they are easy to mount and cheap to produce.

      alt text

      Another one is the IDE, The Arduino Integrated Development Environment is a cross-platform application that is written in functions from C and C++. It is used to write and upload programs to Arduino compatible boards, but also, with the help of 3rd party cores, other vendor development boards.

      The Original Arduino Uno cost around $21, but you can also get clones even cheaper, but I recommend to buy original to support there mission and vision.

      Website: https://www.arduino.cc/


      There are some recommendations if you're into hackathons or quick prototype/POC.
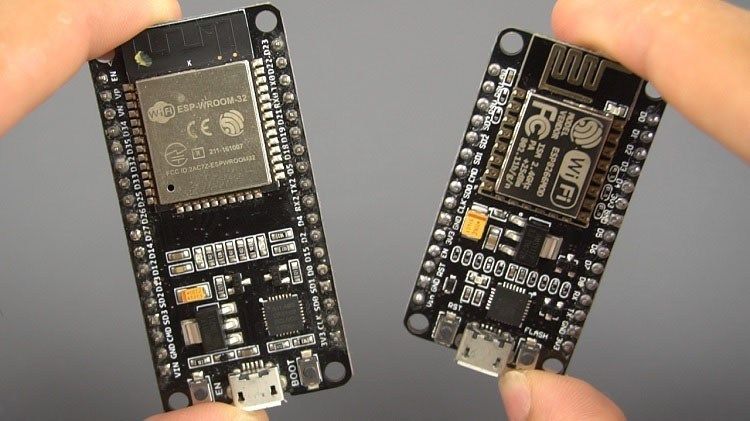
      ESP32/ESP8266

      Others who have experience with the Arduino ecosystem, I suggest the Esperssif ESP8266 or ESP32 Low-cost WiFi and BLE* development platform, which is highly supported by the Arduino ecosystem. That means you can reuse many of the Arduino functions and libraries out of the box.

      esp32-vs-esp8266-devlopment-boards.jpg


      Particle Photon

      Capture.PNG

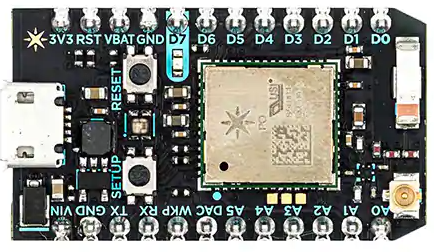
      The Photon is a $19 tiny Wi-Fi IoT device for creating connected projects and products for the Internet of Things. It's easy to use, it's powerful, and it's connected to the cloud. The board is powered by a Cypress Wi-Fi chip alongside a powerful STM32 ARM Cortex M3 microcontroller.

      It's very easy to quickstart, also super easy to connect with particle cloud if you project involve Cloud and Connectivity.

      Website: https://www.particle.io/


      If you need more computing and processing power you can check the Raspberry Pi and BeagleBoard Single Board Computers
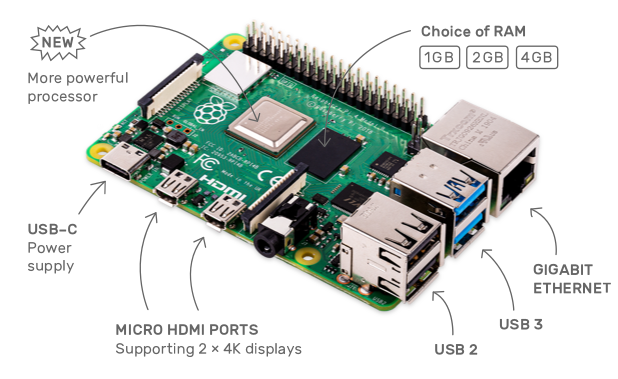
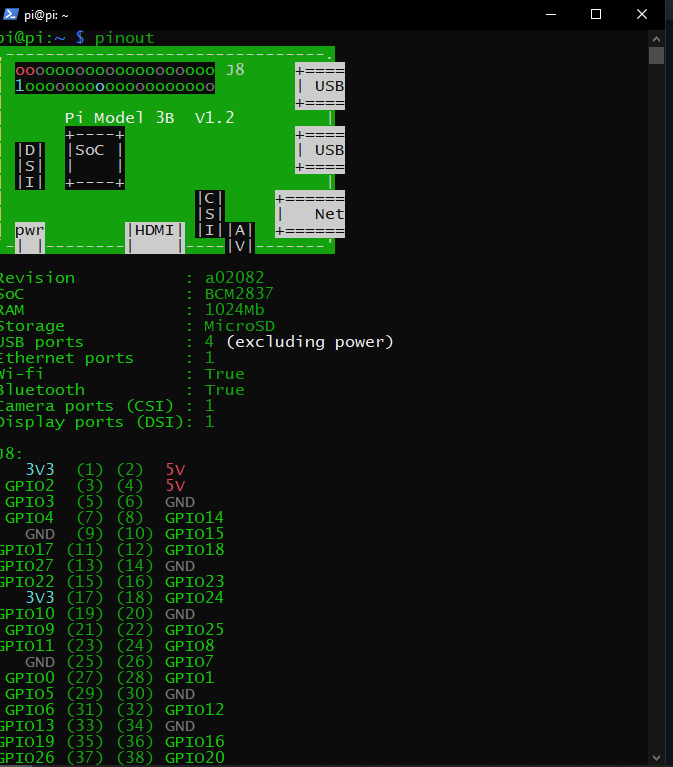
      Raspberry Pi

      The Raspberry Pi is a series of small single-board computers developed in the United Kingdom by the Raspberry Pi Foundation to promote the teaching of basic computer science in schools and in developing countries Since the aim is to teach kids about physical computing and computer science, the documentation and getting started is very straight forward and simple.

      There are different models of Raspberry Pi SBC(Single Board Computer) and the latest one is Raspberry Pi 4 Model B which cost starts from $35. There is also lighter version called PiZero which cost around $5

      Capture.PNG

      Website: https://www.raspberrypi.org/


      BeagleBoard

      The BeagleBoard is a low-power open-source single-board computer produced by Texas Instruments in association with Digi-Key and Newark element14. The BeagleBoard was also designed with open source software development in mind and as a way of demonstrating the Texas Instrument's OMAP3530 system-on-a-chip.

      bbw.jpg

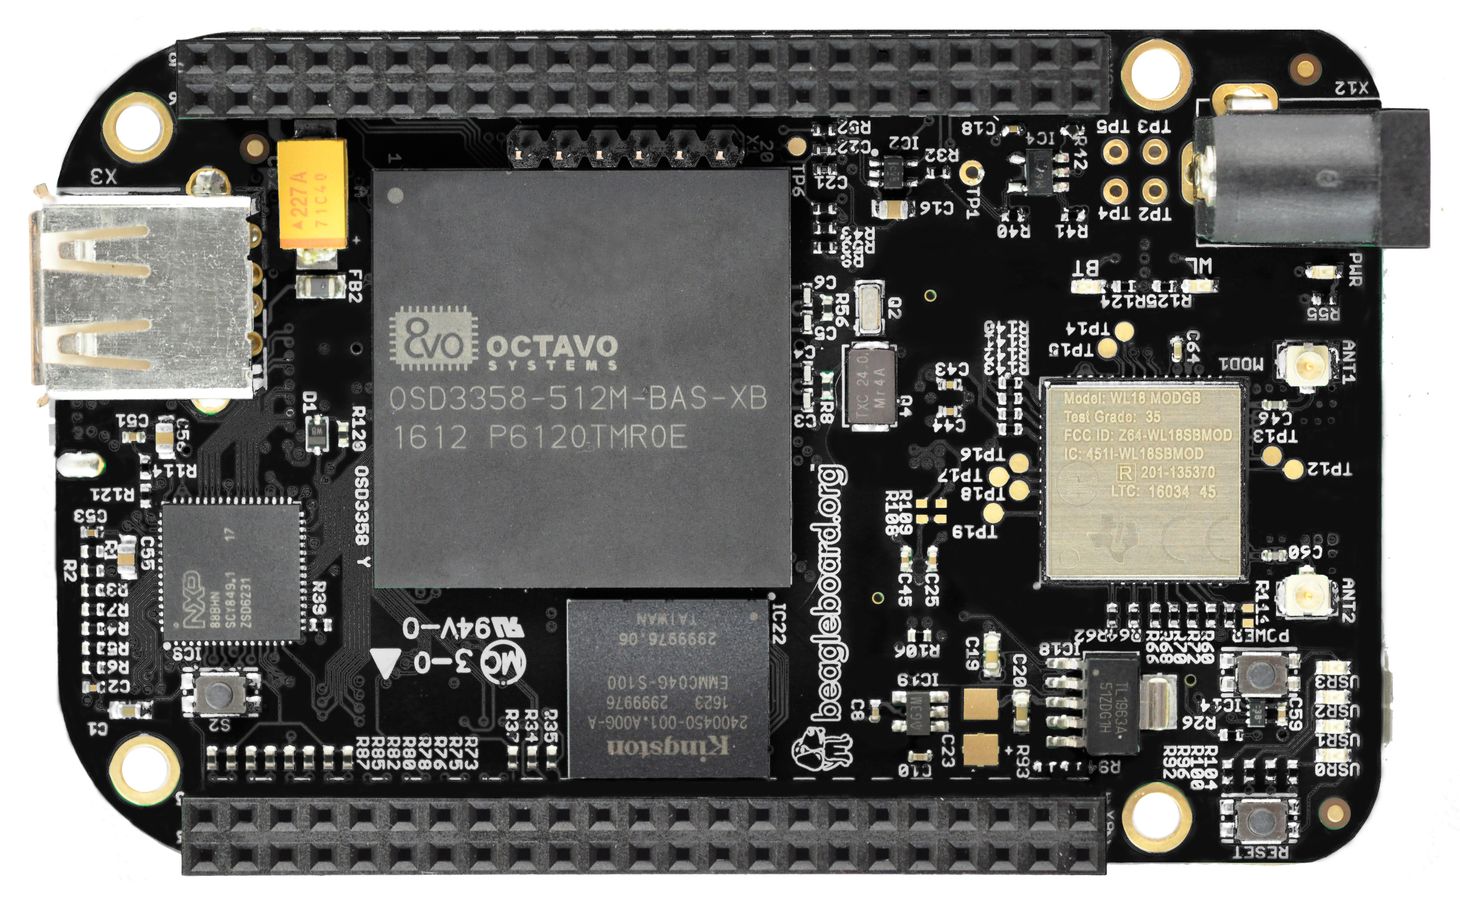
      If you are a beginner and want to get started the embedded Linux development, then you need to checkout beagleboard series single-board computer.

      Website: https://beagleboard.org/


      The list is not over yet, I'll share more thought on the thread as a followup.
      😀 👍

      posted in Development Boards
      salmanfaris
      salmanfaris
    • One week left to grab your free tickets to Spectra 2020

      unnamed.jpg

      Spectra is officially just 7 days away! Make sure to snag your free tickets today while you still can to enjoy a fully live-streamed digital experience with other IoT innovators on April 28th and 29th.

      Spectra is the premier event for IoT professionals who are looking to take their skills to new heights. Join us next week if you are interested to hear from top industry experts and learn the latest product news from the Particle team.

      WHAT IS SPECTRA?

      Spectra 2020 will be live-streamed on April 28 & 29, and we can’t wait to see you online. Whether you’re a first time connected product builder or on the hook to deliver an IoT solution to your CTO, you won’t want to miss this chance to meet industry-leading IoT innovators.

      Attending this conference will give you the skills necessary to build successful IoT products at scale. Learn the technical techniques you’ll need from Particle Developer Advocates and Engineers in our half-day workshops. And bolster your business acumen with panels and presentations from leading IoT innovators and business leaders — all who have built Particle-powered products to market at scale.

      Get Free Ticket Today

      posted in Events & Hackathons
      salmanfaris
      salmanfaris
    • Tip: Inbuilt Raspberry Pi Pin-out Mapping

      Sharing a tip that can be very useful when working with Raspberry pi GPIO, The GPIO Pinout is designed to be both a quick and interactive reference to the Raspberry Pi GPIO pins, plus a comprehensive guide to your Raspberry Pi's GPIO interfaces. It also includes dozens of pinouts for Raspberry Pi add-on boards, HATs and pHATs.

      This Pinout.xyz gather useful information about the Raspberry Pi GPIO interface and add-on boards and invite board manufacturers to produce their own "overlay" files which describe which pins their Pi add-ons use. It's very handy when comes quick prototyping.

      command

      pinout
      

      more details: https://pinout.xyz/

      Untitled.png

      posted in Raspberry Pi
      salmanfaris
      salmanfaris
    • 2-Days Raspberry Pi Beginners Workshop - 2021 🧵 (മലയാളം)

      397e7ecb-d4c4-412d-9b67-3f6b47d40421-image.png

      Are you Interested to Build Electronics Projects?

      • Learn how to use setup raspberry pi 💻
      • Learn how to use raspberry pi GPIO 📍
      • Learn how to use the NodeRED platform ✨
      • Learn how to work with Linux command Line at a basic level 👩‍💻

      Join 2-Days Raspberry Pi Beginners Workshop on 28 and 29 August 2021.

      Day 1

      • Introduction to Raspberry Pi Computer
      • Setting up Raspberry Pi H/W and OS
      • Raspberry Pi OS Tour
      • Explore Raspberry Pi Inbuilt Applications
      • Introduction to Command-Line

      Day 2

      • Introduction to Physical Computing
      • Understand GPIO and Its Functions
      • Introduction to NodeRED Platform
      • Write First NodeRED Application
      • Manipulate GPIO and Blink LED
      • Create GUI and Control LED.
      • Possibilities.

      Who Should Join?

      • Students
      • Faculties
      • Hardware Technology Enthusiast
      • Anyone who wants to learn new technology

      What do we provide?

      • 2-Days Practical Oriental Session
      • Community Support
      • Participation Certificate (After task completion)

      When and Where

      📅 Date: 28 and 29 August 2021 ⌚ Time: 8.00 PM to 10.00 PM

      posted in Events & Hackathons
      salmanfaris
      salmanfaris
    • New product: Raspberry Pi Zero 2 W on sale now at $15 / ₹ 1250.

      alt text

      Raspberry Pi Zero 2 W uses the same Broadcom BCM2710A1 SoC die as the launch version of Raspberry Pi 3, with Arm cores slightly down-clocked to 1GHz, bundled into a single space-saving package alongside 512MB of LPDDR2 SDRAM.

      Here are the highlights:

      • Broadcom BCM2710A1, quad-core 64-bit SoC (Arm Cortex-A53 @ 1GHz)
      • 512MB LPDDR2 SDRAM
      • 2.4GHz IEEE 802.11b/g/n wireless LAN, * Bluetooth 4.2, BLE
      • 1 × USB 2.0 interface with OTG
      • HAT-compatible 40 pin I/O header footprint
      • MicroSD card slot
      • Mini HDMI port
      • Composite video and reset pin solder points
      • CSI-2 camera connector
      • H.264, MPEG-4 decode (1080p30); H.264 encode (1080p30)
      • OpenGL ES 1.1, 2.0 graphics

      src: https://www.raspberrypi.com/news/new-raspberry-pi-zero-2-w-2/

      posted in Raspberry Pi
      salmanfaris
      salmanfaris
    • Part 1: Host a website on GitHub for free using GitHub pages 😎 (1/2).

      In this blog, we are going to learn to host web pages on GitHub for free using GitHub Pages!🤩 . we will host a very simple web page like https://0xsalfar.github.io/ from scratch to complex one.

      You can read the blog from here: https://blog.makergram.com/part1-host-website-on-github-for-free/

      alt text

      posted in Showcase
      salmanfaris
      salmanfaris
    • RE: Schematic Design For esp32

      Hi @ZeeZa ,

      You need to build a custom board with the ESP32 SoC and the MPU6050 IMU, right?

      first, you need to select appropriate ESP32 SoC from the wide variety of model, after that using the datasheet find out the minimum configuration circuit for the SoC and add the MPU6050 module. that's all you need. the most tricky part is the minimum configuration circuit.

      posted in PCB Designing
      salmanfaris
      salmanfaris
    • Fab Lab Network for #Covid-19 projects

      Fab Foundation has started a GitLab repository for the Fab Lab Network for #Covid-19 projects HERE. Please note that in order to edit the repository you need to have a fablabs.io or GitHub account. This repository includes links to many of the incredible projects and efforts being organized around the world, as well as projects of the Fab Lab Network in development. Use this as both a resource and as a central place to sync around projects, aligning with CBA, Fab Foundation and with other gurus from the fab network and beyond.

      posted in Fight Against COVID19 Outbreak
      salmanfaris
      salmanfaris
    • RE: Multi Thread Handling for normal Processes using python

      Hi @kowshik1729 ,

      Yes, you can do Multi Thread in Raspberry Pi using python and note that different threads do not actually execute at the same time: they merely appear to.

      We can easily implement simple threads using threading module. I'll show you some example of how actually it works.

      Example :
      I was trying to blink two LED's at the same time, for that I created a function that does the blink infinitely using while(True) .

      import RPi.GPIO as GPIO
      import time
      
      Rled = 12
      Bled = 6
      
      GPIO.setmode(GPIO.BCM)
      
      GPIO.setup(Rled,GPIO.OUT)
      GPIO.setup(Bled,GPIO.OUT)
      
      
      def blue():
              while True:
                      print "LED BLUE is  ON"
                      GPIO.output(Bled,GPIO.LOW)
                      time.sleep(1)
                      print "LED BLUE is  OFF"
                      GPIO.output(Bled,GPIO.HIGH)
                      time.sleep(1)
      def red():
              while True:
                      print "LED RED is  ON"
                      GPIO.output(Rled,GPIO.LOW)
                      time.sleep(1)
                      print "LED RED is OFF"
                      GPIO.output(Rled,GPIO.HIGH)
                      time.sleep(1)
      
      blue()
      red()


      Output :

      Capture.PNG

      Video : https://www.youtube.com/watch?v=AypMEQFpEWo&feature=youtu.be

      since we are using the infinity loop for both methods, the blue() will not stop and red() will not invoke either.

      In these scenarios, we can use multithread both function without waiting for another , let's try.

      import RPi.GPIO as GPIO
      import time
      import threading


      Rled = 12
      Bled = 6
      
      GPIO.setmode(GPIO.BCM)
      
      GPIO.setup(Rled,GPIO.OUT)
      GPIO.setup(Bled,GPIO.OUT)
      
      
      def blue():
              while True:
                      print "LED BLUE is  ON"
                      GPIO.output(Bled,GPIO.LOW)
                      time.sleep(1)
                      print "LED BLUE is  OFF"
                      GPIO.output(Bled,GPIO.HIGH)
                      time.sleep(1)
      def red():
              while True:
                      print "LED RED is  ON"
                      GPIO.output(Rled,GPIO.LOW)
                      time.sleep(1)
                      print "LED RED is OFF"
                      GPIO.output(Rled,GPIO.HIGH)
                      time.sleep(1)
      
      
      t1 = threading.Thread(target=blue)
      t2 = threading.Thread(target=red)
      
      
      t1.start()
      t2.start()


      Output :

      Capture2.PNG

      Video : https://www.youtube.com/watch?v=HMKYzgdNwd8&feature=youtu.be

      with the help threading module we can simply run both methods at the same time (how we feel).

      I think you got your answer. also, keep in mind to avoid race condition and deadlock while multithreading.

      posted in Raspberry Pi
      salmanfaris
      salmanfaris
    • RE: Custom board for running ML models

      @kowshik1729 if you are more into ML take a look at the Jetson nano module, it's come with 4GB and 2GM Ram with 128-core NVIDIA Maxwell GPU and Quad-core ARM A57 CPU

      more information: https://developer.nvidia.com/embedded/jetson-nano

      55333651-f372-40e2-aa1a-a9391a0f5b35-image.png

      posted in PCB Designing
      salmanfaris
      salmanfaris