Can't connect NodeMCU with MQTT
-
I can't establish a connection with my NodeMCU and MQTT server.
I am getting an error of:Attempting MQTT connection...failed, rc=-2 try again in 5 secondsEvery topic name, nodes and other variables are assigned from the given video: Referred video
Below is the code:
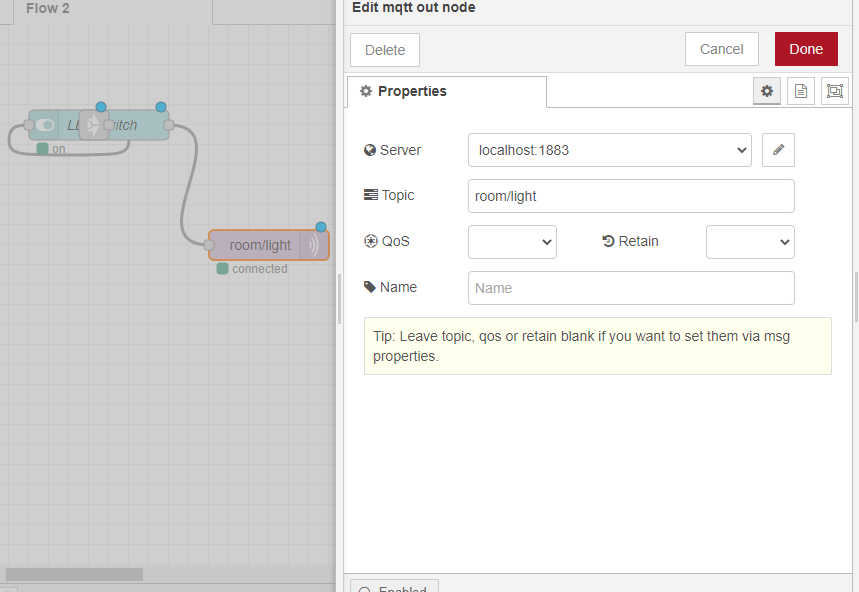
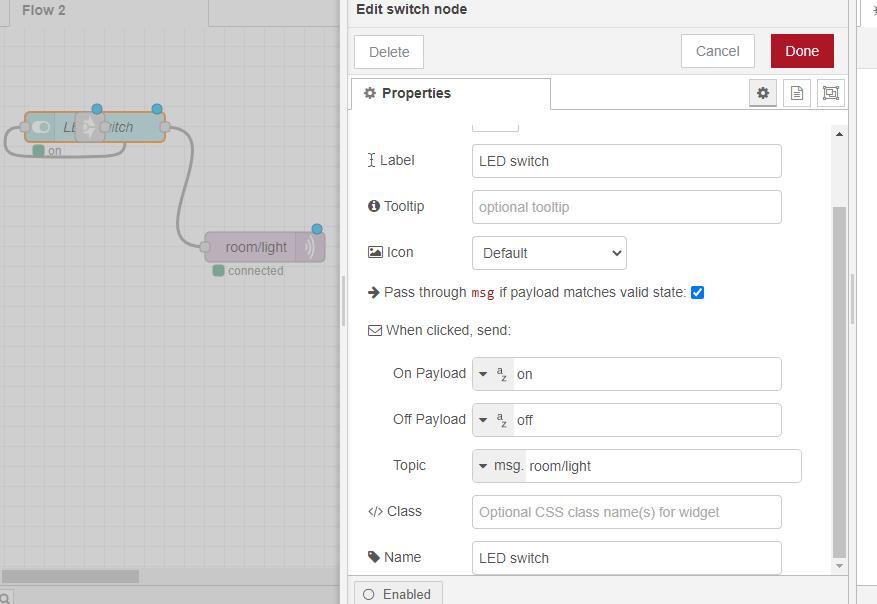
#include <ESP8266WiFi.h>
#include <PubSubClient.h>

// Change the credentials below, so your ESP8266 connects to your router
const char* ssid = "Wifi";
const char* password = "Wifi123";

// Change the variable to your Raspberry Pi IP address, so it connects to your MQTT broker
const char* mqtt_server = "192.168.1.38";

// Initializes the espClient. You should change the espClient name if you have multiple ESPs running in your home automation system
WiFiClient espClient22;
PubSubClient client(espClient22);


// Lamp - LED - GPIO 4 = D2 on ESP-12E NodeMCU board
const int led = 4;


//Connect your NodeMCU to your router
void setup_wifi() {
  delay(10);

  Serial.println();

  Serial.print("Connecting to ");
  Serial.println(ssid);
  WiFi.mode(WIFI_STA);
  WiFi.begin(ssid, password);
  while (WiFi.status() != WL_CONNECTED) {
    delay(100);
    Serial.print(".");
  }
  Serial.println("");
  Serial.print("WiFi connected - NodeMCU IP address: ");
  Serial.println(WiFi.localIP());
}

// This functions is executed when some device publishes a message to a topic that your NodeMCU is subscribed to

void callback(String topic, byte* message, unsigned int length) {
  Serial.print("Message arrived on topic: ");
  Serial.print(topic);
  Serial.print(". Message: ");
  String messageInfo;

  for (int i = 0; i < length; i++) {
    Serial.print((char)message[i]);
    messageInfo += (char)message[i];
  }
  Serial.println();

  // If a message is received on the topic room/lamp, you check if the message is either on or off. Turns the lamp GPIO according to the message
  if(topic=="room/light"){
      Serial.print("Changing Room Light to ");
      if(messageInfo == "on"){
        digitalWrite(led, HIGH);
        Serial.print("On");
      }
      else if(messageInfo == "off"){
        digitalWrite(led, LOW);
        Serial.print("Off");
      }
  }
  Serial.println();
}

// This functions reconnects your ESP8266 to your MQTT broker
// Change the function below if you want to subscribe to more topics with your ESP8266
void reconnect() {
  // Loop until we're reconnected
  while (!client.connected()) {
    Serial.print("Attempting MQTT connection...");


    if (client.connect("ESP8266Client22")) {
      Serial.println("connected");
      // Subscribe or resubscribe to a topic
      // You can subscribe to more topics (to control more LEDs in this example)
      client.subscribe("room/light");
    } else {
      Serial.print("failed, rc=");
      Serial.print(client.state());
      Serial.println(" try again in 5 seconds");
      // Wait 5 seconds before retrying
      delay(5000);
    }
  }
}

// The setup function sets your ESP GPIOs to Outputs, starts the serial communication at a baud rate of 115200
// Sets your mqtt broker and sets the callback function
// The callback function is what receives messages and actually controls the LEDs
void setup() {
  pinMode(led, OUTPUT);
  Serial.begin(115200);
  setup_wifi();
  client.setServer(mqtt_server, 1883);
  client.setCallback(callback);

}

// For this project, you don't need to change anything in the loop function. Basically it ensures that the NodeMCU is connected to MQTT broker
void loop() {

  if (!client.connected()) {
    reconnect();
  }
  if(!client.loop())
    client.connect("ESP8266Client22");

  }
-
Hi
 ,
,Where did you installed the MQTT broker (server) and is it running background when your run the nodeRED application and is it installed on the same machine as nodeRED installed?
-
@salmanfaris It is running locally on my computer. Yes, and is running in the background.

-
@sivanath Before connecting via NodeRED , Could you try to create MQTT Subscribe and Publish client using the CLI and see it can transfer message payload with the same broker name?
-
@salmanfaris Yes, I had tried that before and it was working fine. Infact, everything works perfectly when I connect with the online mqtt server,
test.mosquitto.org. So, there's some problem with the local installation, while using my local IP. But I can't find that problem. I had also re-installed the mqtt, but still the same issue. -
@sivanath Does the local pub and sub is working over CLI?
-
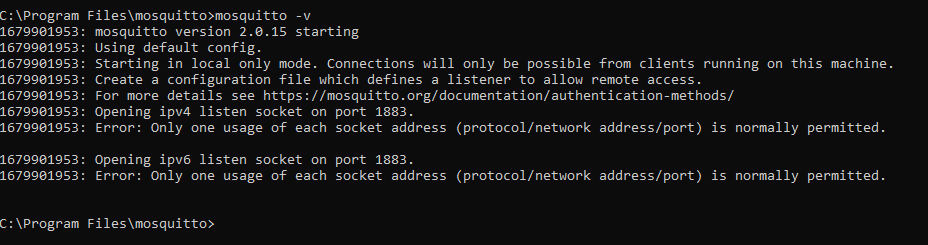
@salmanfaris It was working in CLI, but now it's showing multiple usages at the port
-
It looks like
mosquittois trying to register bothIPv4andIPv6on the same port.If
IPv6is not required for the application your use case, try changing themosquitto.conffile as below for limiting it toipv4:# Set to `ipv4` to force the listener to only use IPv4, or set to `ipv6` to # force the listener to only use IPv6. If you want support for both IPv4 and # IPv6, then do not use the socket_domain option. socket_domain ipv4Please please make sure the default
port 1883is not already in use by any other programs. If yes, you can either kill those programs (not recommended) or change the port inmosquitto.conffile: -
@swalahamani @salmanfaris
I changed my conf file and specified ipv4
And this is the status of the port (from resource monitor):Image: mosquitto.exe PID: 3732 Address: IPv6 loopback Protocol: TCP Port: 1883 Firewall Status: Allowed, not restrictedIt is listening to mosquito..
-
Is it working now?
Recent Posts
-

-
@codelery said in Help needed: Arduino Wireless Notice Board project:
I am using the hardware serial (pin 0 and 1 on Arduino Uno)
As @rafitc99 mentioned, you need to expand the Serila buffer, in the hardware serial also the Arduino board package implements a 64-byte ring buffer for send and receive on the hardware serial messages. So you need to change that to 256 as per your message length.
