Control Thing's Using Google Assistant.
TL;DR This blog post will demonstarte how to control things using voice v, here we are using Google Assistant as Voice User Interface and NodeMCU (esp826612E) as Controller and Adafruit IO as cloud and IFTT as router .
prerequisite
-> NodeMCU/ESP826612-E Development Kit
-> Arduino IDE
->Adafruit IO account
-> IFTT account
-> Android Phone with Google Assistant
-> Beginner level experience in arduino
Setup Arduino IDE
You can download and Install Arduino IDE from here Arduino IDE In default Arduino IDE only Support Native boards like UNO,Nano.. etc , so we need to install NodeMCU Board and MQTT Libraries .
NodeMCU Board Definition
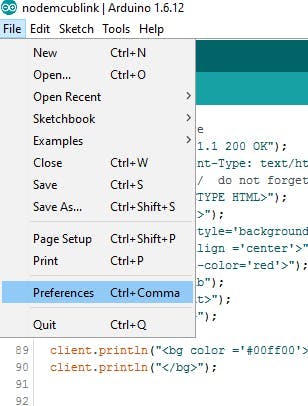
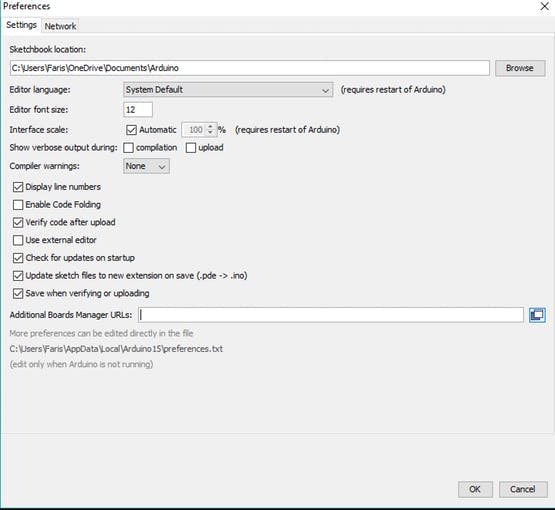
Open Arduino IDE and add additional Board URL File => Preference (Ctrl + Comma)
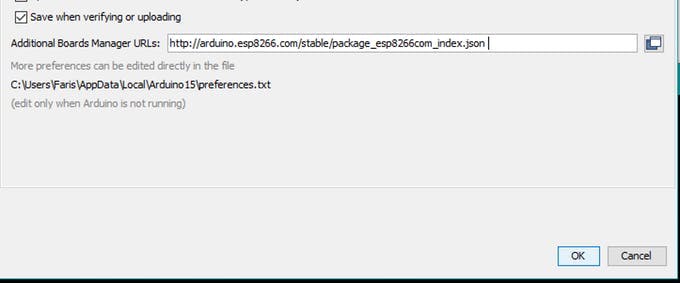
In Additional Boards Manager, click add and paste the URL there http://arduino.esp8266.com/stable/package_esp8266com_index.json And click "OK".
Download Board Definitions
Open Board Manager by going to Tools => Board => Boards Manger

Open Boards Manager and search for NodeMCU:
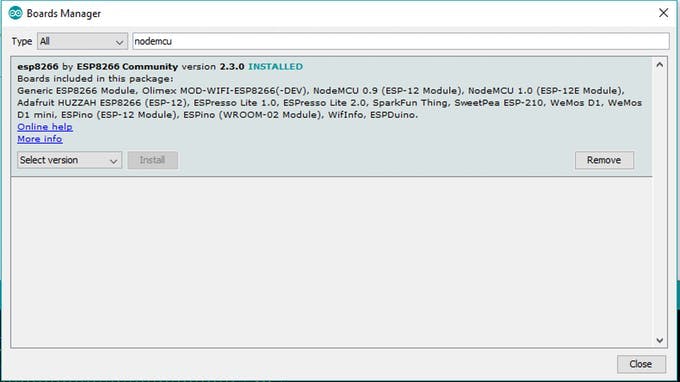
Note: It only appears if you set the NodeMCU Board URL (1.1)
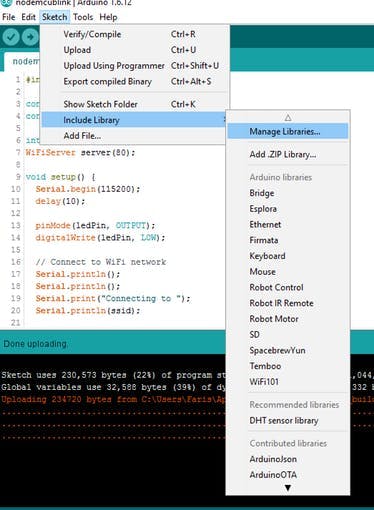
Download MQTT library
For MQTT we are using Adafruit.io broker and for that we need to install Adafruit MQTT library . Sketch => Include library => Manage Libraries
In the following window type mqtt and just wait a sec , it will load mqtt related lib .
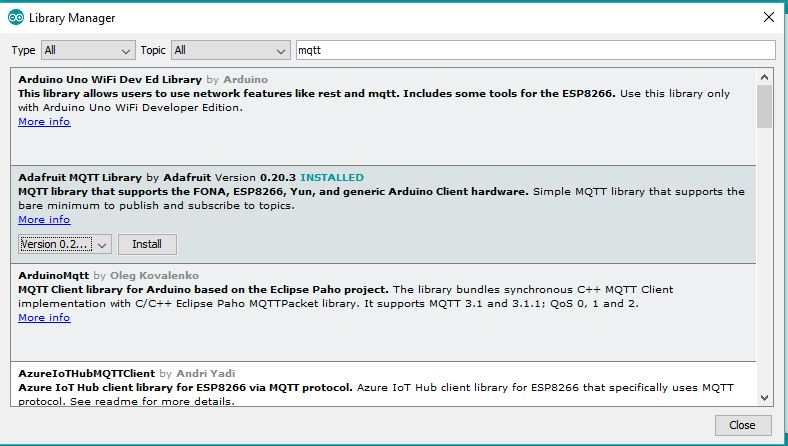
Now we can see the Adafruit MQTT Lib on the Third one , select the latest verison and click install . that's all.
Setup Adafruit.io - Cloud
We are using Adafruit.io as the MQTT Broker and it's also have dashboard with lot of widgets .So first you need to create an account if you did't have one Adafruit.io or login with your credentials.
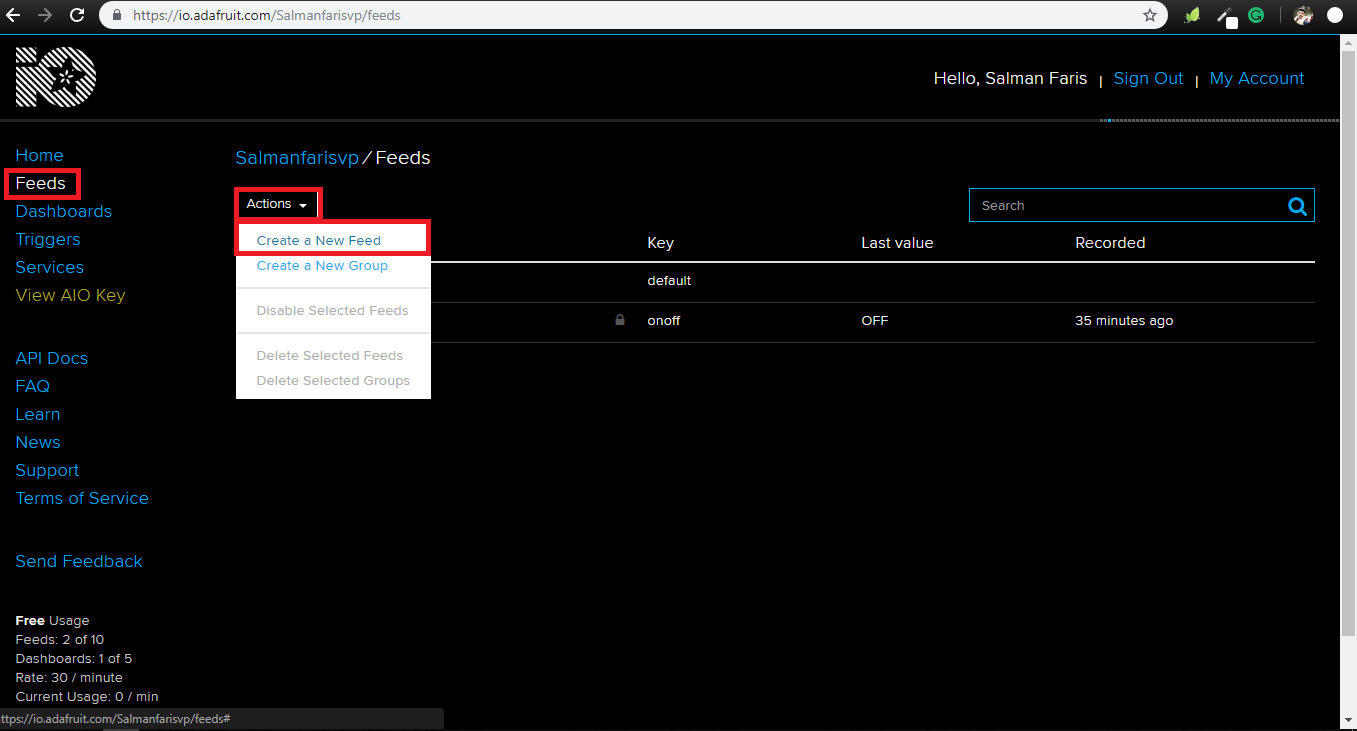
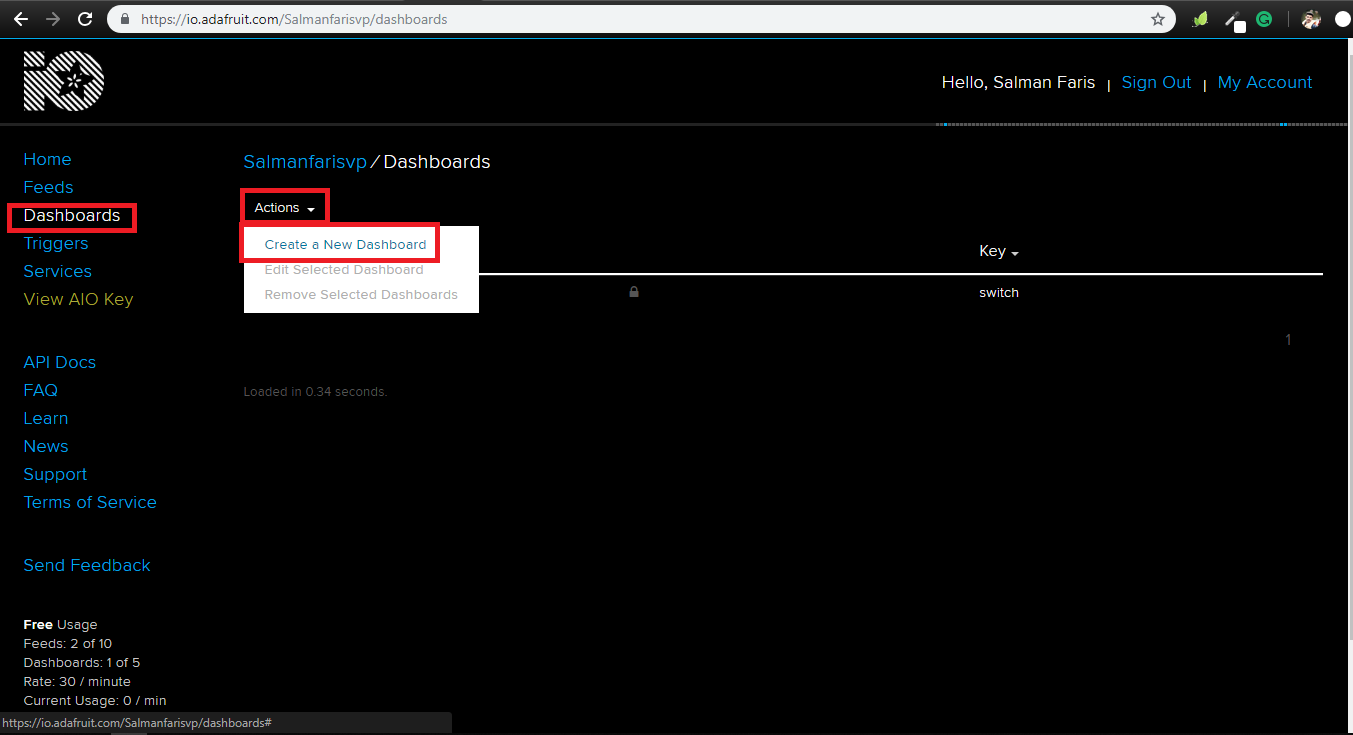
after login , create MQTT feed by clicking Feeds on the left menu bar and Click create a New Feed under the Actions bar .
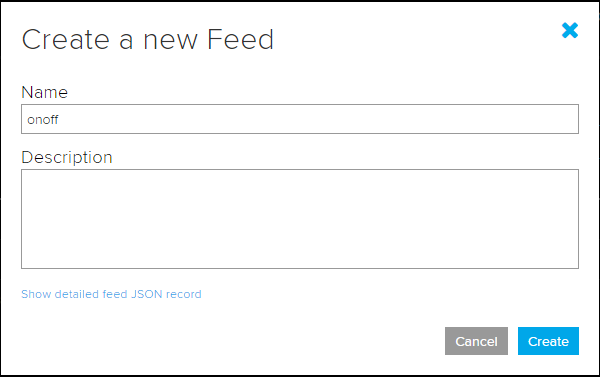
In the following window give a name for our new Feed , like onoff and click create. next we need to setup a dashboard for UI control , for that click Dashboard on the left menu bar and clikc create a New Dashboard under bar.
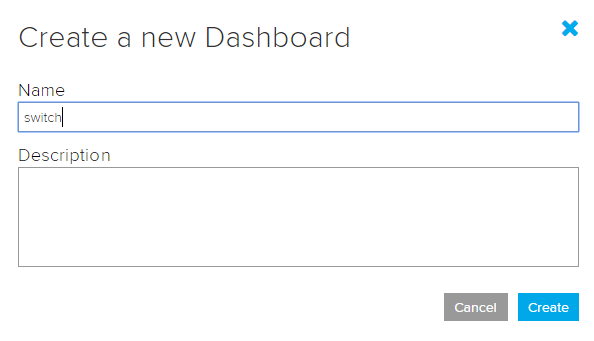
give a name to our new dashboard , I just put Switch.
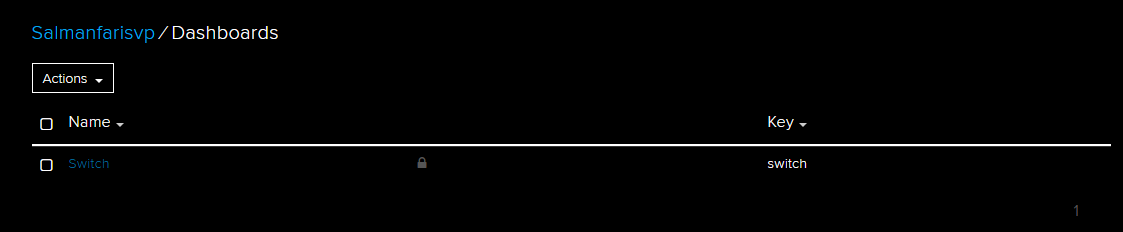
Now we can see the dashbord listed under the dashboard menu .
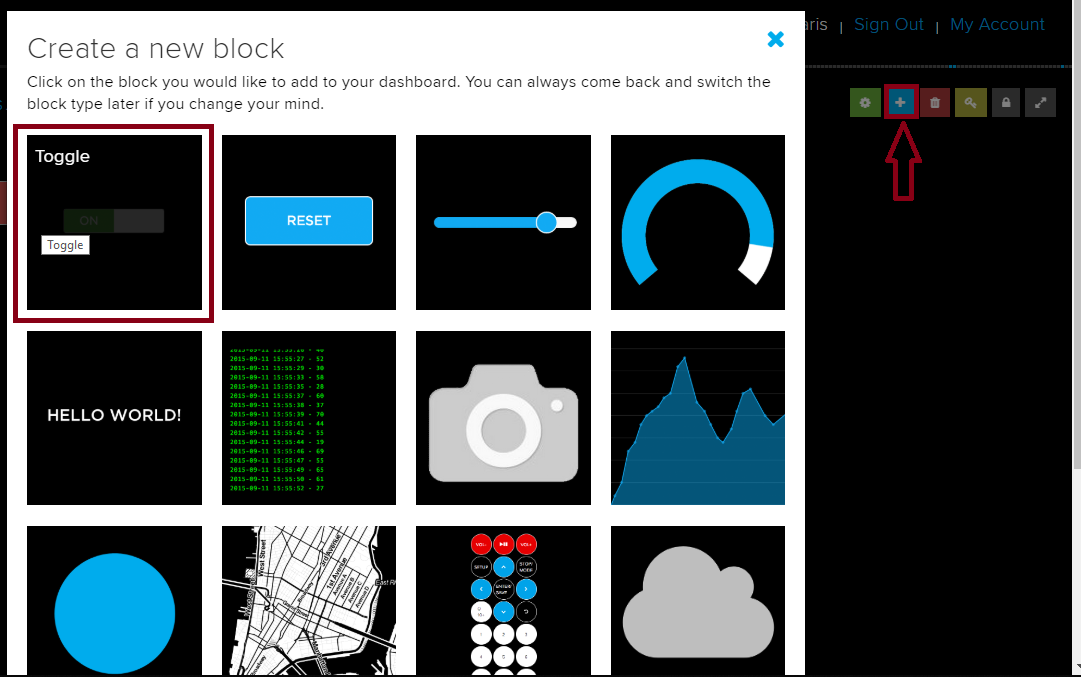
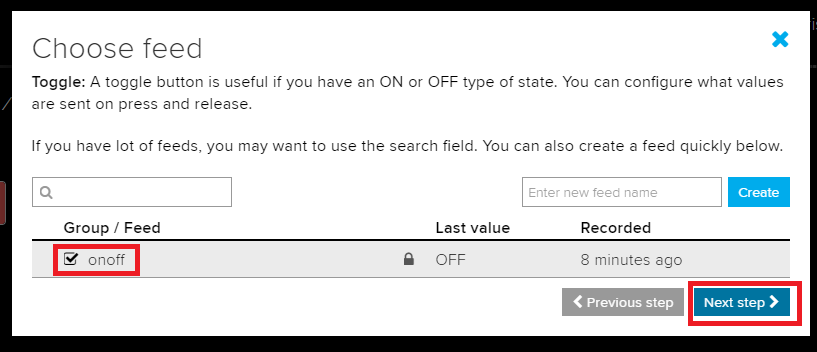
for editing the dashboard , select the dashboard by check the check box and click create a new block on top right menu .and the following window select the Toggle .
on the next step select the right Group/Feed and clikc Next setp.
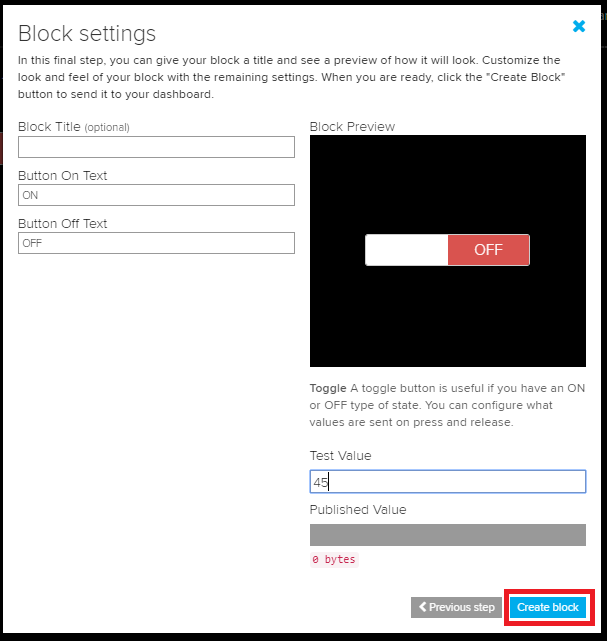
next we setup the Block , just leave as default and click Create block
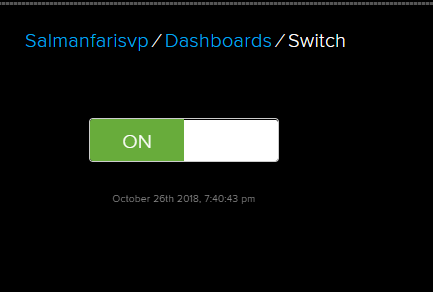
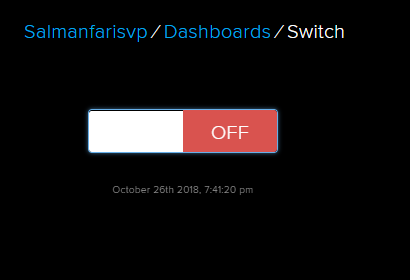
and we are done with the cloud part , our dash board will look like this .

Arduino Programming
Next upload the code , for that we need set target board in the Arduino IDE.
Tools => Board => NodeMCU ESP-12E
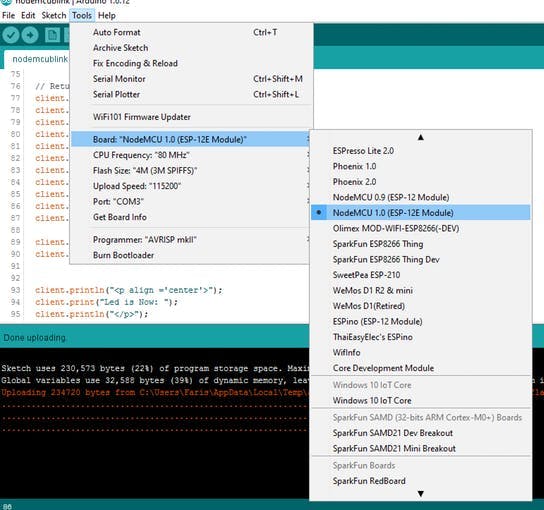
Select Port in same menu (in my case, I have Port-3).
Note: Only the boards appear when you download the Board definitions.
#include <ESP8266WiFi.h>
#include "Adafruit_MQTT.h"
#include "Adafruit_MQTT_Client.h"

#define WIFI_SSID "WiFi Name"
#define WIFI_PASS "WiFi Password"

#define MQTT_SERV "io.adafruit.com"
#define MQTT_PORT 1883
#define MQTT_NAME "Adafruit.io User Name"
#define MQTT_PASS "AIO key"

//Set up MQTT and WiFi clients
WiFiClient client;
Adafruit_MQTT_Client mqtt(&client, MQTT_SERV, MQTT_PORT, MQTT_NAME, MQTT_PASS);

//Set up the feed you're subscribing to
Adafruit_MQTT_Subscribe onoff = Adafruit_MQTT_Subscribe(&mqtt, MQTT_NAME "/f/onoff");


void setup()
{
  Serial.begin(9600);

  //Connect to WiFi
  Serial.print("\n\nConnecting Wifi... ");
  WiFi.begin(WIFI_SSID, WIFI_PASS);
  while (WiFi.status() != WL_CONNECTED)
  {
    delay(500);
  }

  Serial.println("OK!");

  //Subscribe to the onoff feed
  mqtt.subscribe(&onoff);

  pinMode(LED_BUILTIN, OUTPUT);
  digitalWrite(LED_BUILTIN, HIGH);
}

void loop()
{
  MQTT_connect();

  //Read from our subscription queue until we run out, or
  //wait up to 5 seconds for subscription to update
  Adafruit_MQTT_Subscribe * subscription;
  while ((subscription = mqtt.readSubscription(5000)))
  {
    //If we're in here, a subscription updated...
    if (subscription == &onoff)
    {
      //Print the new value to the serial monitor
      Serial.print("onoff: ");
      Serial.println((char*) onoff.lastread);

      //If the new value is  "ON", turn the light on.
      //Otherwise, turn it off.
      if (!strcmp((char*) onoff.lastread, "ON"))
      {
        //Active low logic
        digitalWrite(LED_BUILTIN, LOW);
      }
      else
      {
        digitalWrite(LED_BUILTIN, HIGH);
      }
    }
  }

  // ping the server to keep the mqtt connection alive
  if (!mqtt.ping())
  {
    mqtt.disconnect();
  }
}


/***************************************************
  Adafruit MQTT Library ESP8266 Example

  Must use ESP8266 Arduino from:
    https://github.com/esp8266/Arduino

  Works great with Adafruit's Huzzah ESP board & Feather
  ----> https://www.adafruit.com/product/2471
  ----> https://www.adafruit.com/products/2821

  Adafruit invests time and resources providing this open source code,
  please support Adafruit and open-source hardware by purchasing
  products from Adafruit!

  Written by Tony DiCola for Adafruit Industries.
  MIT license, all text above must be included in any redistribution
 ****************************************************/

void MQTT_connect()
{
  int8_t ret;

  // Stop if already connected.
  if (mqtt.connected())
  {
    return;
  }

  Serial.print("Connecting to MQTT... ");

  uint8_t retries = 3;
  while ((ret = mqtt.connect()) != 0) // connect will return 0 for connected
  {
       Serial.println(mqtt.connectErrorString(ret));
       Serial.println("Retrying MQTT connection in 5 seconds...");
       mqtt.disconnect();
       delay(5000);  // wait 5 seconds
       retries--;
       if (retries == 0)
       {
         // basically die and wait for WDT to reset me
         while (1);
       }
  }
  Serial.println("MQTT Connected!");
}
Before uploding the code we need to change some parameters , like wifi congi,mqtt credentials ..
#define WIFI_SSID "WiFi Name"
#define WIFI_PASS "WiFi Password"
Replace the WiFi Name with your WiFi SSID name Password
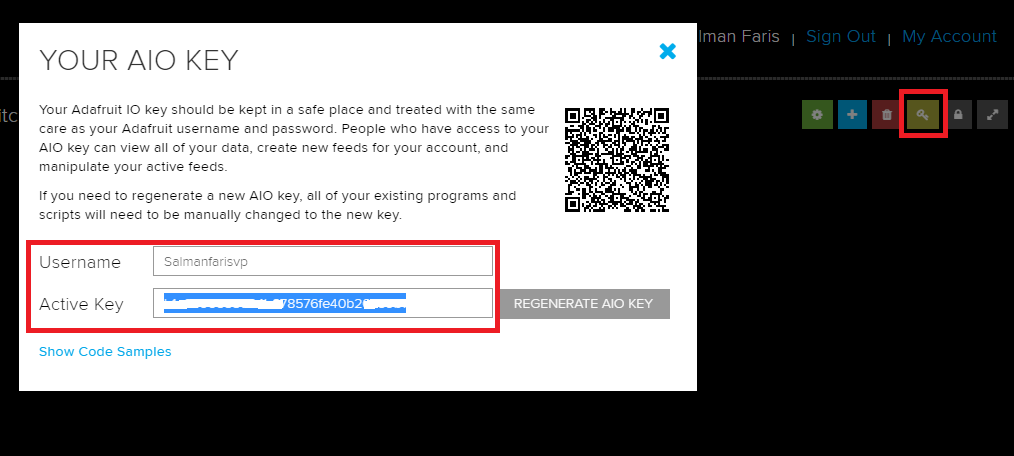
#define MQTT_NAME "Adafruit.io User Name"
#define MQTT_PASS "AIO key"
In this code block re-place the MQTT_NAME with your Adafruit.io User name , and MQTT_PASS with AIO Key .
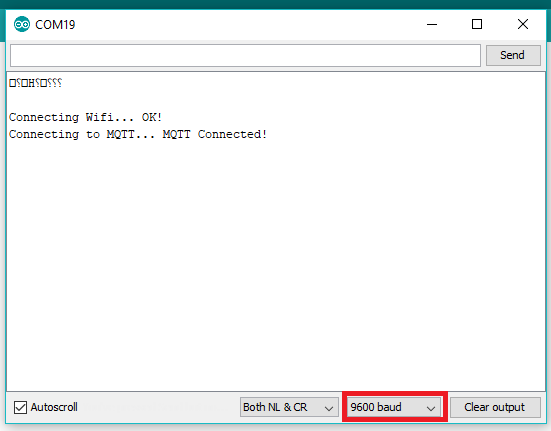
after uplaoding the code open your serial monitor (9600 buad rate) so we can see some usefull messages .
Testing Adafruit.io
After the sketch uploading everything is fine we can now test the adafruit cloud dashboard .
we can simply control the LED that connected to the NodeMCU by Toggle the Digital Switch . Yes , we just did some internet connected Devices . we can now control the light anywhere in the world .
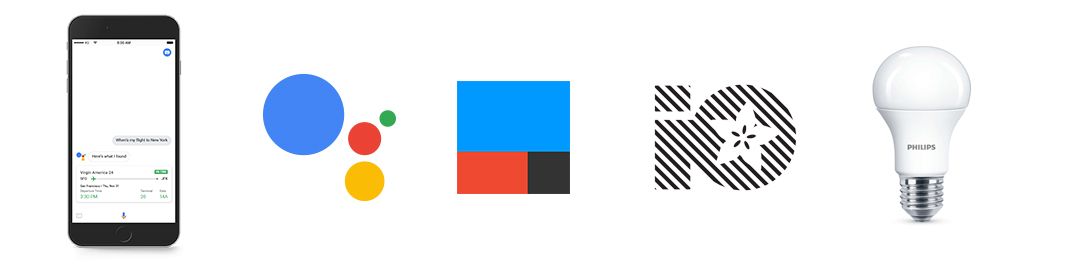
Google Assistant Integration
now we are just connected the our hardware module to the internet and we can now control it anywhere in the world , but it's little bit tricky to open the adafruit.io for only turn on the light , now days voice is the new interface so can do anything with our voice , we also have several voice assistant like Amazon Alexa , Google Assistant ...ect . so now we are going to control our device with a voice , more precisely Google Assistant in a simple way . let's do it.
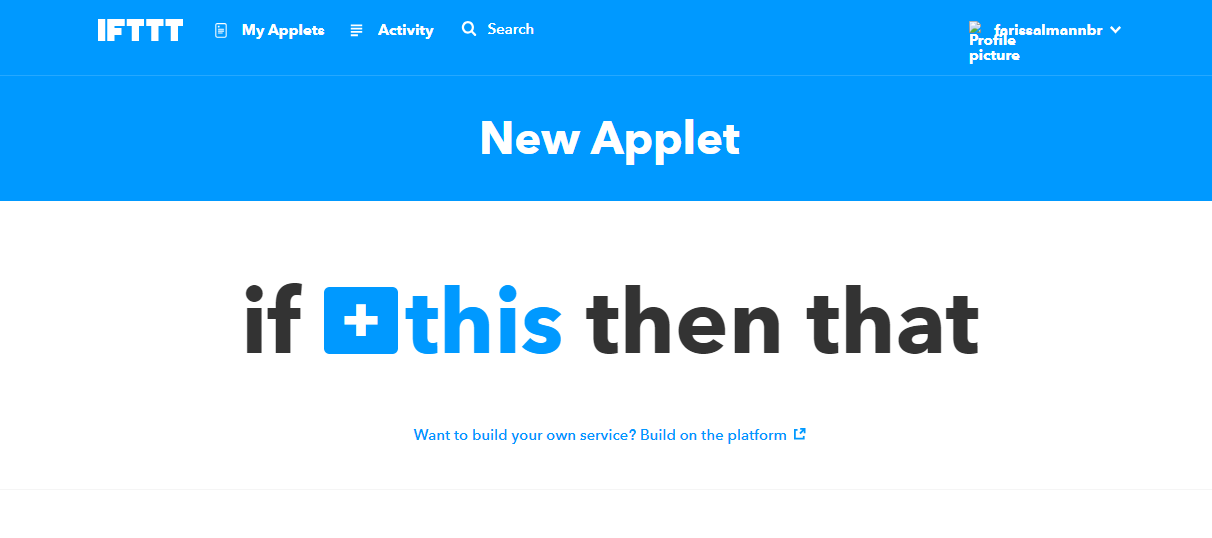
IFTTT
If This Then That, also known as IFTTT, is a free web-based service to create chains of simple conditional statements, called applets. An applet is triggered by changes that occur within other web services such as Gmail, Facebook, Telegram, Instagram, or Pinterest.
so we are using the IFTTT to triger the Adafruit.io from the Google Assistant .
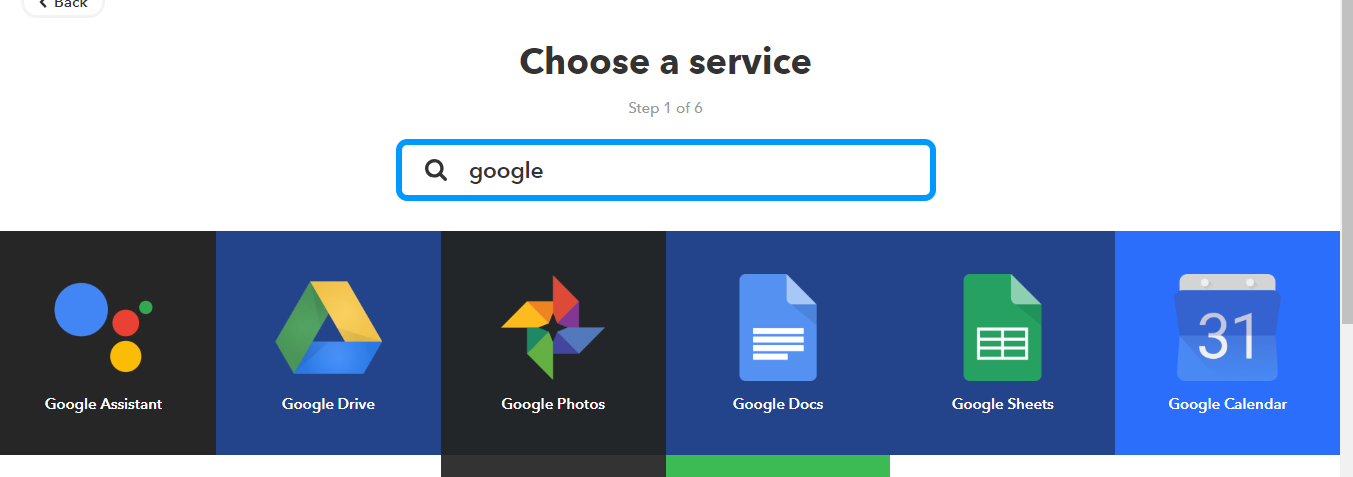
first we need to create an account IFTTT.and click New Applet
Click this button and select the google assistant from the service .
next choose a trigger from the listed items , for our application I used Say a simple phrase
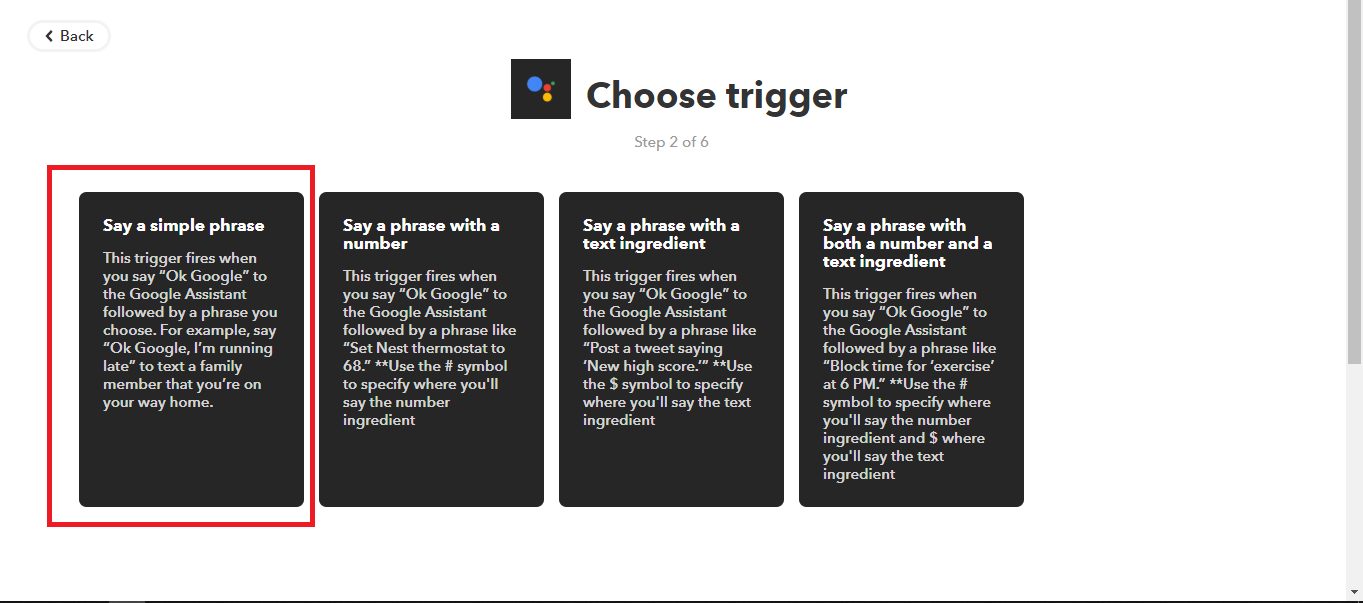
next we need to set Say a simple phrase , This trigger fires when you say “Ok Google” to the Google Assistant followed by a phrase you choose. For example, say “Ok Google, I’m running late” to text a family member that you’re on your way home.
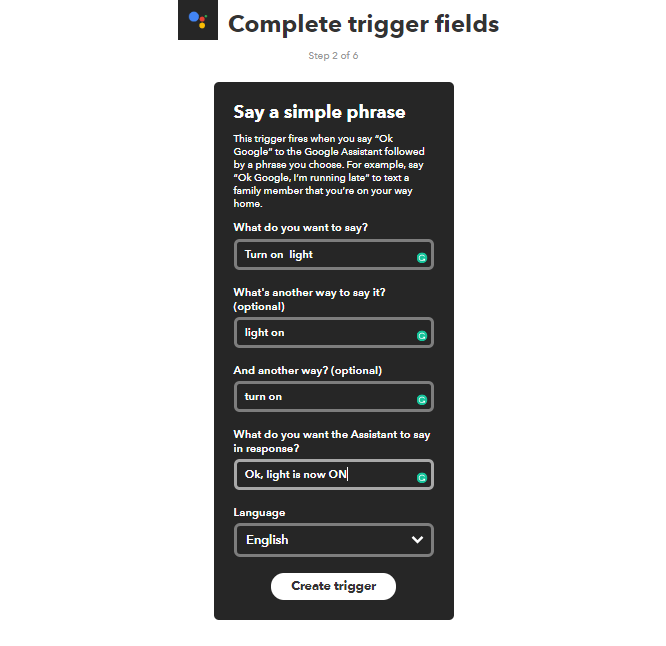
next select the that

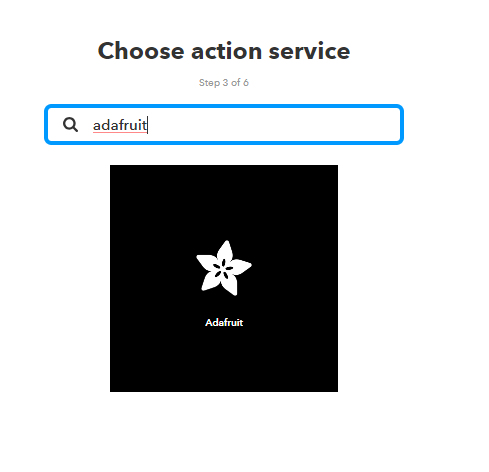
we need select a Choose action service , we choosed Adafruit service
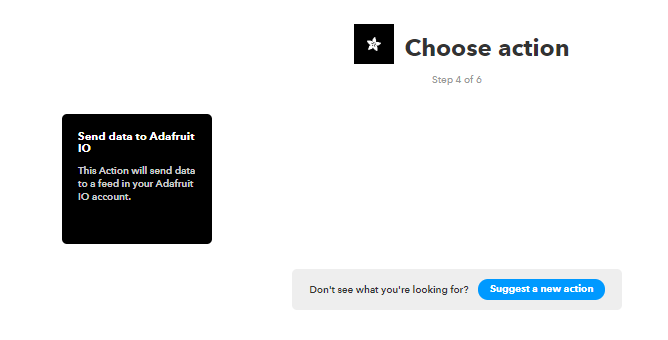
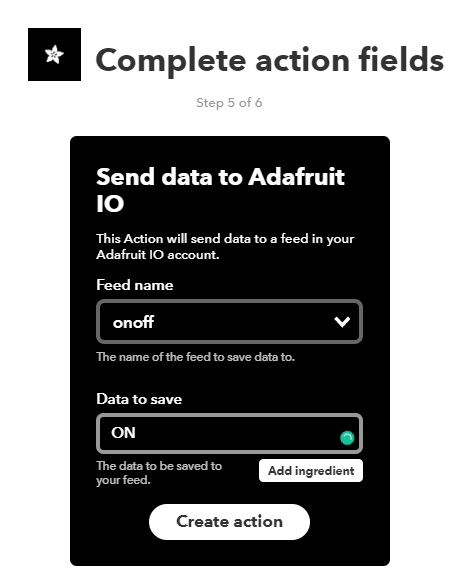
so next we need Complete action fields by gaving the Feed name and Data to save
we completed the work and as last step we need to proceeds Review and finish
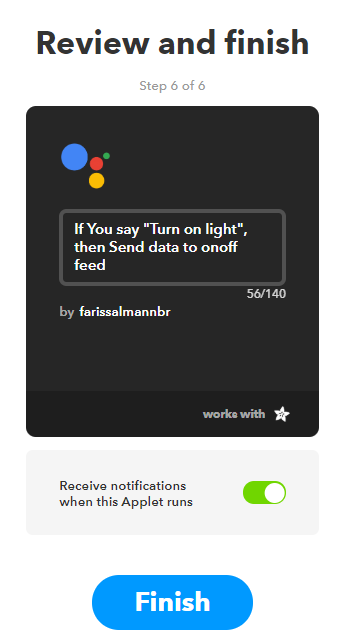
and we need to the same IFTTT Applet for Turn Off the Light .after that use your Google Assistant in your mobile phone to control devices