Introduction to ROS 🤖 : Part 1

ROS(Robot Operating System) is a meta-operating system consisting of libraries, tools, packages, etc used to develop a robot application. It provides the services that would be expected from an operating system, including hardware abstraction, low-level device control, implementation of commonly-used functionality, message-passing between processes, and package management.
Why ROS?
ROS is an open-source framework used to build robots. The main important feature of ROS is allowing you to understand the problems or challenges of the robot before going to build the actual hardware model. Also, it provides functionality for hardware abstraction, device drivers, communication between processes over multiple machines and visualization, etc.

Here we don't want to reinvent the wheel for using it, we can use the existing wheel. Similarly, we don't want to write all the code from the beginning, we can use the existing one for our project.
How does it work?
We already know what is a node. In the case of ROS, the nodes are capable of doing a particular task. The nodes communicate with each other via rostopics. Every ROS node receives or sends data to each other in publish/subscribe model.
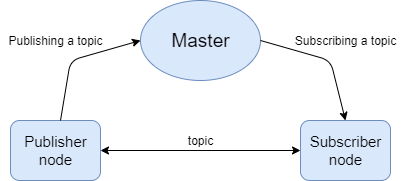
As the name says the subscriber can subscribe to a topic from ROS master and the publisher can publish the topic to the ROS master, also if once the publisher and subscriber were connected the ROS master is not required for the same topic communication. For further clarification click here.
ROS installation
At first, if we are using ubuntu 16.04 we want to install ROS kinetic version, for ubuntu 18.04 we want to use ROS Melodic version or if we are using ubuntu 20.04 we want to install ROS Noetic version.
In my case, I'm using Jetson nano with ubuntu 18.04 so I want to proceed with the ROS Melodic version.
First, we want to set up our computer to accept software from packages.ros.org
sudo sh -c 'echo "deb http://packages.ros.org/ros/ubuntu $(lsb_release -sc) main" > /etc/apt/sources.list.d/ros-latest.list'Setup your keys using
sudo apt install curl # if you haven't already installed curl
curl -s https://raw.githubusercontent.com/ros/rosdistro/master/ros.asc | sudo apt-key add -
update Debian package index
sudo apt updateThere are three different ROS are available to install
Desktop-Full Install: ROS, rqt, rviz, robot-generic libraries, 2D/3D simulators and 2D/3D perception are available in this, (in the case of Jetson nano or raspberry pi desktop full version is not recommended).
sudo apt install ros-melodic-desktop-fullDesktop Install: ROS, rqt, rviz, and robot-generic libraries are only available in this.
sudo apt install ros-melodic-desktopROS-Base: ROS package, build, and communication libraries also there is no GUI for this.
sudo apt install ros-melodic-ros-base
Next, we want to set up the environment for that we have two options. In the first one, we can make a particular terminal a ROS environment.
echo "source /opt/ros/melodic/setup.bash" >> ~/.bashrc
source ~/.bashrc
The next way of setting up the ROS environment is by editing the .bashrc file, for that first we need to type
gedit .bashrcThen inside that editor, we can source the setup.bash for the version
source /opt/ros/melodic/setup.bashTo check whether it is a ROS environment or not, For that we want to enter.
echo $ROS_PACKAGE_PATHFor that particular terminal, it will show an error but if we open a new terminal and type the same, the error will be rectified.
To install some tools and other dependencies for building ROS packages, we need to enter
sudo apt install python-rosdep python-rosinstall python-rosinstall-generator python-wstool build-essentialIf we haven't installed rosdep yet, install it.
sudo apt install python-rosdepThen enter the command below
sudo rosdep init
rosdep update
Now we have installed ROS successfully. So then we need a workspace.
Similar to this in the case of the ROS workspace, it is a space to save all our ROS packages.
Then we can move on to creating a catkin workspace in our home directory with the commend
mkdir -p ~/catkin_ws/srcIn here catkin_ws is the name of the workspace and inside that workspace, we are creating a folder called src to save all our packages.
cd ~/catkin_ws/
catkin_make
catkin_make is used to make the workspace into a ROS workspace. The first time running this command, it will create a CMakeLists.txt link in our src folder.
Currently, in our directory, there will be a build and devel folder. Inside the devel folder, we can see several setup.*sh files. Sourcing any of these files will overlay this workspace on top of our environment. For this, we can source a setup.bash file
gedit ~/.bashrcThen the bottom of that file source
source ~/catkin_ws/devel/setup.bashTo make sure our workspace is properly overlayed, we can enter
echo $ROS_PACKAGE_PATHFor that particular terminal, it will show an error but if we open a new terminal and type the same, the error will be rectified.
Reference:- ROS installation, Workspace setup
Now we are ready to build the project! 🚀
Creating URDF from CAD model
Step 1: Create our cad model in SolidWorks or Fusion360 or any other Cad software that can generate URDF.
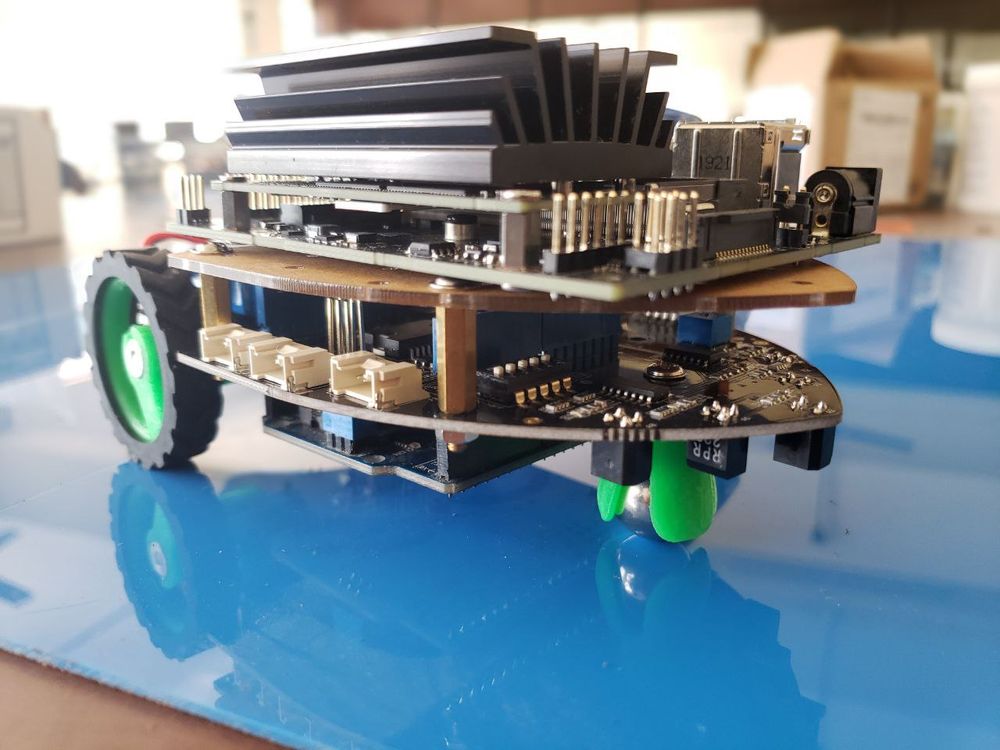
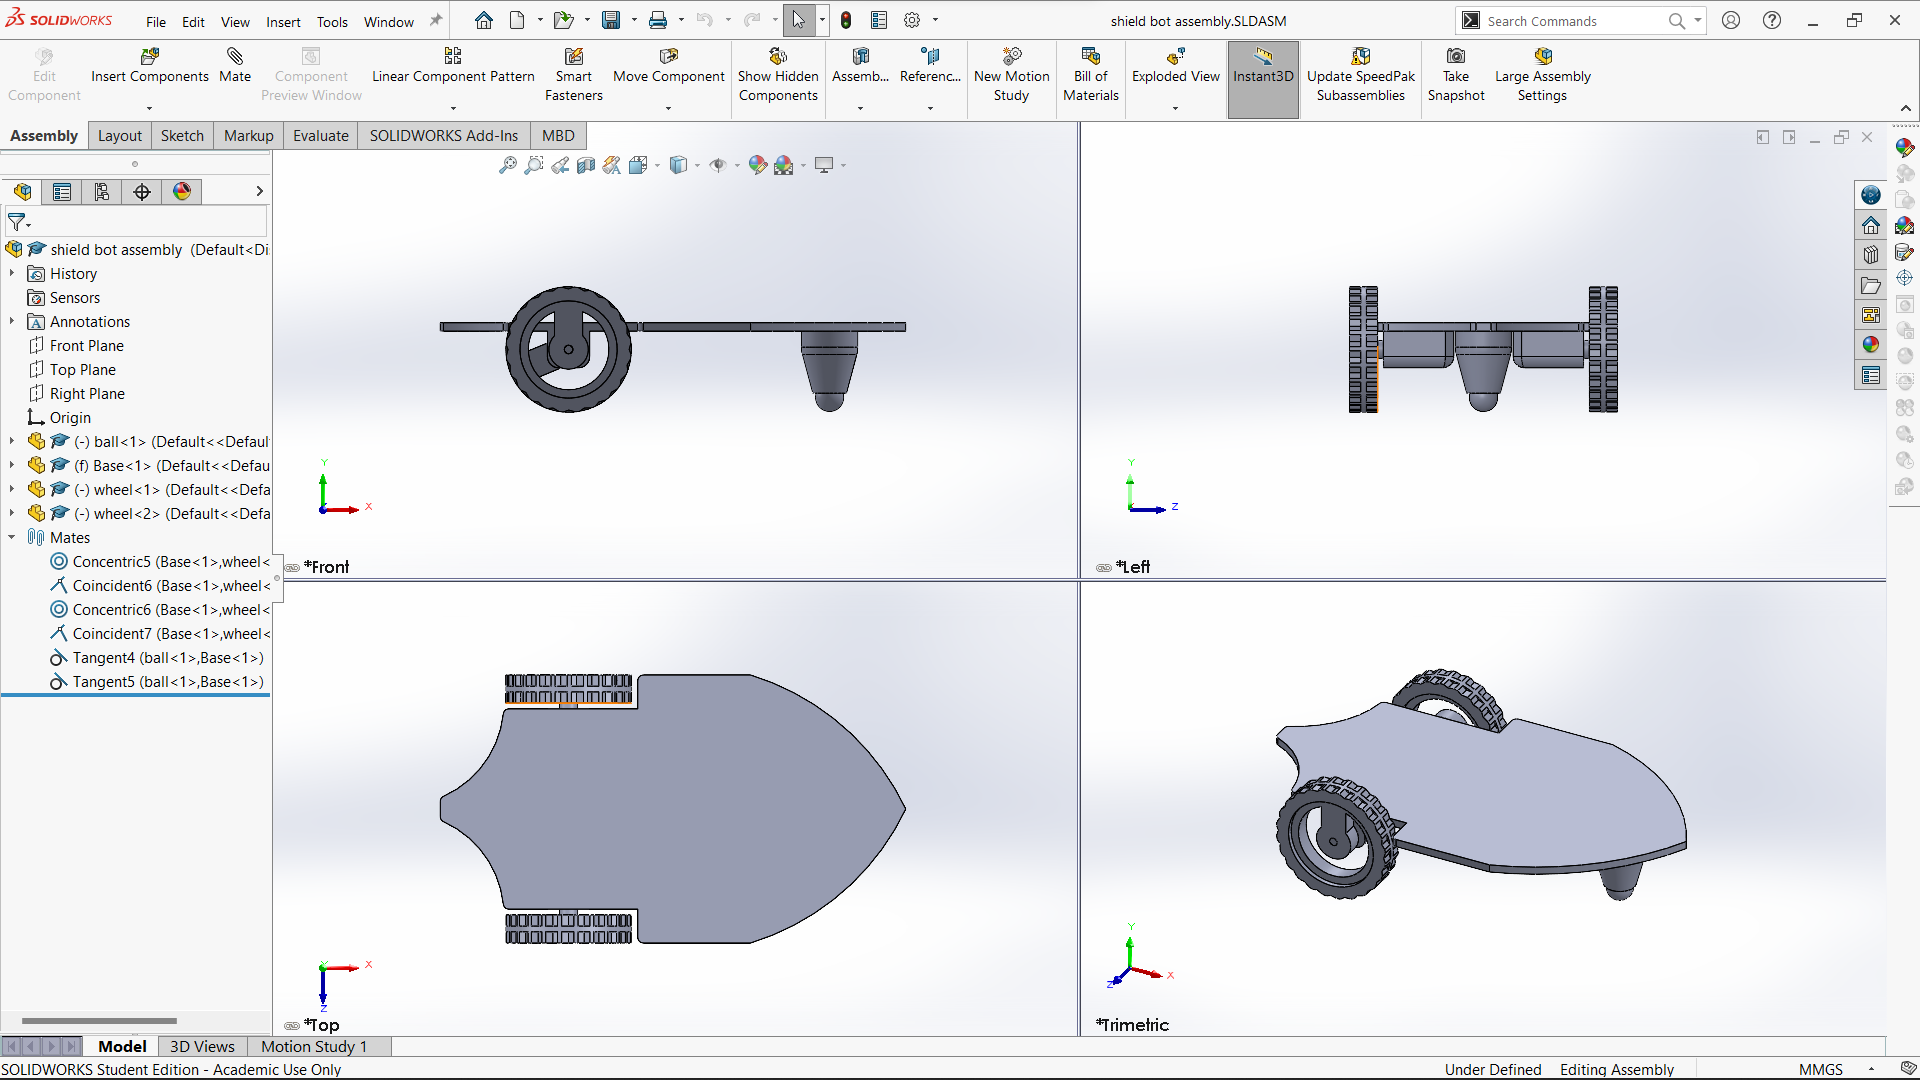
Here I use SolidWorks to create a CAD model For now, I design a differential drive robot. This is the same design as Seeedstudio Shield Bot V1.2.
"Place the robot's center of mass above the origin (For a simple robot it will be the center of the robot also for a complex robot place the origin to the center of mass and change the y-axis coordinate value like just touching the base on the top plane) and both wheel and caster wheel on the top plane"
Step 2: Add URDF plugin for SolidWorks, for this refer here
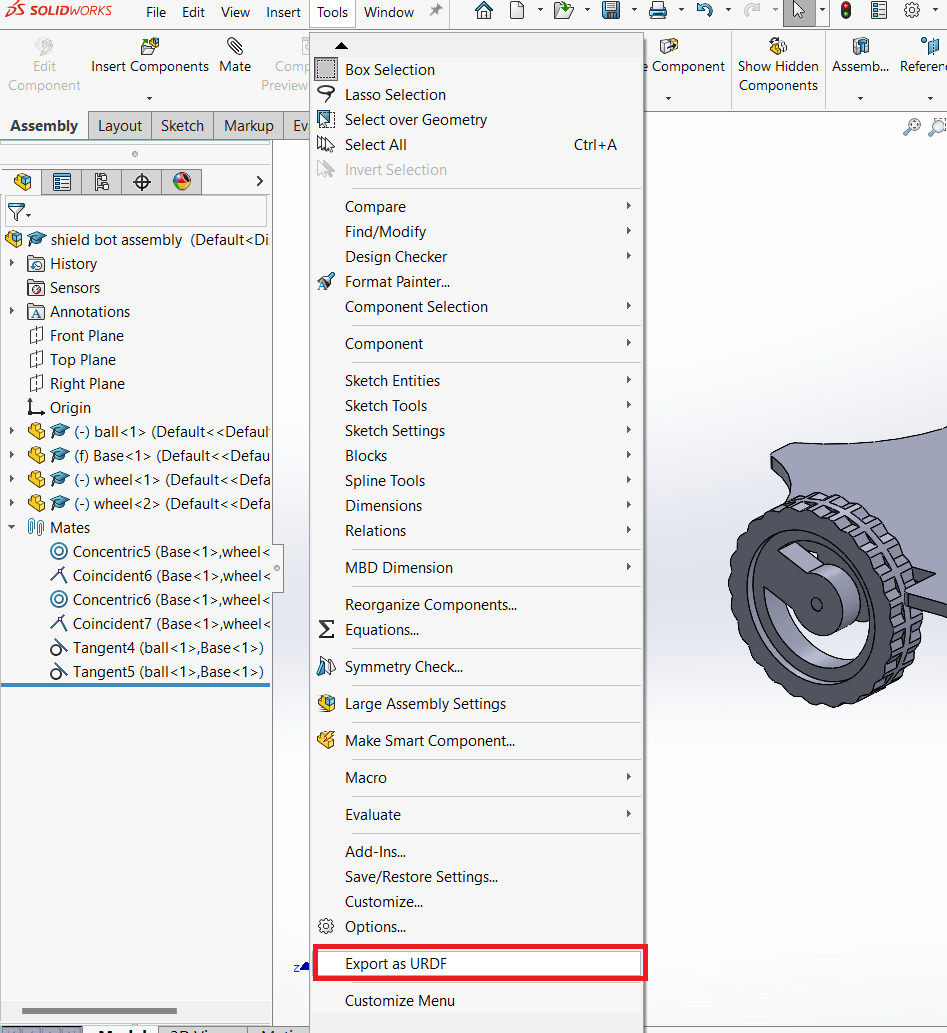
Step 3: Go to Tools and click on Export as URDF
Step 4: After that, we can see the URDF Exporter on the right side of the window.
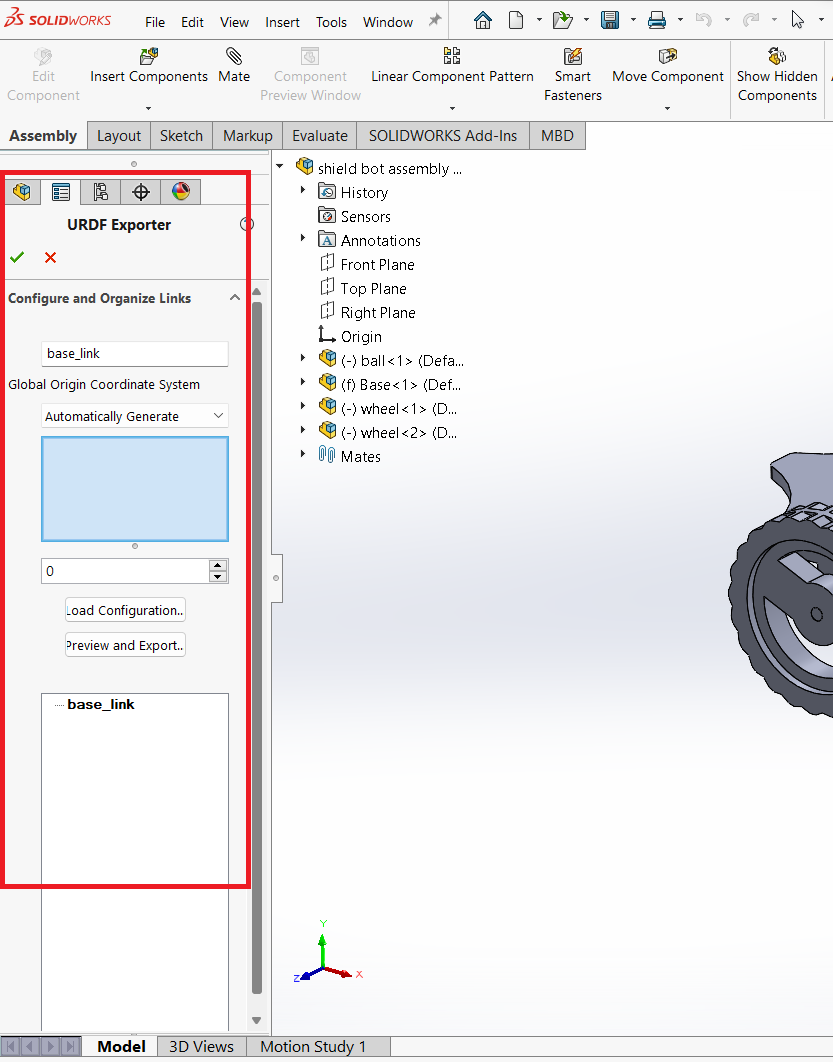
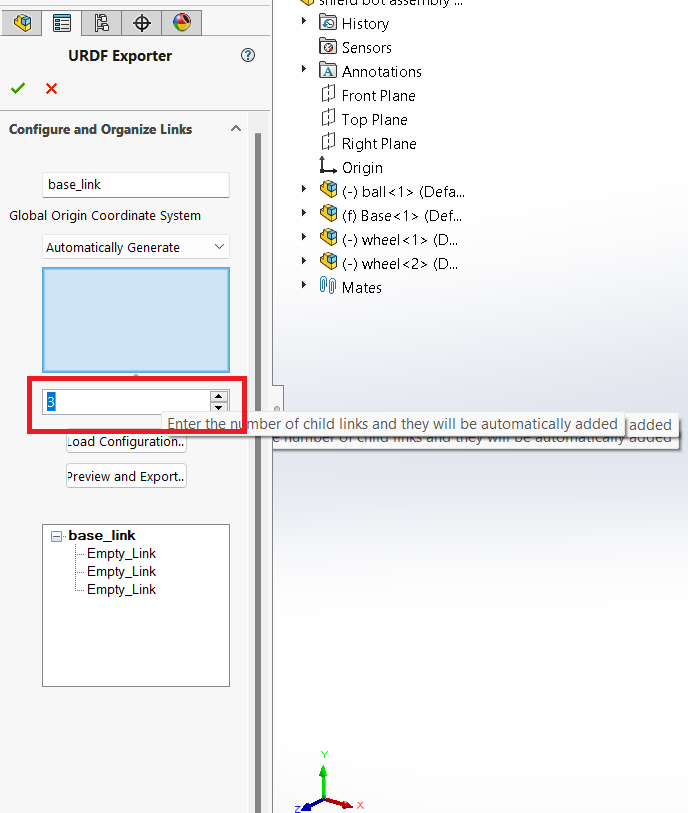
Here we can see that base_link is the parent link. Also, we have three child links here, So increase the number of child links from zero to three as shown below.
Step 5: Select the component associated with the base link as shown below.
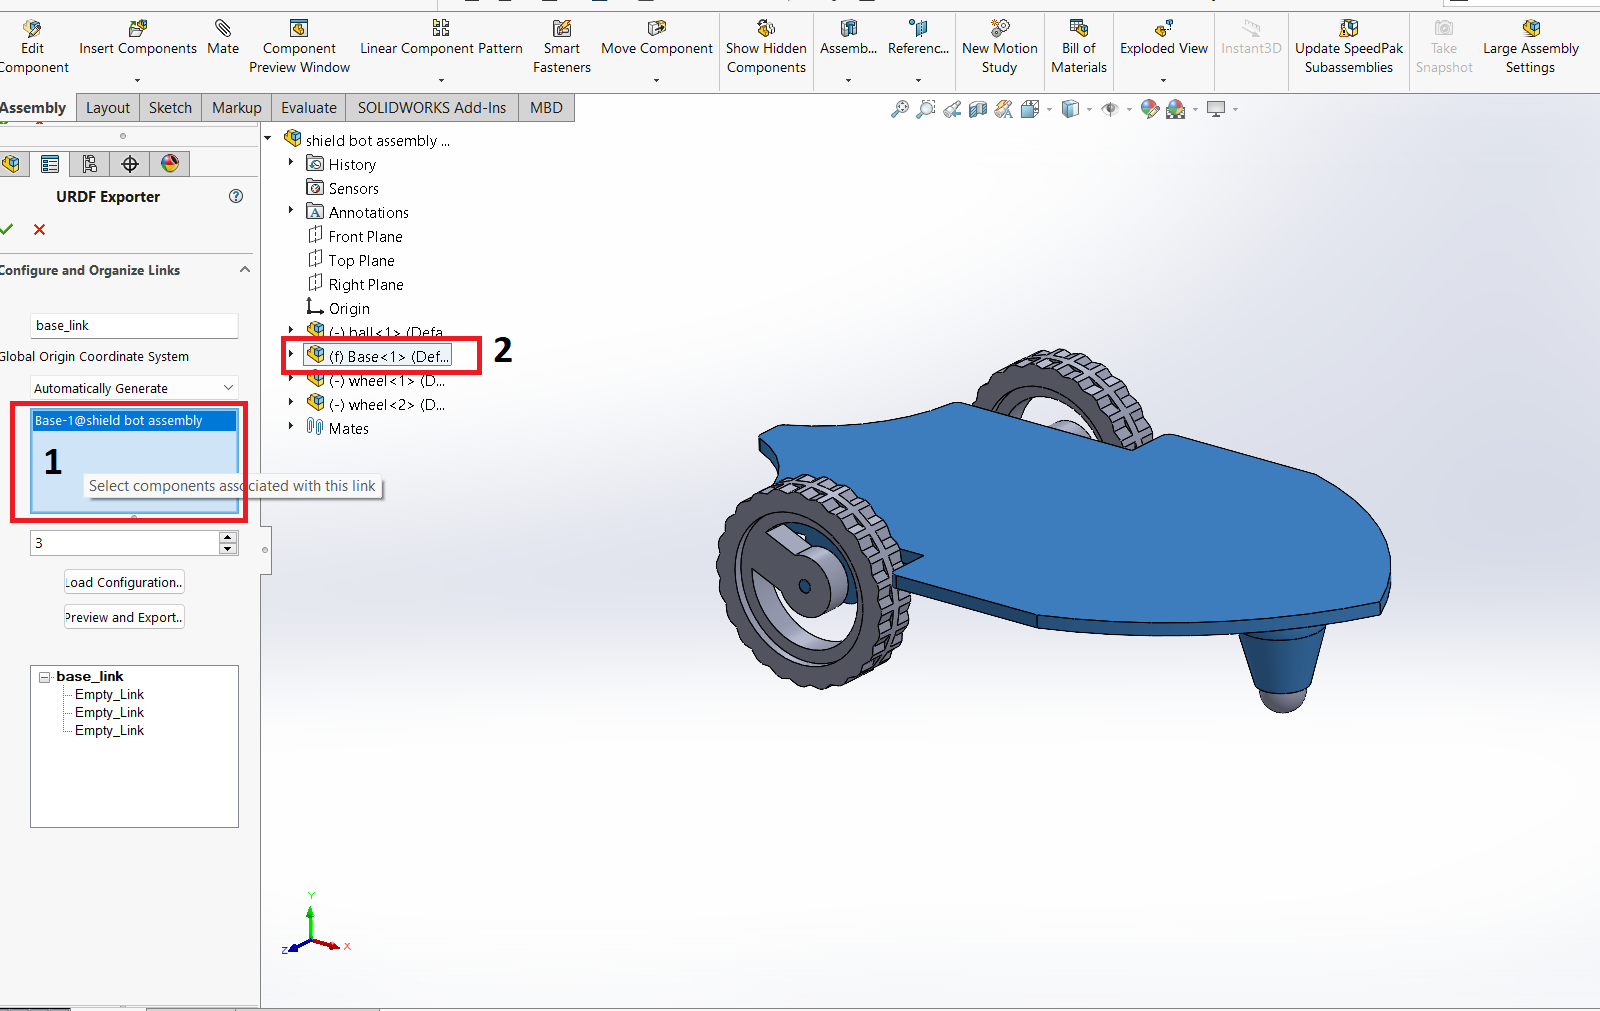
First click on the box Select components associated with this link 1, Then click on 2 (Associated link).
Step 6: Then click on Empty_Link
Now we can see that everything is in the default condition. So we need to select all the required parameters and components.
Now change Empty_Link into wheel_1 and joint name as wheel_1jt, Also select the joint type to continuos as shown below.
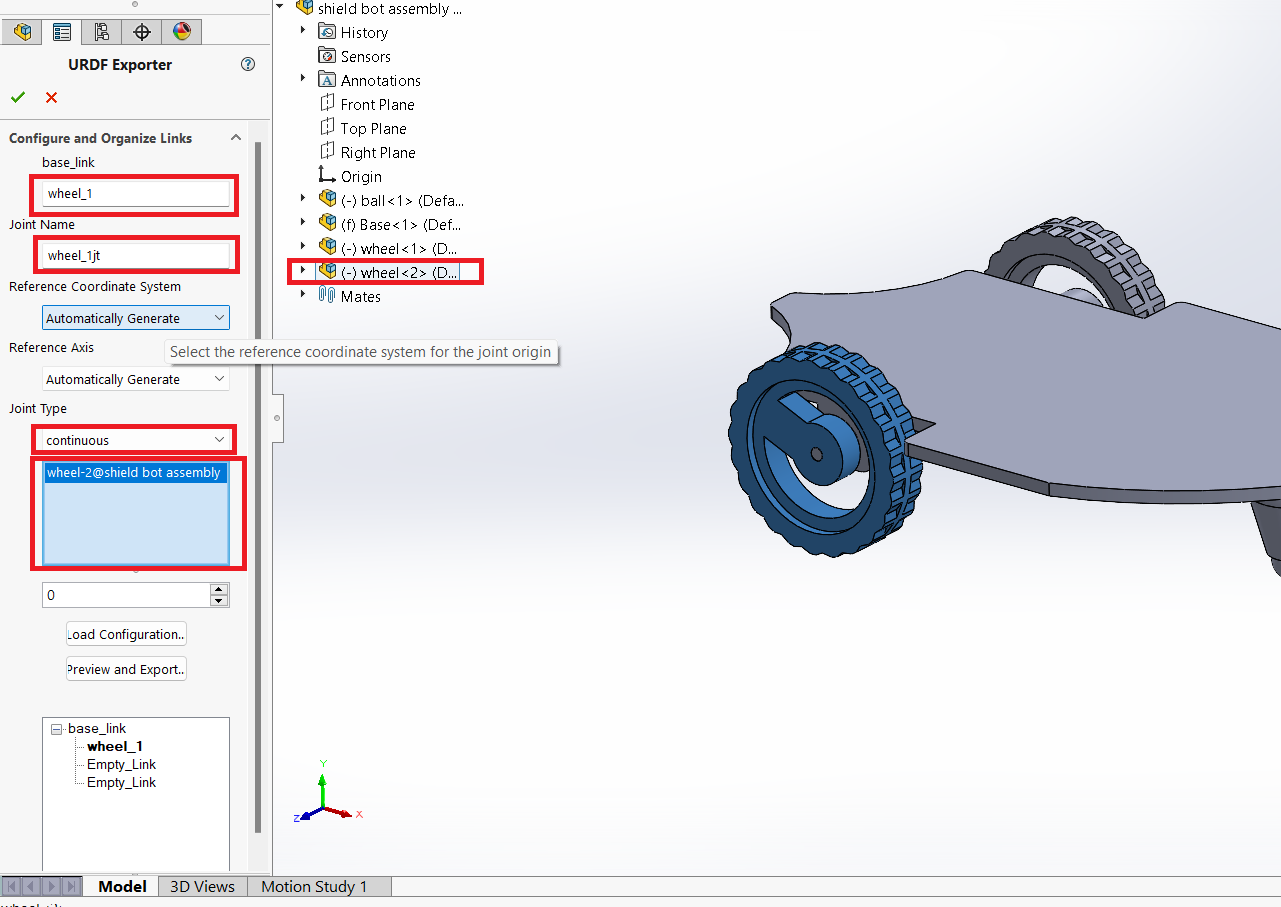
Similarly, do for the left wheel too.
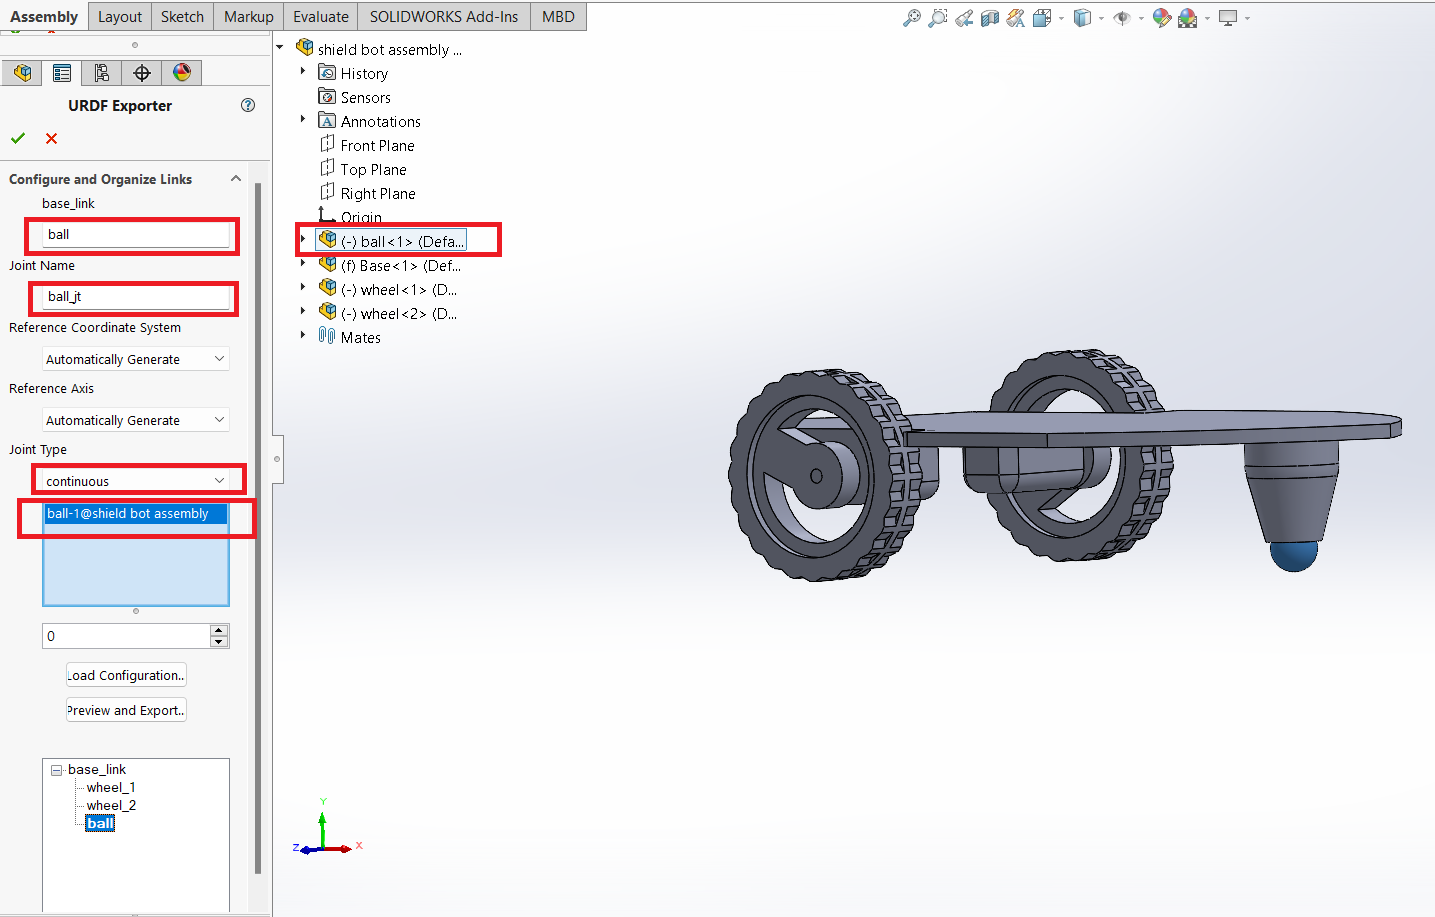
Step 7: Now click on last Empty_Link, and name it as the ball and joint name as ball_jt and change the joint type into continuos because it is freely rotating.
Now we can click on Preview and Export
Step 8: After that, a "SolidWorks Assembly to URDF Exporter" window will pop up.
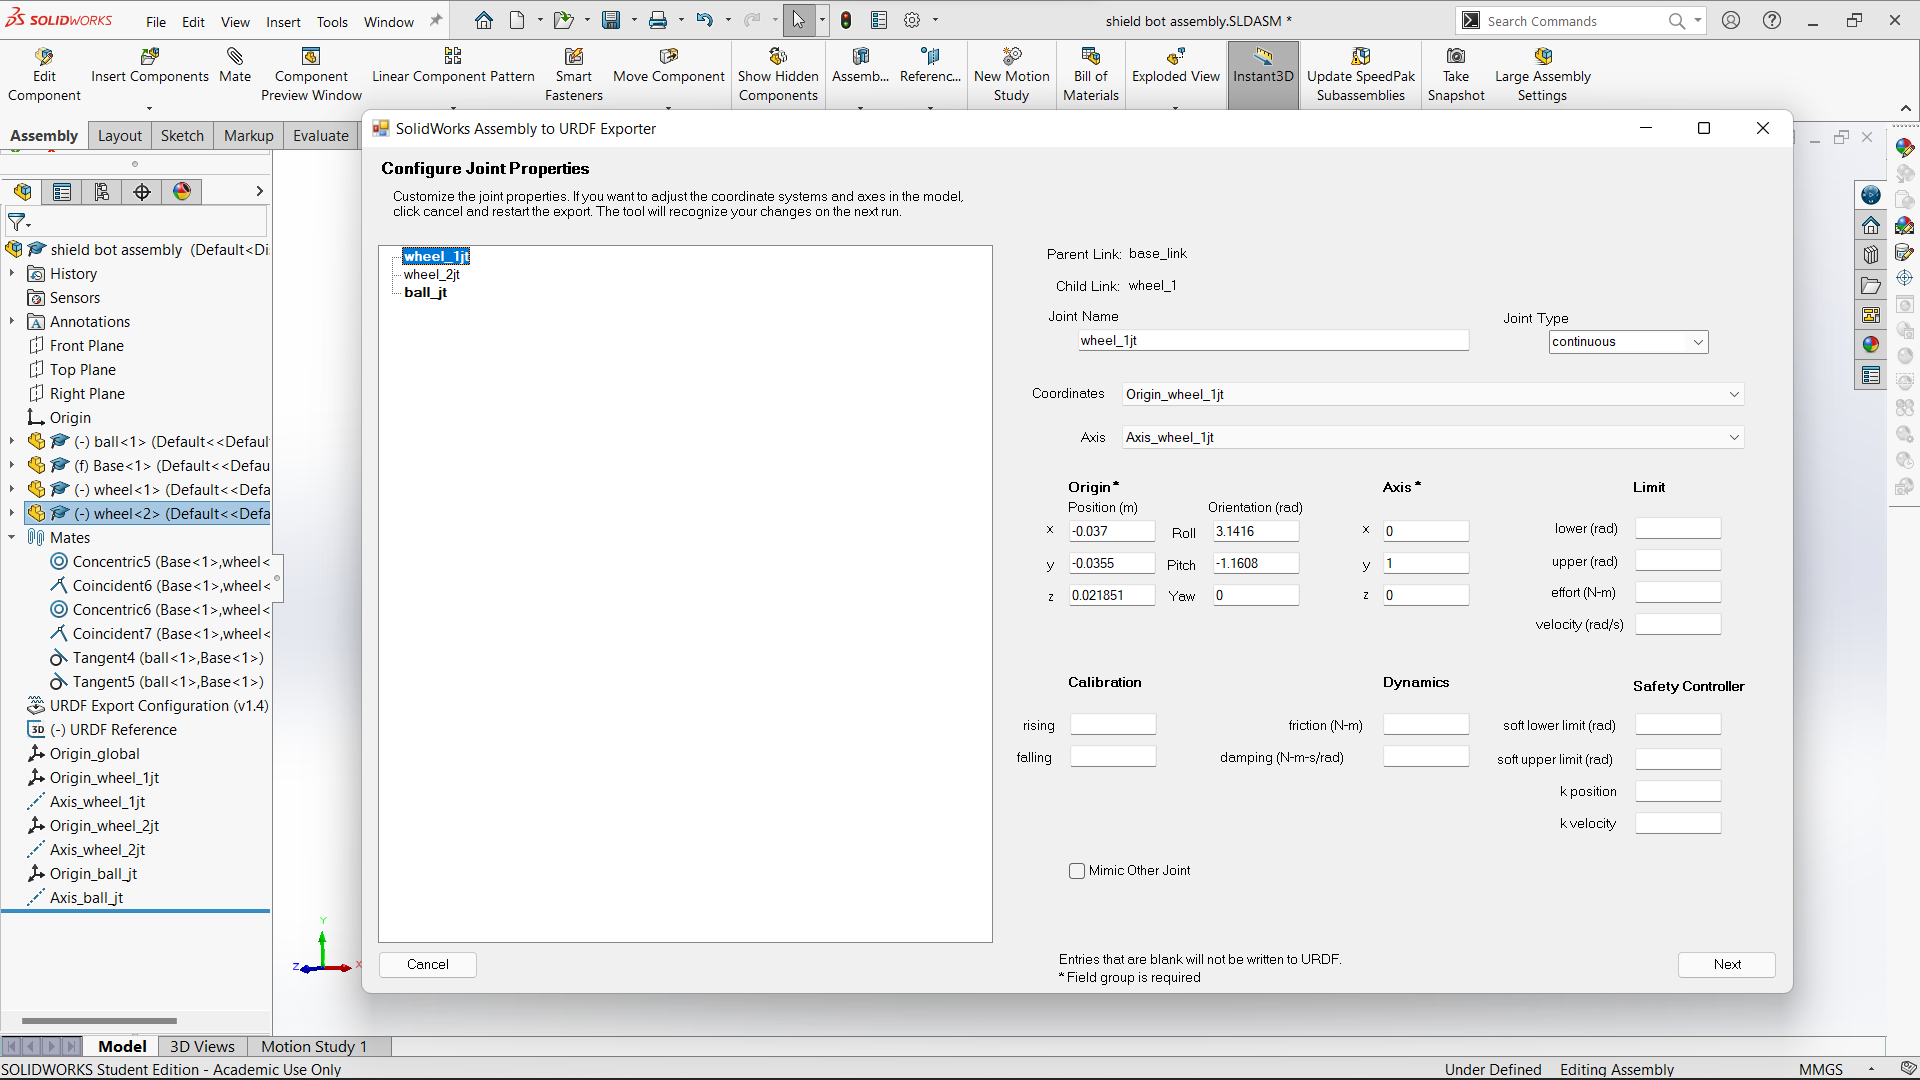
Click on wheel_1jt and set velocity limit as 100 and effort as 100. Also, keep the lower and upper limits blank because it only comes into the role when we are limiting the rotation at a particular angle.
Do a similar process for wheel_2jt too.
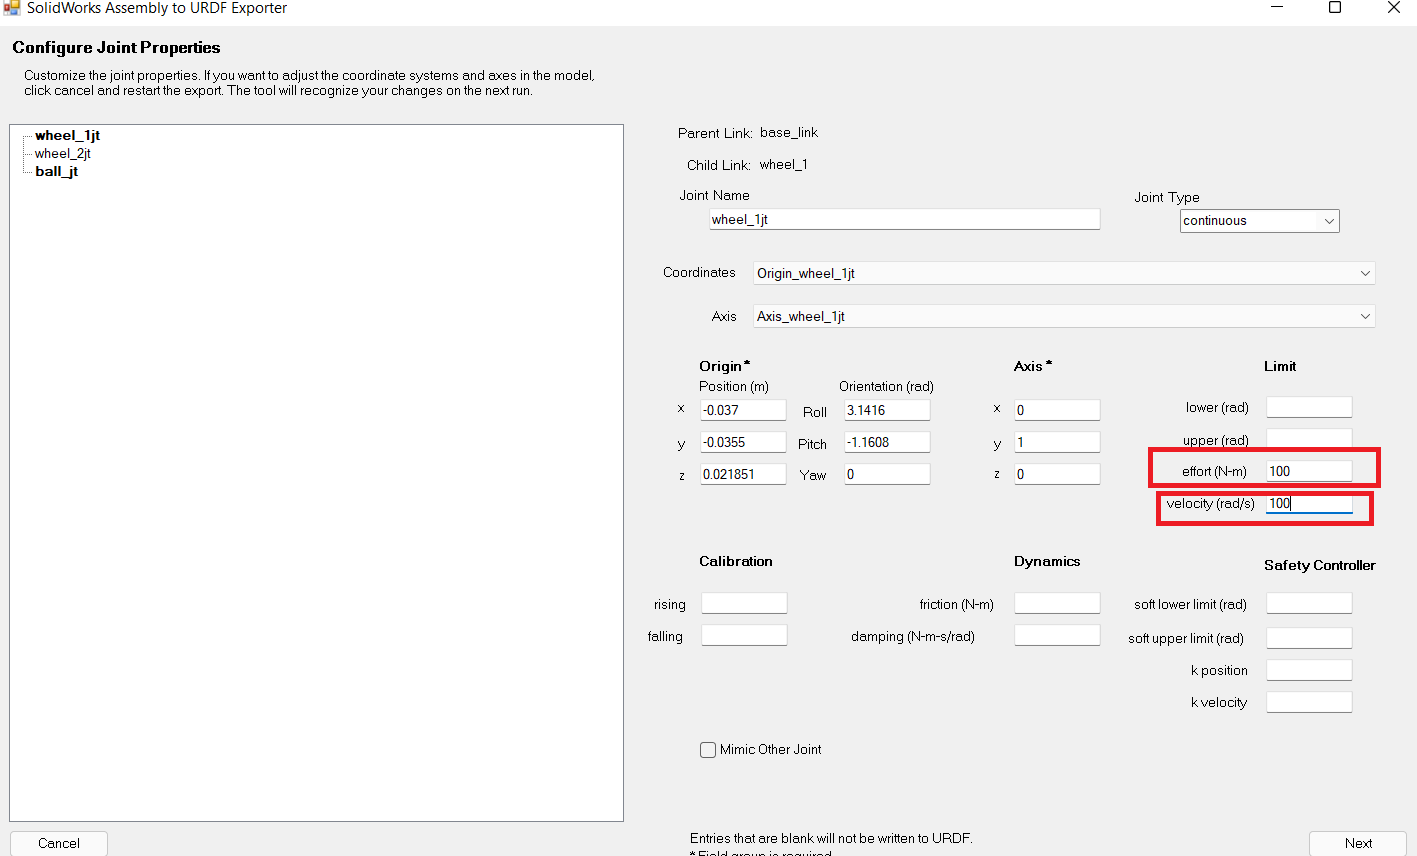
Step 9: Give the effort and velocity as 1 for ball_jt shown below.
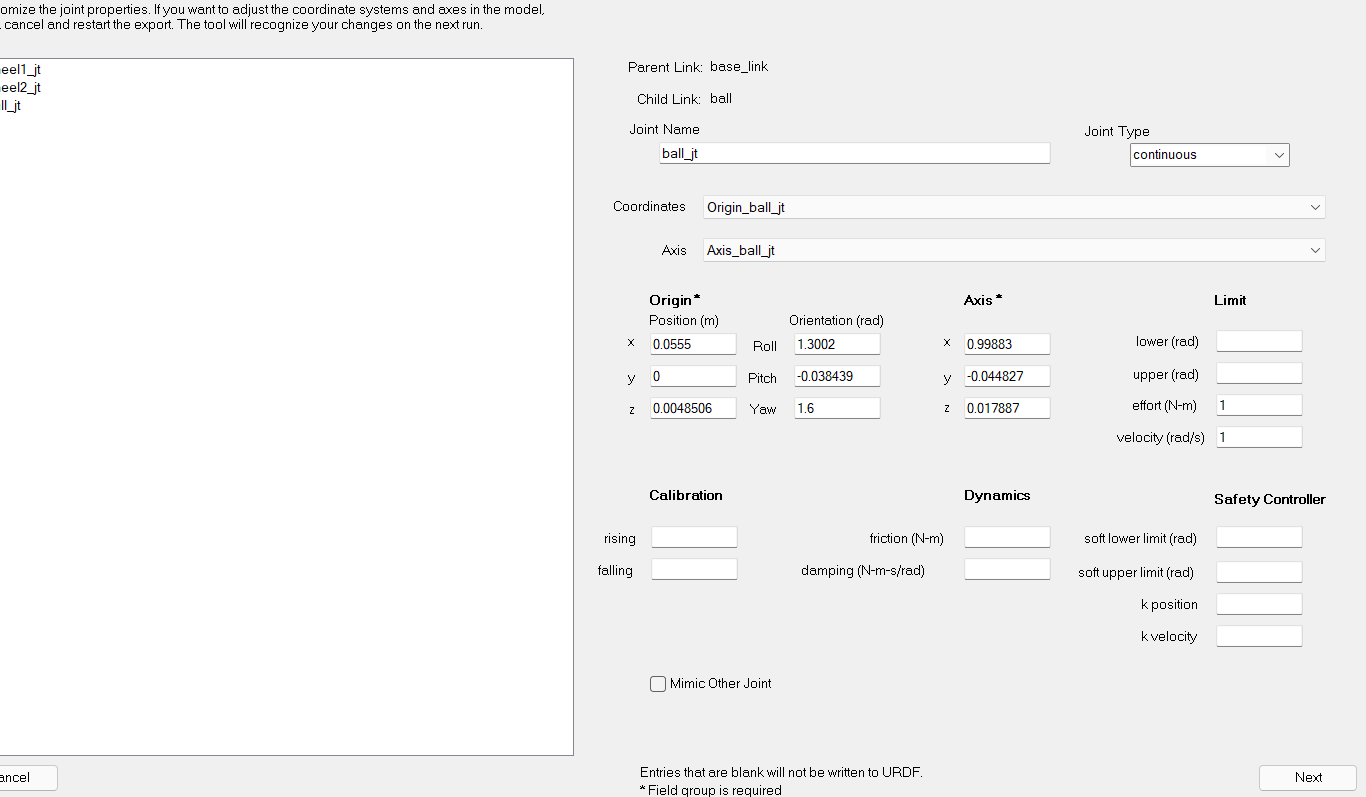
Both are one because it is a caster wheel it only supports the motion of the robot.
Then click on Next, After that, we can see the window given below.
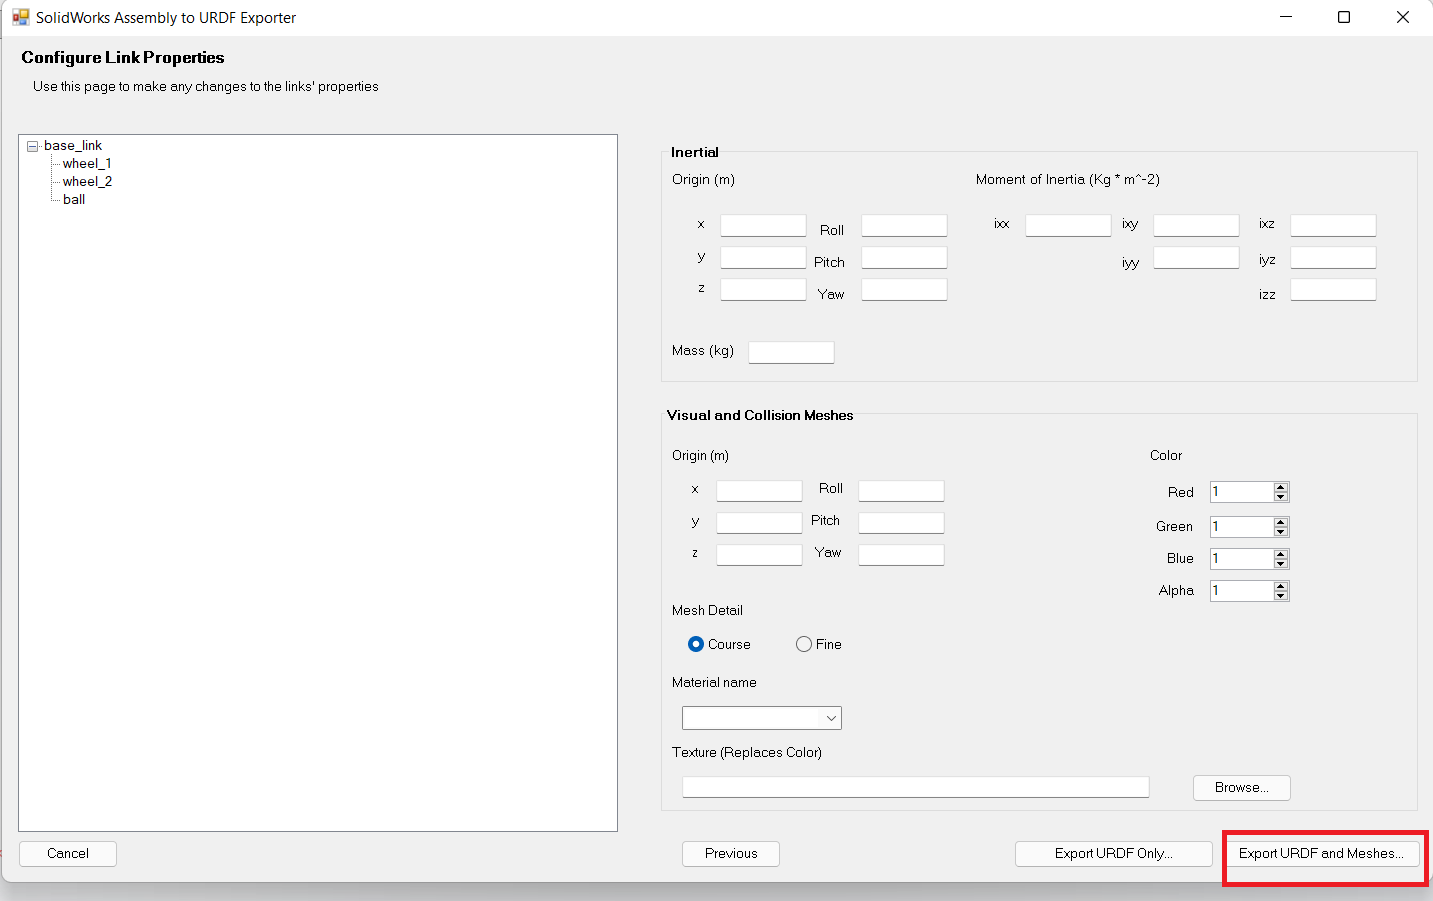
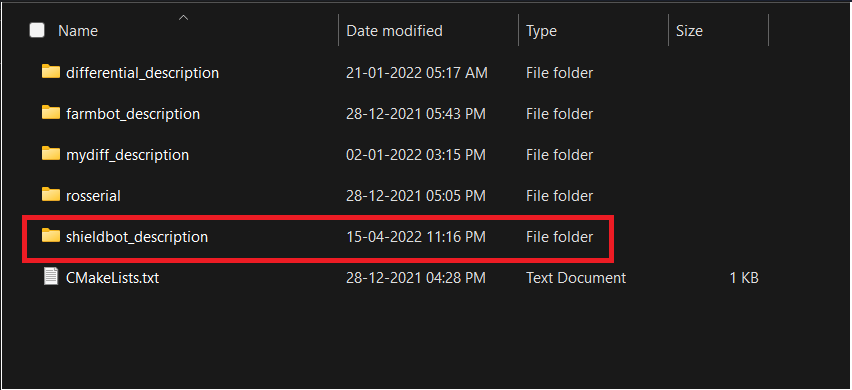
Then click on Export URDF and Meshes and give the file name (Here I named it as shieldbot_description), then save it.
Now we have Successfully created the URDF!
Next, we are going to simulate the robot in Gazebo.
Step 1:Copy the URDF into the src of catkin_ws
Step 2: Open the terminal and Type
roscoreThen open a new tab and type
catkin_makeIf there is no error we can good to go and launch the robot in the simulation environment.
For that type
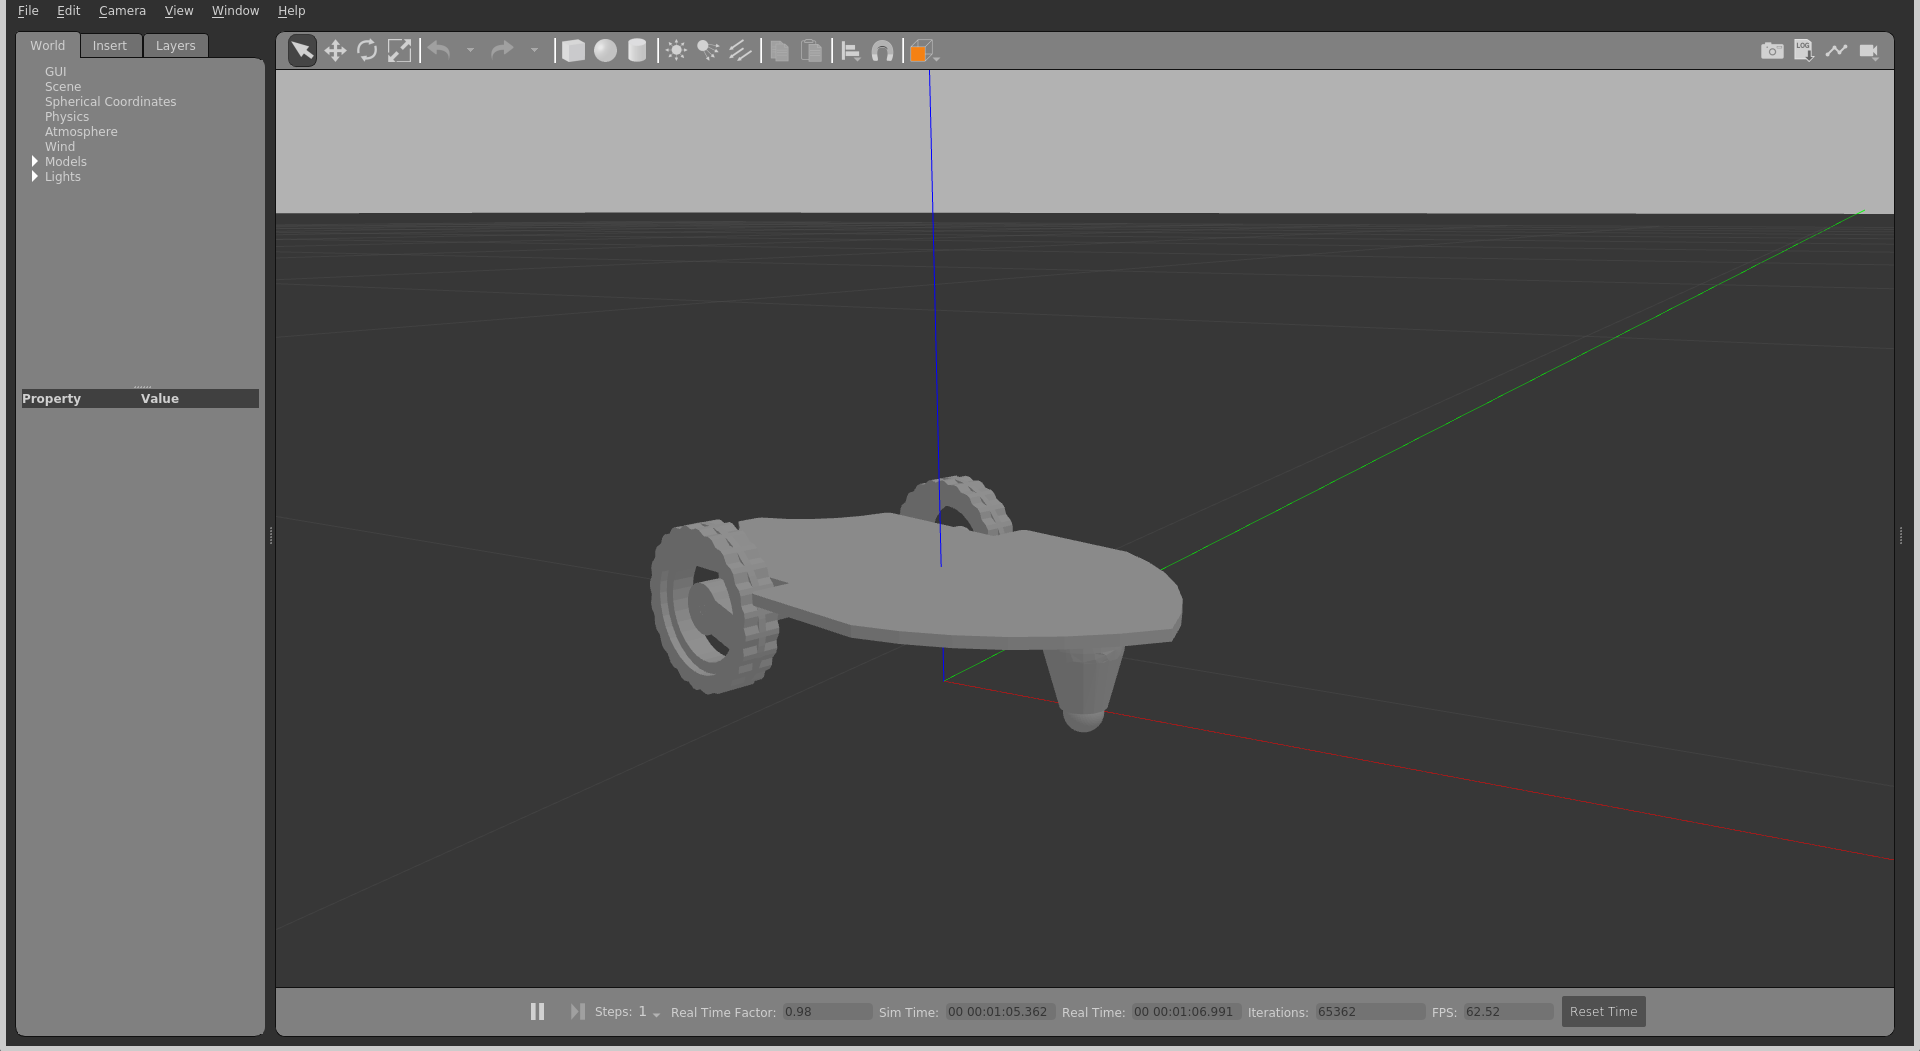
roslaunch shieldbot_description gazebo.launchHere is shieldbot_description because we name the URDF in this way.
After launching this we can see our robot in the Gazebo simulation world.
Now the simulation environment doesn't know this is a differential drive robot, So for this go to the Gazebo plugin website and find the differential drive. Also, you can find the plugin below.
<gazebo>
<plugin name="differential_drive_controller" filename="libgazebo_ros_diff_drive.so">
<!-- Plugin update rate in Hz -->
<updateRate>${update_rate}</updateRate>
<!-- Name of left joint, defaults to `left_joint` -->
<leftJoint>base_link_left_wheel_joint</leftJoint>
<!-- Name of right joint, defaults to `right_joint` -->
<rightJoint>base_link_right_wheel_joint</rightJoint>
<!-- The distance from the center of one wheel to the other, in meters, defaults to 0.34 m -->
<wheelSeparation>0.5380</wheelSeparation>
<!-- Diameter of the wheels, in meters, defaults to 0.15 m -->
<wheelDiameter>0.2410</wheelDiameter>
<!-- Wheel acceleration, in rad/s^2, defaults to 0.0 rad/s^2 -->
<wheelAcceleration>1.0</wheelAcceleration>
<!-- Maximum torque which the wheels can produce, in Nm, defaults to 5 Nm -->
<wheelTorque>20</wheelTorque>
<!-- Topic to receive geometry_msgs/Twist message commands, defaults to `cmd_vel` -->
<commandTopic>cmd_vel</commandTopic>
<!-- Topic to publish nav_msgs/Odometry messages, defaults to `odom` -->
<odometryTopic>odom</odometryTopic>
<!-- Odometry frame, defaults to `odom` -->
<odometryFrame>odom</odometryFrame>
<!-- Robot frame to calculate odometry from, defaults to `base_footprint` -->
<robotBaseFrame>base_footprint</robotBaseFrame>
<!-- Odometry source, 0 for ENCODER, 1 for WORLD, defaults to WORLD -->
<odometrySource>1</odometrySource>
<!-- Set to true to publish transforms for the wheel links, defaults to false -->
<publishWheelTF>true</publishWheelTF>
<!-- Set to true to publish transforms for the odometry, defaults to true -->
<publishOdom>true</publishOdom>
<!-- Set to true to publish sensor_msgs/JointState on /joint_states for the wheel joints, defaults to false -->
<publishWheelJointState>true</publishWheelJointState>
<!-- Set to true to swap right and left wheels, defaults to true -->
<legacyMode>false</legacyMode>
</plugin>
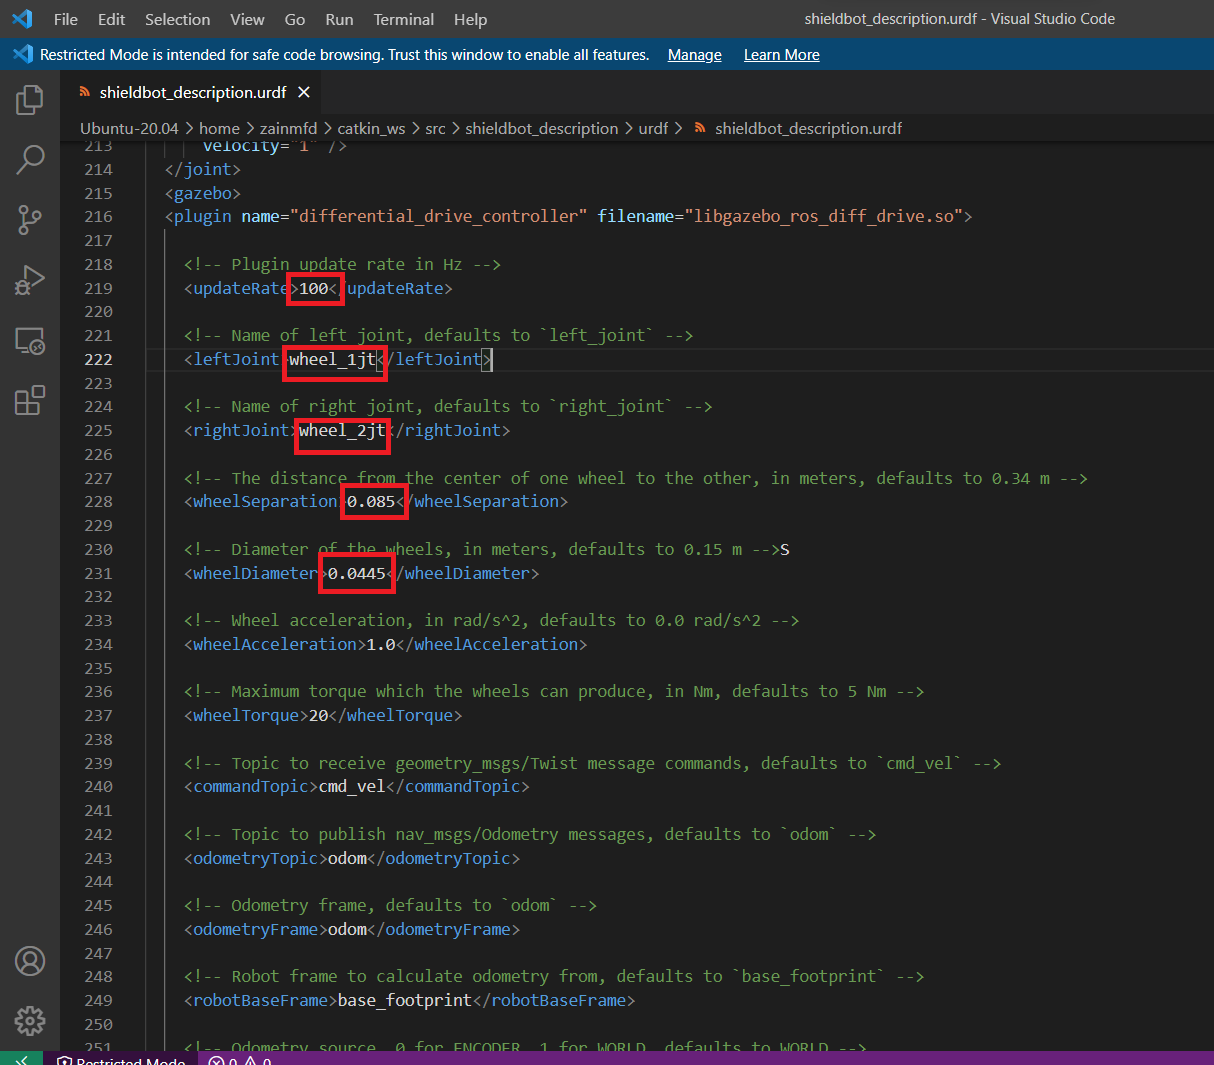
</gazebo>Now goto catkin_ws\src\shieldbot_description\urdf
Then click on "shieldbot_description.urdf" in that folder.
Open it and click on the bottom URDF and just above the robot closing tag as shown below.
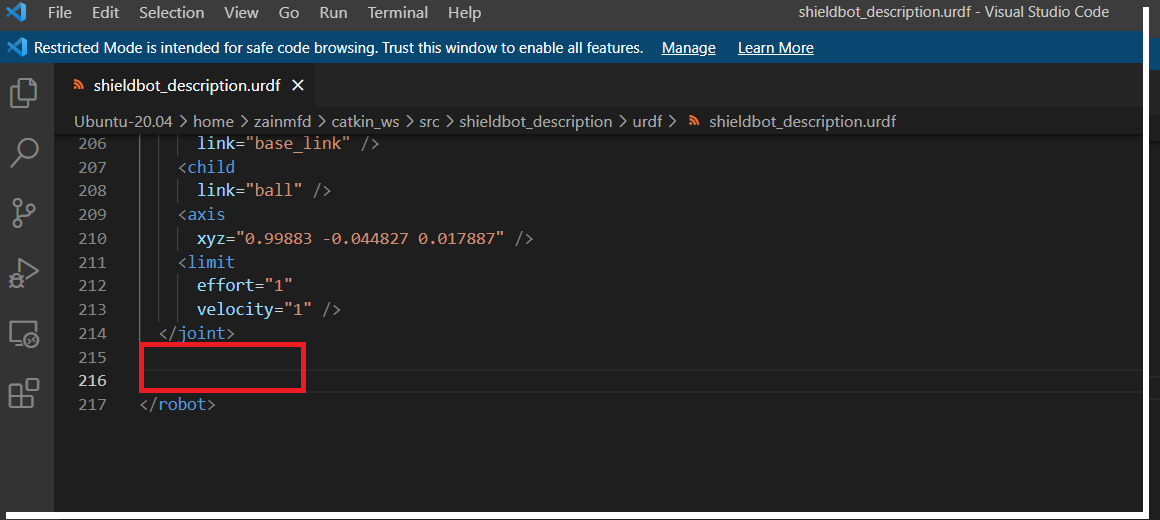
Now paste the differential drive plugin code here. And edit
${update_rate}into 100 ,
base_link_left_wheel_jointinto wheel_1jt
base_link_right_wheel_jointinto wheel_2jt
And both wheel separation and wheel diameter as per your design in meters. In my case, both are given below
 <!-- The distance from the center of one wheel to the other, in meters, defaults to 0.34 m -->
    <wheelSeparation>0.085</wheelSeparation>

    <!-- Diameter of the wheels, in meters, defaults to 0.15 m -->
    <wheelDiameter>0.0445</wheelDiameter>
After all editing, we will get the plugin below.
Now again enter
catkin_make In terminal after running roscore.
Step 3: Now we want to install the teleop_twist_keyboard. For that refer to the link.
Step 4: Launch the shieldbot_description again in the terminal after running roscore
roslaunch shieldbot_description gazebo.launchStep 5: Run teleop_twist_keyboard by entering the command below in the terminal.
rosrun teleop_twist_keyboard teleop_twist_keyboard.py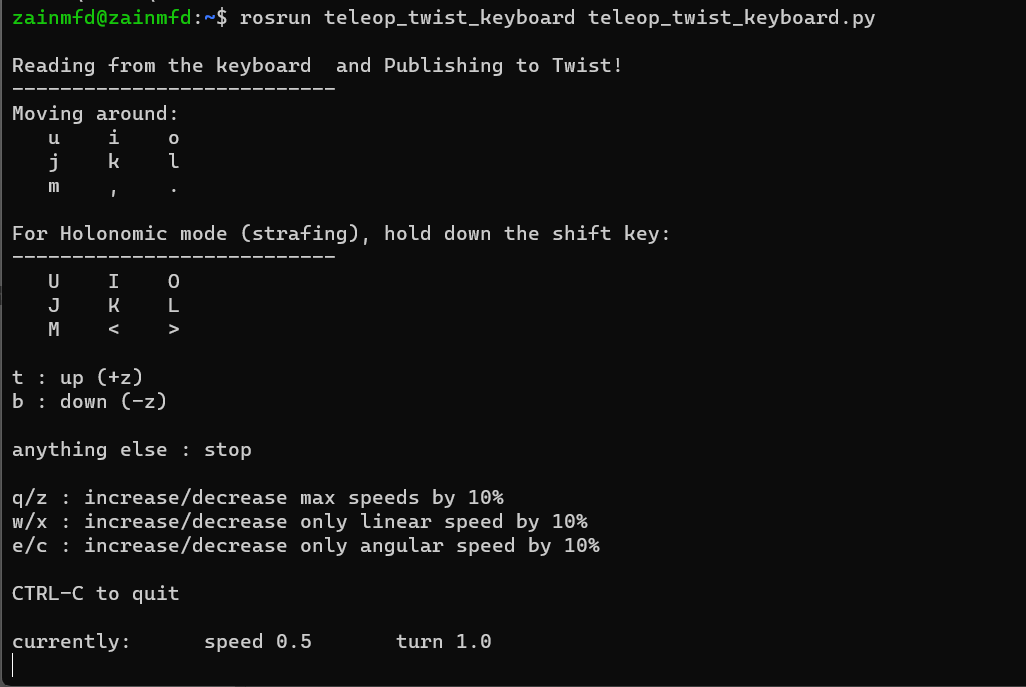
After this, we can control our robot using our keyboard.
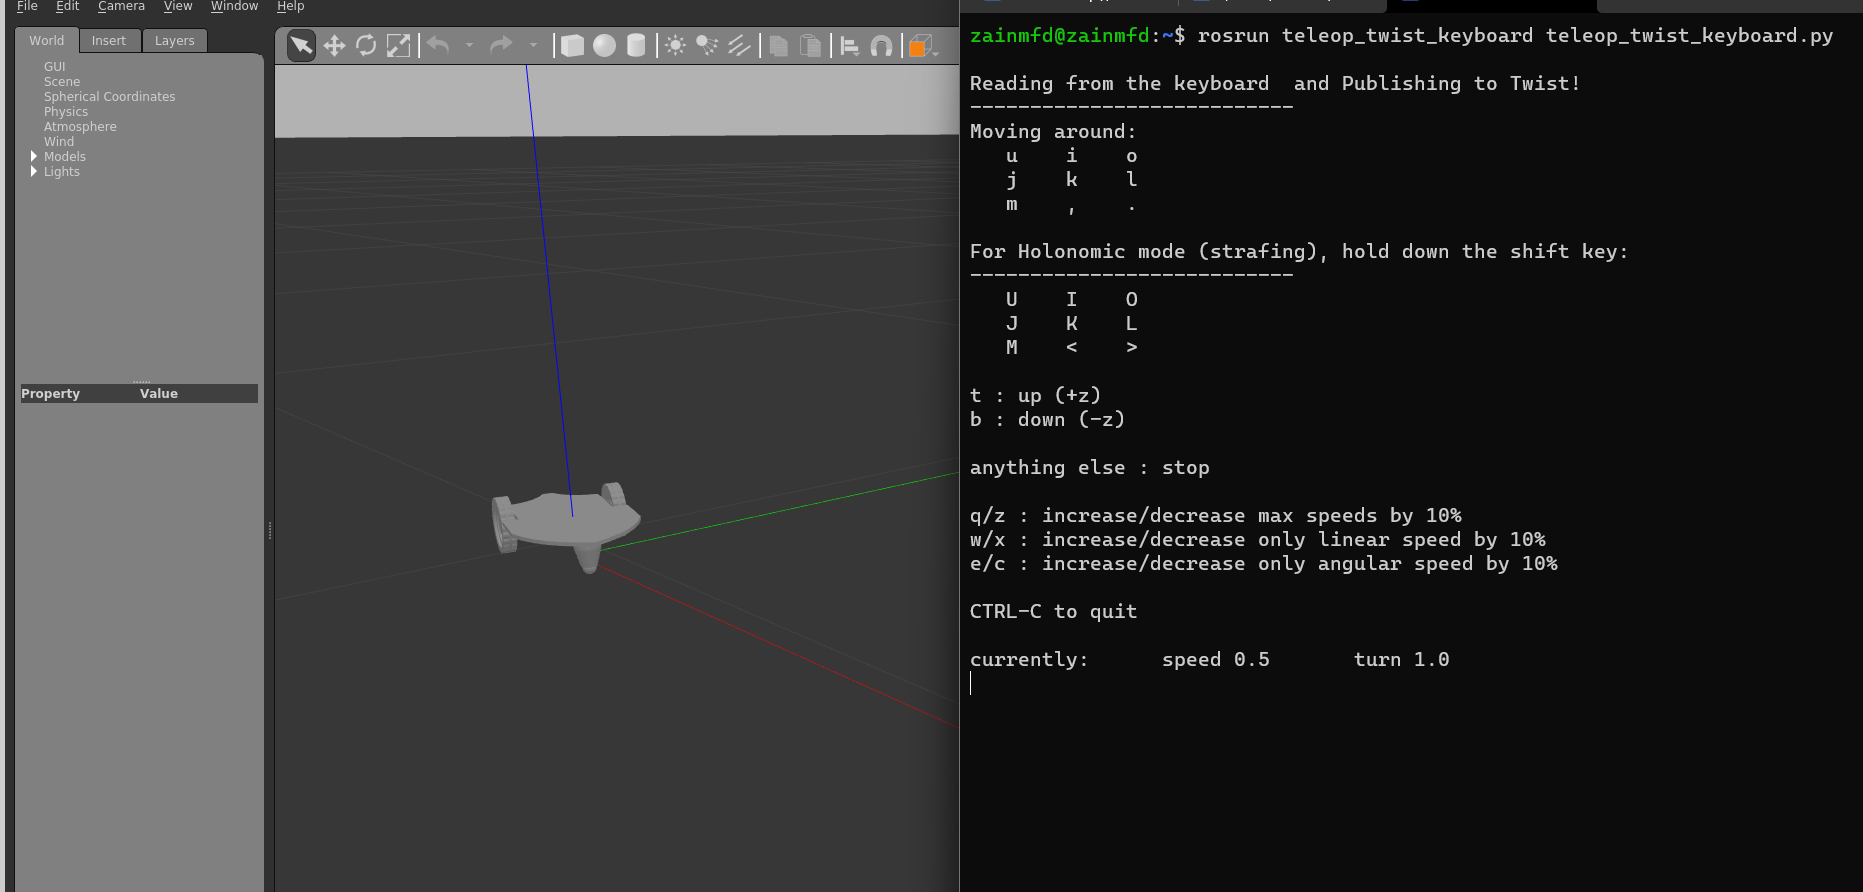
Below you can see the simulation video of Seeedstudio Shield Bot V1.2.
Thank you for reading my documentation, post your suggestions and my mistakes I will try to clear your doubt and rectify all the mistakes.