Speech Recognition using Wio Terminal & Code Craft + Edge Impulse.

A simple voice recognition project using code craft graphical programming, wio terminal and edge Impulse.
Overview
In the project, we are going to build simple voice recognition using Edge Impluse and SeeedStudio Codecraft.
Edge Impulse


Machine learning (ML) is a way of writing computer programs. Specifically, it’s a way of writing programs that process raw data and turn it into information that is meaningful at an application level. Recent advances in microprocessor architecture and algorithm design have made it possible to run sophisticated machine learning workloads on even the smallest of microcontrollers. Embedded machine learning, also known as TinyML, is the field of machine learning when applied to embedded systems such as these.Edge Impulse is the leading development platform for machine learning on edge devices, free for developers and trusted by enterprises. Read more Here we are using edge impulse to create and run the tinyML model on the wio terminal using code craft.
CodeCraft

Codecraft is a programming software based on Scratch3.0 and supports both graphical and text programming languages. It’s a versatile software tool for STEM education. With Codecraft, children are able to design engaging stories, games and animations, and use various electronic kits which CH Maker Ed and Seeedstudio provide to create interactive smart applications. Furthermore, when you’re ready, you can always convert the code blocks to Arduino, Python, or JavaScript to learn more about the most popular languages.Here we are using CodeCraft to create embedded ML using the graphical and text programming language with the support of Edge Impulse.
Wio Terminal
The Wio Terminal based ATSAMD51-based microcontroller with wireless connectivity supported by Realtek RTL8720DN and is equipped with a 2.4” LCD Screen, onboard IMU(LIS3DHTR), Microphone, Buzzer, microSD card slot, Light sensor, and Infrared Emitter(IR 940nm). Realtek RTL8720DN chip supports both Bluetooth and Wi-Fi providing the backbone for IoT projects.

Key Features
- Powerful MCU: Microchip ATSAMD51P19 with ARM Cortex-M4F core running at 120MHz
- Reliable Wireless Connectivity: Equipped with Realtek RTL8720DN, dual-band 2.4Ghz / 5Ghz Wi-Fi
- Highly Integrated Design: 2.4” LCD Screen, IMU and more practical add-ons housed in a compact enclosure with built-in magnets & mounting holes
- Raspberry Pi 40-pin Compatible GPIO
- Compatible with over 300 plug&play Grove modules to explore with IoT
- USB OTG Support
- Support Arduino, CircuitPython, Micropython, ArduPy(What is ArduPy?), AT Firmware, Visual Studio Code.
For more information go to https://www.seeedstudio.com/Wio-Terminal-p-4509.html.Let's get started ✨
Step 1: Log in to CodeCraft

Go to https://ide.tinkergen.com/ Create a new account or use log in to existing account, If you have one.
Step 2: Create a new Project.
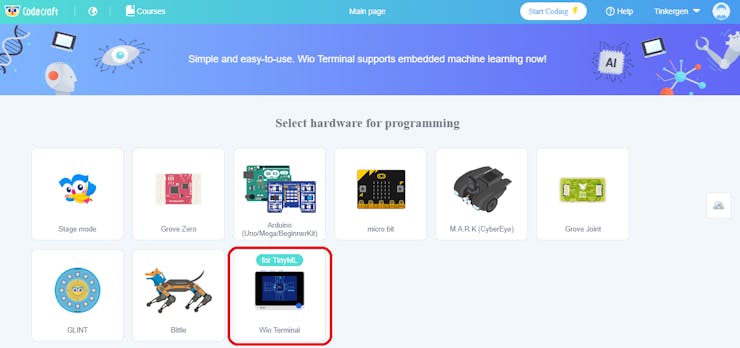
Select Wio Terminal from the hardware list.

Click the annotated box and enter the project name.
Step 3: Connect Wio Terminal
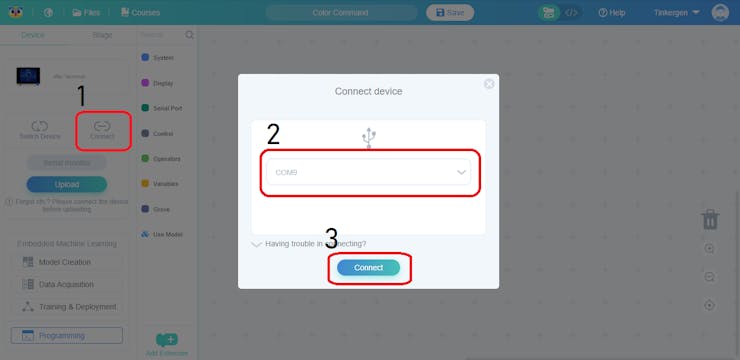
Step 3.1: Connect the Wio Terminal to the computer with a USB cable.Step 3.2: Select Connect option from the left bar.Step 3.3: Select Wio Terminal COM Port.Step 3.4: Click Connect.Once connected, you'll get a pop-up mentioning you are connected.

ML Model Creation
To recognize the sound we are using machine learning, that we need to follow few steps one by one., all other machine learning stuffs here is managed by Edge Impulse.

In CodeCraft, we have 4 Steps to do the ML project.1. Model Creation2. Data Acquisition3. Training & Deployment4. Programming
Step 4: Model Creation
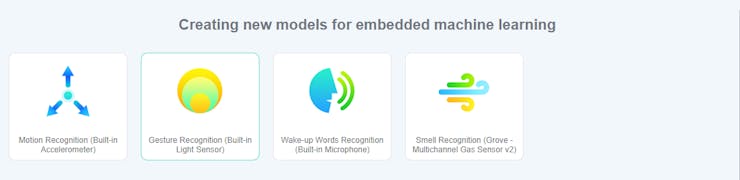
A model is an algorithm, that has been trained to recognize certain types of patterns. In Codecraft we have four inbuilt model templates.Since we need to recognize voice to do our project, we are using the"Wake-up words recognition (Built-in Microphone)" template model.

Select Model Creation from the left panel then select the "Wake-up words recognition (Built-in Microphone)" template, model from the following screen.

Enter the name of your model, then click OK.
Step 5: Data Acquisition
After selecting the model we need to collect data to train the neural network in the ML.We need to collect different sounds including background noise and other noises, then only the model can easily different words such as RED, GREEN, BLUE from other background noises.
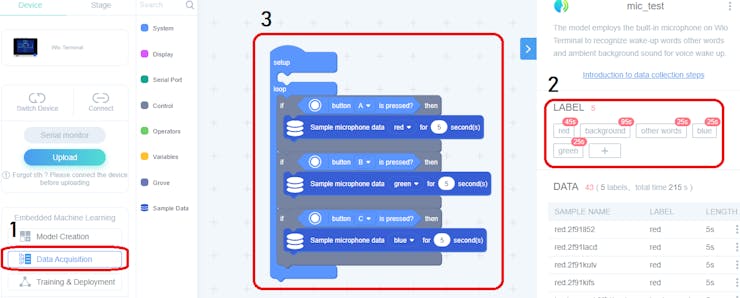
From the following window, change the default label to a meaningful one, I used the name RED, GREEN, BLUE and Other Words.Then Connect the wio terminal as we mentioned in Step 3: Connect Wio Terminal above.Finlay clicks Upload to install the data collection program on their terminal.<data collecting video>The same way we collected pressure cooker whistle, we need to do that for background sound too.I totally captured the 25-seconds of all sounds.
Step 6: Training & Deployment
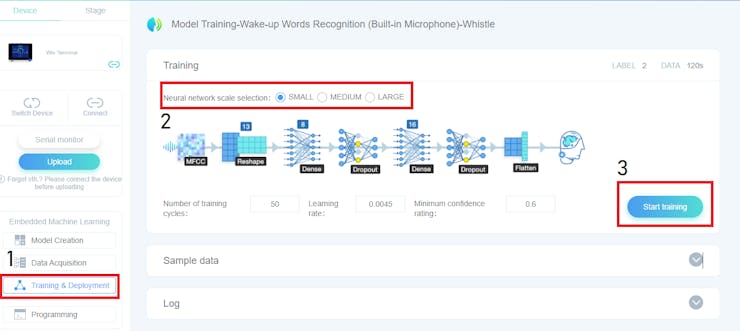
Select the "Training & Deployment" option from the left panel to start training the model.In the training session, we need to select the network scale from Small to Large. The selection depends on how complex our model is, Here I'm using a Small network first.

We can also see the raw data from the sample data field. This is helpful to understand the collection was successful.

After all the parameters settings., we need to click Start Training. It will need some time to complete the training, meanwhile please wait or check out my other projects 😉

Once the training is complete, you can see the training performance details.

Once you are satisfied with your result, click Model deployment to use the model.

You'll get a pop-up message mentioning the deployment is completed. now we can use the model in programming 🙌.
Step 7: Programming
In the following screen, you can see the similar screen that we used for data collection, here we are programming the wio terminal with the model we trained.

Explanation.

Here we setup the display orientation, background color, text color and size.

In the loop section, we are using conditional statement to check the predicted command then make action depends on that.
Step 8: Upload and Run

Click Upload to upload the program, then it will be automatically run.
Conclusion
The CodeCraft is a very easy tool to build a simple tinyML application with the help of edge impulse and wio terminal. I hope you enjoyed the small project and learned something new. please share your comments below. 🤗