This seems to be a typical Dynamic memory allocation done through your software stack. I've seen similar error while implementing OpenCV on MCU's.
Try freeing unused objects from your application.
This seems to be a typical Dynamic memory allocation done through your software stack. I've seen similar error while implementing OpenCV on MCU's.
Try freeing unused objects from your application.
@salmanfaris I am using Arduino UNO as ISP programmer.(General ISP connections are made). I used both Arduino IDE and also avrdude command line to burn the bootloader. I am sharing link to pictures and debug outputs I got on both avrdude and arduino here. Please check it and let me know if it rings any bells for you.
https://drive.google.com/drive/folders/1BP74HvmbBOlqBN4XDcvLkMt7eNK5hWaL?usp=sharing
Hi all,
I have made a custom board with Atmega328P SMD IC and now I am having a problem flashing it. I have flashed multiple chips like these earlier, however this time I am having a hard time figuring out the issue.
I am using Arduino UNO as an ISP programmer to burn bootloader but getting responses like Attempt 1 of 10 - stk500() is not responding etc., like that. I need some help regarding this issue.
Any kind of help will be greatly appreciated. Please ask me for any additional information that I might have not mentioned in this post.
Thanks in advance.
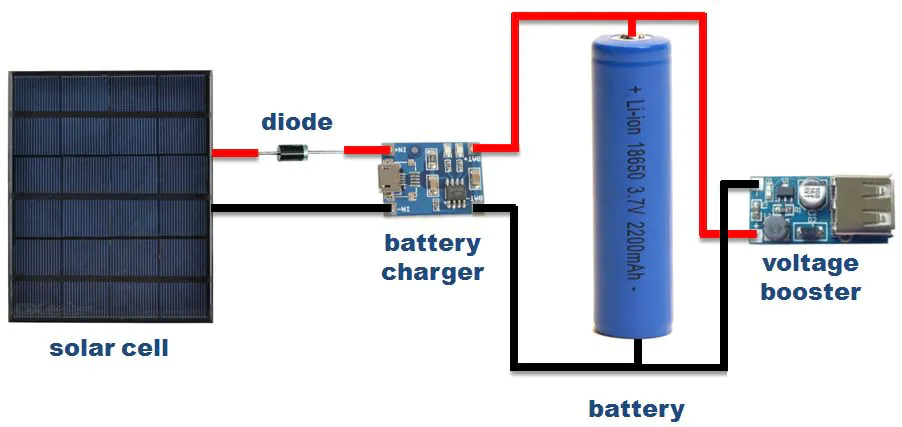
@milanvarghese No, the battery comes into the play only if there is no power from the solar cell. It's like inverters in our home. They activate only if main power is gone, rest of the time they keep charging. similarly here the direct power will be coming from the solar cell, only if the solar cell can't produce enough voltage battery comes into the loop and starts providing voltage to our circuit.
@milanvarghese Basically you have cited the solution to your question. yes, you can run the Arduino microcontroller from a solar panel with some protection circuitry in between. There are many tutorials and blogs out there. You can start with something as following.

Hi all,
I recently came across this post where they have shown photos printed on PCB in high resolution. I would like to know how to add this kind of photos to the silkscreen layers of the PCB in Eagle/Altium.
Adding such kind of photos will be attractive for beginners and also can be used for educational purposes too.
Please let me know in case anybody knows.
@abdultechguy999 usually https://dl.espressif.com/dl/package_esp32_index.json this works while installing through boards manager. But I faced the same issue some times. it might be due to a couple of reasons.
Bad Internet connectivity
The license of the https://dl.espressif.com/dl/package_esp32_index.json might be expired(If this is the reason you can't do anything but just wait until they re-activate the license)
I remember there is a way to install the board files offline by downloading from some github repos.
All the best.
@Mennyt The general right angled header pins are the cheapest option. Something like this https://robu.in/product/2-54mm-2x20-right-angle-male-header-strip-pack-of-2/?gclid=CjwKCAiA4o79BRBvEiwAjteoYDcmnOSwTUviMZzRBeHz_aENF_fQgj3BrKXAzYs6GIHknHSOJ4_2KhoC1fAQAvD_BwE
@salmanfaris Actually the schematics files you've mentioned are the same files which I've got from them. They are carrier board design files.
@salmanfaris Oh hey woow...this is what I've been searching for. I have contacted Nvidia forums asking for the design files of this module. But those people gave me the design files of the Carrier board. What a waste of time. This is awesome...!! Can I get the design files of this SOM? Not to replicate but just for my reference, practicing, and understanding.