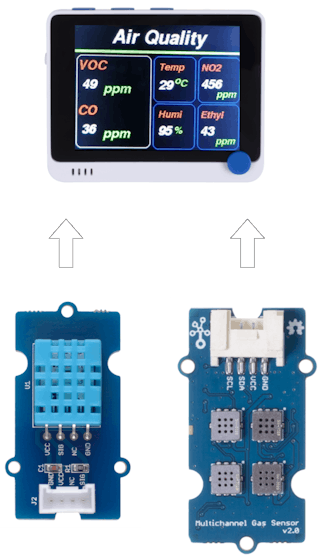
Air Quality Monitoring Station with Wio Terminal
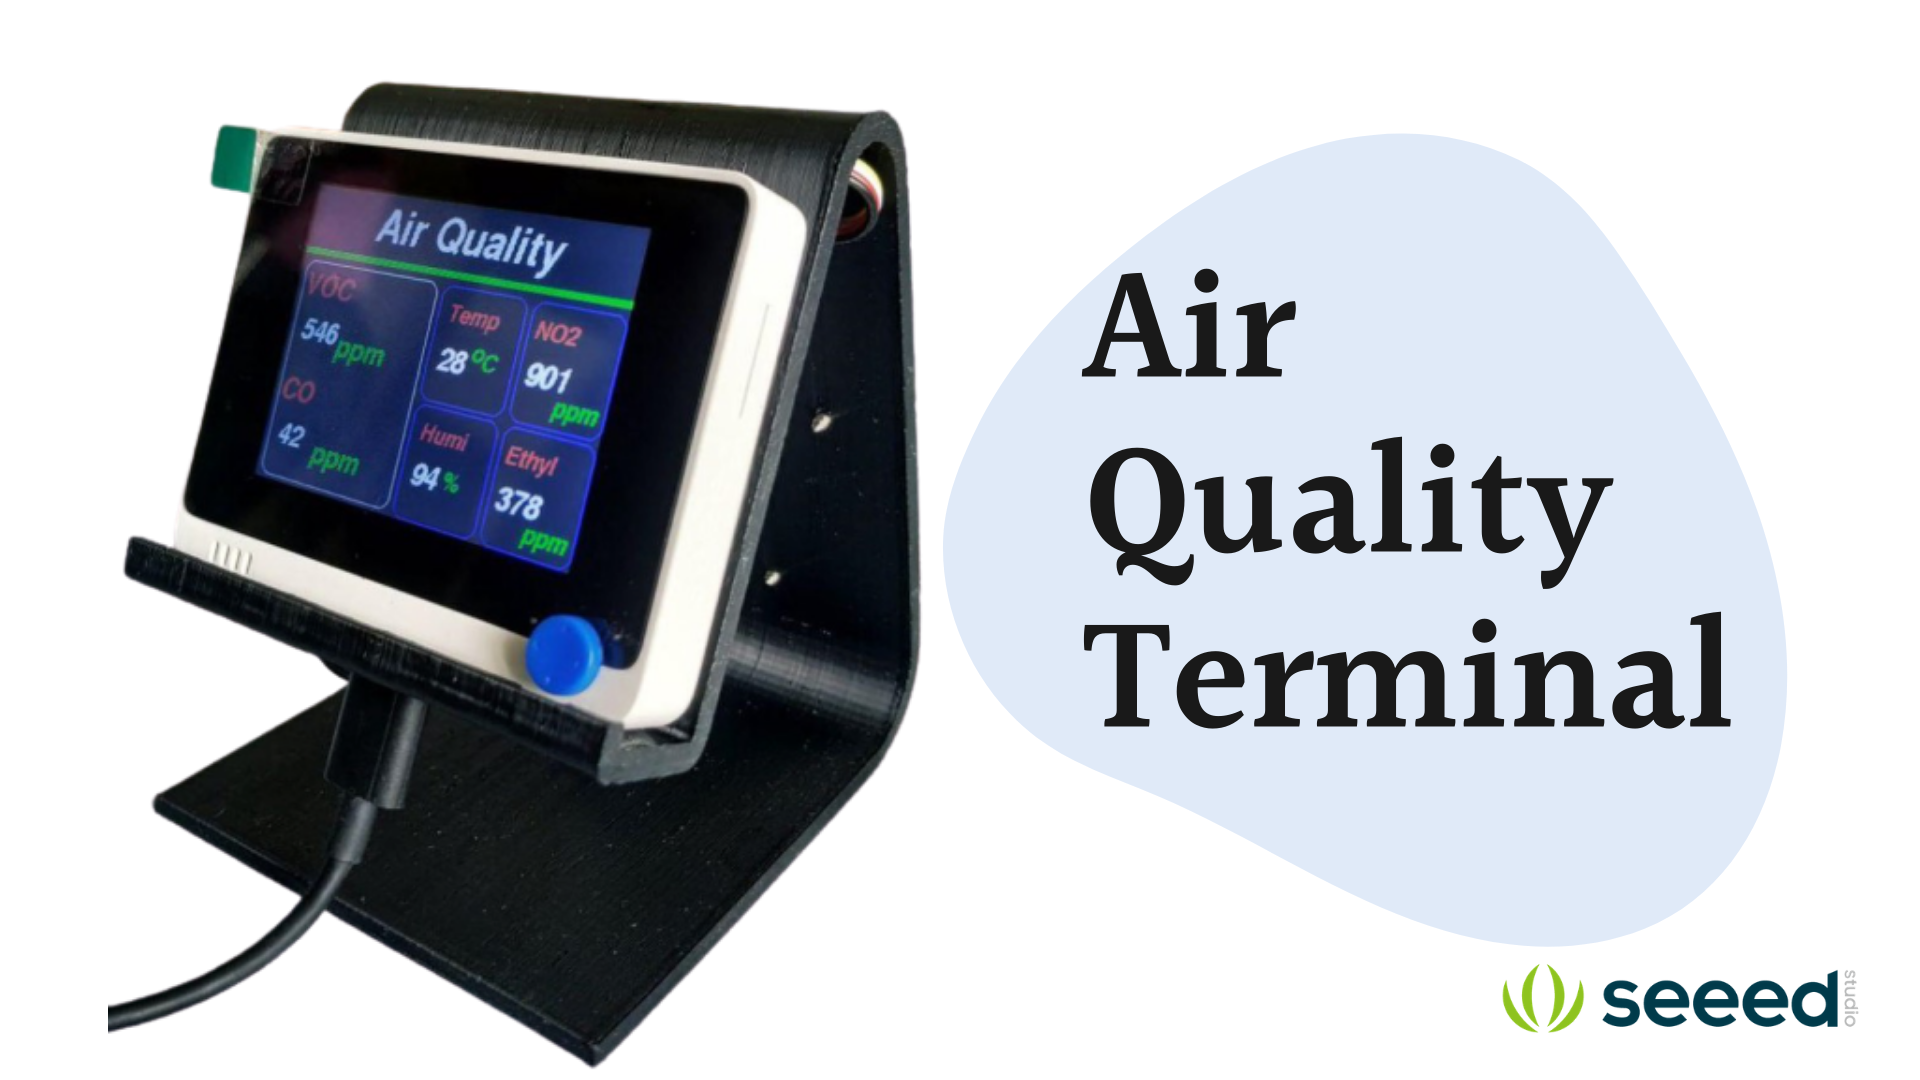
TL;DR: The Air Quality Terminal can be used as an indoor air quality meter to monitorVolatile organic compounds(VOCs),Carbon monoxide(CO), Nitrogen Dioxide(NO2), Ethyl alcohol(C2H5CH), Room Temperature and Humidity which can be used detect gas leaks and make alert..etc.
Introduction
Breathing quality indoor air is critical for good health, Humans spend a significant amount of time indoors—either in the home, office or other types of buildings—where gases, chemicals and other pollutants can cause headaches, eye irritation, allergies and fatigue. Serious pollutants can cause certain types of cancers and other long-term health complications. (Src: https://pureaircontrols.com/why-indoor-air-quality-is-important-to-all-of-us/)
Common indoor air pollutants include:
- Secondhand smoke – A serious indoor air pollutant which can worsen symptoms for asthma sufferers, increase risks of ear infections in children and increase risks for Sudden Infant Death Syndrome.
- Radon – A dangerous gas pollutant identified as the second leading cause of lung cancer, Radon enters homes through cracks and other improperly sealed openings.
- Combustion pollutants – These gases, which include carbon monoxide and nitrogen dioxide, come from burning materials or improperly vented fuel-burning appliances such as space heaters, wood stoves, gas stoves, water heaters, dryers and fireplaces.
When you breathe the harmful pollutants, it may stress your immune system that leads to several health conditions. The effects of poor indoor air quality on each person may differ based on their relative health and age. In general, this poor indoor air quality also leads to many allergy symptoms such as weakened immune systems and respiratory problems, and so on.
Specifically, the children are susceptible to so many health issues of the contaminated indoor air because their lungs are very smaller, and also they have to take many breaths during the entire day. If you suffer from the allergy sign or asthma-related issues will find in your home when you may have the polluted or more dust in your home. Even some other sources of air-related problems may also include such as remaining odours, improper ventilation, and natural changes such as new furnishings, a new pet, recent construction, or water damage.

One of the foremost steps to control the source of air pollution is finding out the cause of pollutants such as something like smoke,mold, or chemical off-gassing, and it also possible to eliminate from your house. However, this is one of the long-lasting and most effective methods of enhancing indoor air quality. Below are some of the best solutions to indoor air pollution that could be suggested by the EPA such as. Src: https://indoorbreathing.com/what-are-the-most-common-indoor-air-quality-complaints/
The Air Quality Terminal can be used as an indoor air quality meter to monitor Volatile organic compounds(VOCs),Carbon monoxide(CO), Nitrogen Dioxide(NO2), Ethyl alcohol(C2H5CH), Room Temperature and Humidity which can be used detect gas leaks and make alert..etc.
Carbon monoxide is a colourless and odourless gas which is not easily detectable by human senses and interferes with oxygen delivery throughout the body. Carbon monoxide causes headaches, dizziness, weakness, and nausea. Toxic amounts can lead to death.
Nitrogen dioxide, which is also a colourless and odourless gas, causes eye, nose and throat irritation, shortness of breath, and an increased risk for respiratory infections.
Volatile organic compounds (VOCs) - VOCs are organic chemicals that have a high vapour pressure at ordinary room temperature. Their high vapour pressure results from a low boiling point, which causes large numbers of molecules to evaporate or sublimate from the liquid or solid form of the compound and enter the surrounding air, a trait known as volatility. For example, formaldehyde, which evaporates from paint and releases from materials like resin, has a boiling point of only –19 °C (–2 °F).
Ethyl Alcohol- Ethanol, also called alcohol, ethyl alcohol and grain alcohol, is a clear, colourless liquid and the principle ingredient in alcoholic beverages like beer, wine or brandy. Because it can readily dissolve in water and other organic compounds, ethanol also is an ingredient in a range of products, from personal care and beauty products to paints and varnishes to fuel.
Here I will show you how to build the Air Quality Terminal step by step 🙂.
Components Required
- Wio Terminal: Wio Terminal based on ATSAMD51-based microcontroller with wireless connectivity supported by Realtek RTL8720DN and is equipped with a 2.4” LCD Screen, onboard IMU(LIS3DHTR), Microphone, Buzzer, microSD card slot, Light sensor, and Infrared Emitter(IR 940nm). Realtek RTL8720DN chip supports both Bluetooth and Wi-Fi providing the backbone for IoT projects.
- Grove - Multichannel Gas Sensor: Grove - Multichannel Gas Sensor V2 provides stable and reliable gases detecting function under the circumstances of any other four sorts of gases. It can detect a variety of gases, besides Carbon monoxide (CO), Nitrogen dioxide (NO2), Ethyl alcohol(C2H5CH), Volatile Organic Compounds (VOC), and etc.
- Grove - Temperature & Humidity Sensor (DHT11): Grove - DHT11 Temperature & Humidity Sensor is a high quality, low-cost digital temperature, and humidity sensor based on the DHT11 module.
- Wio Terminal Stand: You can find the.STL attached to this project, this not mandatory.
Steps Required:
- Connect the Multichannel Sensor to Wio terminal and Read the value and display to the serial monitor
- Draw UI Design
- Convert UI Design to Code
- Display Sensor data on Display with UI Design
- Design Stand/Enclosures
- 3D Print Stand/Enclosures
- Assemble and Attach Sensors
- Done!
Architecture
Seeed Wio Terminal
The Wio Terminal based ATSAMD51-based microcontroller with wireless connectivity supported by Realtek RTL8720DN and is equipped with a 2.4” LCD Screen, onboard IMU(LIS3DHTR), Microphone, Buzzer, microSD card slot, Light sensor, and Infrared Emitter(IR 940nm). Realtek RTL8720DN chip supports both Bluetooth and Wi-Fi providing the backbone for IoT projects.

Key Features
- Powerful MCU: Microchip ATSAMD51P19 with ARM Cortex-M4F core running at 120MHz
- Reliable Wireless Connectivity: Equipped with Realtek RTL8720DN, dual-band 2.4Ghz / 5Ghz Wi-Fi
- Highly Integrated Design: 2.4” LCD Screen, IMU and more practical add-ons housed in a compact enclosure with built-in magnets & mounting holes
- Raspberry Pi 40-pin Compatible GPIO
- Compatible with over 300 plug&play Grove modules to explore with IoT
- USB OTG Support
- Support Arduino, CircuitPython, Micropython, ArduPy(What is ArduPy?), AT Firmware, Visual Studio Code
- TELEC certificated
For more information go to https://www.seeedstudio.com/Wio-Terminal-p-4509.html.
Step 1: Setup Wio Terminal
For Setup, you can follow this wonderful guide provide by SeeedStudio. Get Started with Wio Terminal, anyway I'll go through quickly.Step 1.1: Download and Install the Arduino IDE: We are using Arduino IDE to programme the Wio Terminal, so we need to install it on our computer first. Click here to download Arduino IDEStep 1.2: Install Wio Terminal: Arduino IDE comes with official boards loaded from the Arduinio.cc so In order to program Wio Terminal we need to install the Wio Terminal Board packages and definition on the Arduino IDE.1.2.2: Add Additional Boards Manager URL: For that Open your Arduino IDE, click on File > Preferences, and copy below URL to Additional Boards Manager URLs
https://files.seeedstudio.com/arduino/package_seeeduino_boards_index.json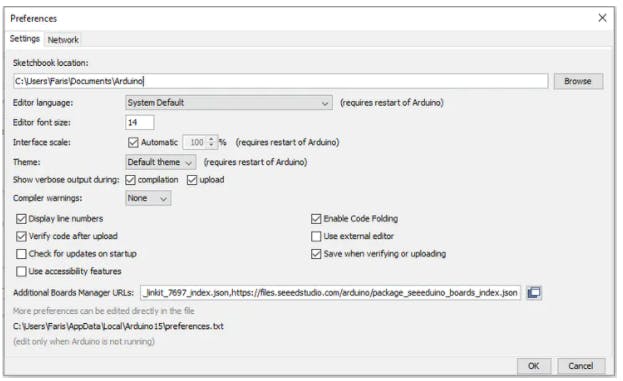
Note: If you have more additional boards manager URL's like me, make it separate with commas.1.2.3: Install Wio Terminal Board Manager: For that Click on Tools > Board > Board Manager and Search Wio Terminal in the Boards Manager.

1.2.4: Select your board and port: For that, you'll need to select the entry in the Tools > Board menu that corresponds to your Arduino. Selecting the Wio Terminal.

Select the serial device of the Wio Terminal board from the Tools -> Port menu. This is likely to be COM3 or higher (COM1 and COM2 are usually reserved for hardware serial ports). To find out, you can disconnect your Wio Terminal board and re-open the menu; the entry that disappears should be the Arduino board. Reconnect the board and select that serial port.
Step 2: Sensor Test and Display it on Serial Monitor
- Grove - Multichannel Gas Sensor: Grove - Multichannel Gas Sensor V2 provides stable and reliable gases detecting function under the circumstances of any other four sorts of gases. It can detect a variety of gases, besides Carbon monoxide (CO), Nitrogen dioxide (NO2), Ethyl alcohol(C2H5CH), Volatile Organic Compounds (VOC), and etc.
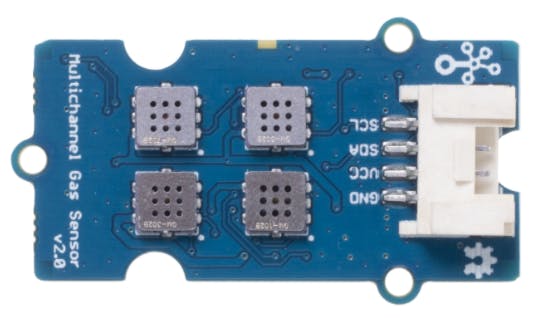
Features
- Four fully independent sensor elements on one package.
- The ability to detect a variety of gases, besides Carbon monoxide (CO), Nitrogen dioxide (NO2), Ethyl alcohol(C2H5CH), Volatile Organic Compounds (VOC) and etc.
- Qualitative detecting, rather than quantitative.
- Compact size for easy deployment.
Step 2.1. Connect Grove - Multichannel Gas Sensor V2 to port I2C of Wio Terminal And connect Wio Terminal to PC via a USB cable.Step 2.2. Download the Grove_Multichannel_Gas_Sensor_v2 Library from Github. And refer How to install library for Arduino.Step 2.3. Copy the code into Wio Terminal and upload. If you do not know how to upload the code, please check how to upload code.
#include <Multichannel_Gas_GMXXX.h>
#include <Wire.h>
GAS_GMXXX<TwoWire> gas;
unsigned int no2, c2h5ch, voc, co;
void setup() {
Serial.begin(115200);
gas.begin(Wire, 0x08);
}
void loop() {
//VOC
voc = gas.getGM502B();
Serial.print("VOC: ");
Serial.print(voc);
Serial.println(" ppm");
//CO
co = gas.getGM702B();
if (co > 999) co = 999;
Serial.print("CO: ");
Serial.print(co);
Serial.println(" ppm");
//NO2
no2 = gas.getGM102B();
if (no2 > 999) no2 = 999;
Serial.print("NO2: ");
Serial.print(no2);
Serial.println(" ppm");
//C2H5CH
c2h5ch = gas.getGM302B();
if (c2h5ch > 999) c2h5ch = 999;
Serial.print("C2H5CH: ");
Serial.print(c2h5ch);
Serial.println(" ppm");
Serial.println("----------------------------------------------------------------");
delay(2000);
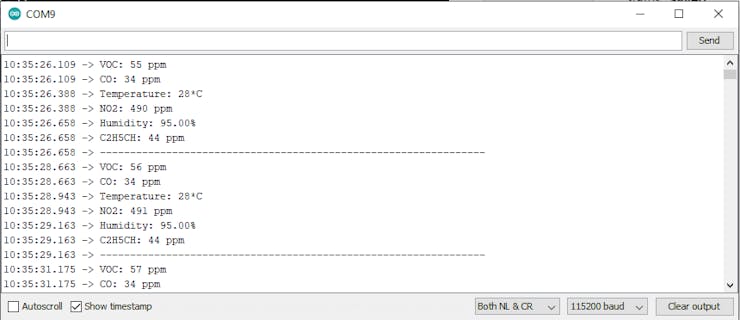
}Step 2.4. After uploading code open the serial monitor

Done, now we interfaced our first sensor and obtained the data.
- Grove - Temperature & Humidity Sensor (DHT11): Grove - DHT11 Temperature & Humidity Sensor is a high quality, low-cost digital temperature, and humidity sensor based on the DHT11 module.
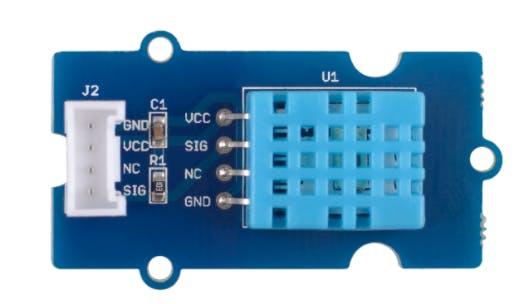
Features
- Relative Humidity and temperature measurement
- Full range temperature compensation Calibrated
- Digital signal
- Long term stability
- Long transmission distance(>20m)
- Low power consumption
Step 1. Download the Seeed DHT library from Github.Step 2. Connect DHT11 sensor to Wio TerminalStep 3. Refer How to install library for Arduino.Step 4. Copy the code into Wio Terminal and upload. If you do not know how to upload the code, please check how to upload code.
#include "DHT.h"

#define DHTPIN 0
#define DHTTYPE DHT11
DHT dht(DHTPIN, DHTTYPE);

void setup() {
  Serial.begin(115200);
  dht.begin();
}
void loop() {

  //Temp
  float t = dht.readTemperature();
  int tem = t;
  Serial.print("Temperature: ");
  Serial.print(tem);
  Serial.println( "*C");

  //Humidity
  float h = dht.readHumidity();
  if (h > 99) h = 99;
  Serial.print("Humidity: ");
  Serial.print(h);
  Serial.println( "%");

  Serial.println("----------------------------------------------------------------");
  delay(2000);
}
Step 5. After uploading code open the serial monitor

- Combine both Multichannel Gas Sensor V2 and Grove - DHT11 Temperature & Humidity Sensor
Step 1. Connect both Multichannel Gas sensor and DHT11 sensor to Wio TerminalStep 2. Copy the code into Wio Terminal and upload.
#include <TFT_eSPI.h>
#include <Multichannel_Gas_GMXXX.h>
#include <Wire.h>
#include "DHT.h"

GAS_GMXXX<TwoWire> gas;

unsigned int no2, c2h5ch, voc, co;

#define DHTPIN 0
#define DHTTYPE DHT11
DHT dht(DHTPIN, DHTTYPE);

void setup() {
  Serial.begin(115200);
  gas.begin(Wire, 0x08);
  dht.begin();
}
void loop() {


  // VOC
  voc = gas.getGM502B();
  if (voc > 999) voc = 999;
  Serial.print("VOC: ");
  Serial.print(voc);
  Serial.println(" ppm");


  //CO
  co = gas.getGM702B();
  if (co > 999) co = 999;
  Serial.print("CO: ");
  Serial.print(co);
  Serial.println(" ppm");


  //Temp
  float t = dht.readTemperature();
  //int tem = round(t);
  int tem = t;
  Serial.print("Temperature: ");
  Serial.print(tem);
  Serial.println( "*C");


  //NO2
  no2 = gas.getGM102B();
  if (no2 > 999) no2 = 999;
  Serial.print("NO2: ");
  Serial.print(no2);
  Serial.println(" ppm");


  //Humidity
  float h = dht.readHumidity();
  if (h > 99) h = 99;
  Serial.print("Humidity: ");
  Serial.print(h);
  Serial.println( "%");


  //C2H5CH
  c2h5ch = gas.getGM302B();
  if (c2h5ch > 999) c2h5ch = 999;
  Serial.print("C2H5CH: ");
  Serial.print(c2h5ch);
  Serial.println(" ppm");

  Serial.println("----------------------------------------------------------------");
  delay(2000);
}
Step 3. After uploading code open the serial monitor
Step 3: Design a User Interface.
I Designed simple UI with Draw.io, it's an awesome online tool to create diagrams very quickly. 🤗
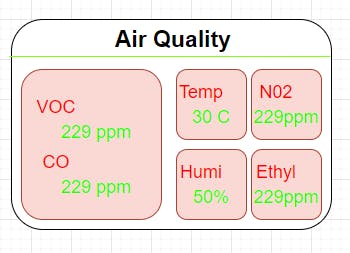
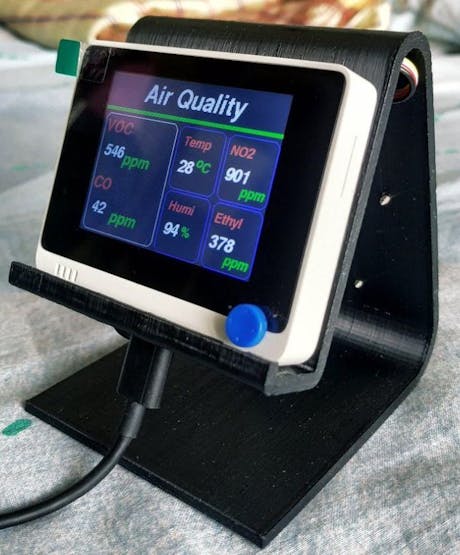
The RED colours are the sensor value names, The GREEN colours are the sensorvalues.
Step 3: Convert Design to Code.
There is a video tutorial show from Wio Terminal Classroom! and Lakshantha will explain how to use the LCD: Wio Terminal Classroom #2 | Drawing Shapes on LCD.By default, the TFT LCD Library is included inside the Wio Terminal Board Library. Hence, there is no need to download the TFT LCD library again.First, we can start with the heading. Air Quality
#include <TFT_eSPI.h>
#include <Multichannel_Gas_GMXXX.h>
#include <Wire.h>
#include "DHT.h"

GAS_GMXXX<TwoWire> gas;

TFT_eSPI tft;
TFT_eSprite spr = TFT_eSprite(&tft);  //sprite

unsigned int no2, c2h5ch, voc, co;

#define DHTPIN 0
#define DHTTYPE DHT11
DHT dht(DHTPIN, DHTTYPE);

void setup() {
  Serial.begin(115200);
  tft.begin();
  tft.setRotation(3);
  gas.begin(Wire, 0x08);
  dht.begin();
  //Head
  tft.fillScreen(TFT_BLACK);
  tft.setFreeFont(&FreeSansBoldOblique18pt7b);
  tft.setTextColor(TFT_WHITE);
  tft.drawString("Air Quality", 70, 10 , 1);
}
void loop() { }
Code review
tft.setFreeFont(&FreeSansBoldOblique24pt7b);FF# where # is a number determined by looking at the list in the Free_Fonts.hTo draw Strings on the LCD screen:
drawString(const String& string, int32_t poX, int32_t poY);where string is the text string, and (poX, poY) is the starting coordinates.Here, we set the cursor on the 70 and 10 and drawstring "Air Quality" as white colour.
//Head
tft.fillScreen(TFT_BLACK);
tft.setFreeFont(&FreeSansBoldOblique18pt7b);
tft.setTextColor(TFT_WHITE);
tft.drawString("Air Quality", 70, 10 , 1);
To draw a line between two points on the LCD screen:
drawLine(int32_t x0, int32_t y0, int32_t x1, int32_t y1, uint32_t color);where the line starts drawing from (x0, y0) to (x1, y1) and colour.Here, we draw a line horizontally with green colour.
//Line
for (int8_t line_index = 0; line_index < 5 ; line_index++)
{
tft.drawLine(0, 50 + line_index, tft.width(), 50 + line_index, TFT_GREEN);
}
Display output:

Next, we are daring rectangles for sensor values To draw or fill a rounded rectangle on the LCD screen for
drawRoundRect(int32_t x, int32_t y, int32_t w, int32_t h, int32_t r, uint32_t color);where (x, y) is the starting coordinate, w and h for width and height of rectangles, r for the corner radius and colour. So.
#include <TFT_eSPI.h>
#include <Multichannel_Gas_GMXXX.h>
#include <Wire.h>
#include "DHT.h"


GAS_GMXXX<TwoWire> gas;

TFT_eSPI tft;
TFT_eSprite spr = TFT_eSprite(&tft);  //sprite

unsigned int no2, c2h5ch, voc, co;

#define DHTPIN 0
#define DHTTYPE DHT11

DHT dht(DHTPIN, DHTTYPE);


void setup() {
  Serial.begin(115200);
  tft.begin();
  tft.setRotation(3);

  gas.begin(Wire, 0x08);

  dht.begin();


  //Head
  tft.fillScreen(TFT_BLACK);
  tft.setFreeFont(&FreeSansBoldOblique18pt7b);
  tft.setTextColor(TFT_WHITE);
  tft.drawString("Air Quality", 70, 10 , 1);

  //Line
  for (int8_t line_index = 0; line_index < 5 ; line_index++)
  {
    tft.drawLine(0, 50 + line_index, tft.width(), 50 + line_index, TFT_GREEN);
  }


  //VCO & CO Rect
  tft.drawRoundRect(5, 60, (tft.width() / 2) - 20 , tft.height() - 65 , 10, TFT_WHITE); // L1

  // Temp rect
  tft.drawRoundRect((tft.width() / 2) - 10  , 60, (tft.width() / 2) / 2 , (tft.height() - 65) / 2 , 10, TFT_BLUE); // s1

  //No2 rect
  tft.drawRoundRect(((tft.width() / 2) + (tft.width() / 2) / 2) - 5  , 60, (tft.width() / 2) / 2 , (tft.height() - 65) / 2 , 10, TFT_BLUE); // s2

  //Humi Rect
  tft.drawRoundRect((tft.width() / 2) - 10 , (tft.height() / 2) + 30, (tft.width() / 2) / 2 , (tft.height() - 65) / 2 , 10, TFT_BLUE); // s3

  //c2h5ch Rect
  tft.drawRoundRect(((tft.width() / 2) + (tft.width() / 2) / 2) - 5  , (tft.height() / 2) + 30, (tft.width() / 2) / 2 , (tft.height() - 65) / 2 , 10, TFT_BLUE); // s4

}

void loop() {

}
Here, we drawing rectangles for the sensor values
//VCO & CO Rect
  tft.drawRoundRect(5, 60, (tft.width() / 2) - 20 , tft.height() - 65 , 10, TFT_WHITE); // L1

  // Temp rect
  tft.drawRoundRect((tft.width() / 2) - 10  , 60, (tft.width() / 2) / 2 , (tft.height() - 65) / 2 , 10, TFT_BLUE); // s1

  //No2 rect
  tft.drawRoundRect(((tft.width() / 2) + (tft.width() / 2) / 2) - 5  , 60, (tft.width() / 2) / 2 , (tft.height() - 65) / 2 , 10, TFT_BLUE); // s2

  //Humi Rect
  tft.drawRoundRect((tft.width() / 2) - 10 , (tft.height() / 2) + 30, (tft.width() / 2) / 2 , (tft.height() - 65) / 2 , 10, TFT_BLUE); // s3

  //c2h5ch Rect
  tft.drawRoundRect(((tft.width() / 2) + (tft.width() / 2) / 2) - 5  , (tft.height() / 2) + 30, (tft.width() / 2) / 2 , (tft.height() - 65) / 2 , 10, TFT_BLUE); // s4
Display output:

next, we need to add theappropriate sensor label name for that,
#include <TFT_eSPI.h>
#include <Multichannel_Gas_GMXXX.h>
#include <Wire.h>
#include "DHT.h"


GAS_GMXXX<TwoWire> gas;

TFT_eSPI tft;
TFT_eSprite spr = TFT_eSprite(&tft);  //sprite

unsigned int no2, c2h5ch, voc, co;

#define DHTPIN 0
#define DHTTYPE DHT11

DHT dht(DHTPIN, DHTTYPE);


void setup() {
  Serial.begin(115200);
  tft.begin();
  tft.setRotation(3);

  gas.begin(Wire, 0x08);

  dht.begin();


  //Head
  tft.fillScreen(TFT_BLACK);
  tft.setFreeFont(&FreeSansBoldOblique18pt7b);
  tft.setTextColor(TFT_WHITE);
  tft.drawString("Air Quality", 70, 10 , 1);

  //Line
  for (int8_t line_index = 0; line_index < 5 ; line_index++)
  {
    tft.drawLine(0, 50 + line_index, tft.width(), 50 + line_index, TFT_GREEN);
  }


  //VCO & CO Rect
  tft.drawRoundRect(5, 60, (tft.width() / 2) - 20 , tft.height() - 65 , 10, TFT_WHITE); // L1

  //VCO Text
  tft.setFreeFont(&FreeSansBoldOblique12pt7b);
  tft.setTextColor(TFT_RED);
  tft.drawString("VOC", 7 , 65 , 1);
  tft.setTextColor(TFT_GREEN);
  tft.drawString("ppm", 55, 108, 1);

  //CO Text
  tft.setFreeFont(&FreeSansBoldOblique12pt7b);
  tft.setTextColor(TFT_RED);
  tft.drawString("CO", 7 , 150 , 1);
  tft.setTextColor(TFT_GREEN);
  tft.drawString("ppm", 55, 193, 1);


  // Temp rect
  tft.drawRoundRect((tft.width() / 2) - 10  , 60, (tft.width() / 2) / 2 , (tft.height() - 65) / 2 , 10, TFT_BLUE); // s1

  tft.setFreeFont(&FreeSansBoldOblique9pt7b);
  tft.setTextColor(TFT_RED) ;
  tft.drawString("Temp", (tft.width() / 2) - 1  , 70 , 1); // Print the test text in the custom font
  tft.setTextColor(TFT_GREEN);
  tft.drawString("o", (tft.width() / 2) + 30, 95, 1);
  tft.drawString("C", (tft.width() / 2) + 40, 100, 1);


  //No2 rect
  tft.drawRoundRect(((tft.width() / 2) + (tft.width() / 2) / 2) - 5  , 60, (tft.width() / 2) / 2 , (tft.height() - 65) / 2 , 10, TFT_BLUE); // s2

  tft.setFreeFont(&FreeSansBoldOblique9pt7b);
  tft.setTextColor(TFT_RED);
  tft.drawString("NO2", ((tft.width() / 2) + (tft.width() / 2) / 2)   , 70 , 1); // Print the test text in the custom font
  tft.setTextColor(TFT_GREEN);
  tft.drawString("ppm", ((tft.width() / 2) + (tft.width() / 2) / 2) + 30 , 120, 1);

  //Humi Rect
  tft.drawRoundRect((tft.width() / 2) - 10 , (tft.height() / 2) + 30, (tft.width() / 2) / 2 , (tft.height() - 65) / 2 , 10, TFT_BLUE); // s3

  tft.setFreeFont(&FreeSansBoldOblique9pt7b);
  tft.setTextColor(TFT_RED) ;
  tft.drawString("Humi", (tft.width() / 2) - 1 , (tft.height() / 2) + 40 , 1); // Print the test text in the custom font
  tft.setTextColor(TFT_GREEN);
  tft.drawString("%", (tft.width() / 2) + 30, (tft.height() / 2) + 70, 1);


  //c2h5ch Rect
  tft.drawRoundRect(((tft.width() / 2) + (tft.width() / 2) / 2) - 5  , (tft.height() / 2) + 30, (tft.width() / 2) / 2 , (tft.height() - 65) / 2 , 10, TFT_BLUE); // s4


  tft.setFreeFont(&FreeSansBoldOblique9pt7b);
  tft.setTextColor(TFT_RED) ;
  tft.drawString("Ethyl", ((tft.width() / 2) + (tft.width() / 2) / 2)   , (tft.height() / 2) + 40 , 1); // Print the test text in the custom font
  tft.setTextColor(TFT_GREEN);
  tft.drawString("ppm", ((tft.width() / 2) + (tft.width() / 2) / 2) + 30 , (tft.height() / 2) + 90, 1);

}

void loop() {

}
Here, we using the drawString function to add the sensor label name.display VOC and ppm label text
//VCO Text
  tft.setFreeFont(&FreeSansBoldOblique12pt7b);
  tft.setTextColor(TFT_RED);
  tft.drawString("VOC", 7 , 65 , 1);
  tft.setTextColor(TFT_GREEN);
  tft.drawString("ppm", 55, 108, 1);
display CO and ppm label text
//CO Text
  tft.setFreeFont(&FreeSansBoldOblique12pt7b);
  tft.setTextColor(TFT_RED);
  tft.drawString("CO", 7 , 150 , 1);
  tft.setTextColor(TFT_GREEN);
  tft.drawString("ppm", 55, 193, 1);
display Temperature and oc label text
//Temp
tft.setFreeFont(&FreeSansBoldOblique9pt7b);
  tft.setTextColor(TFT_RED) ;
  tft.drawString("Temp", (tft.width() / 2) - 1  , 70 , 1);
  tft.setTextColor(TFT_GREEN);
  tft.drawString("o", (tft.width() / 2) + 30, 95, 1);
  tft.drawString("C", (tft.width() / 2) + 40, 100, 1);
display NO2 and ppm label name
//NO2
tft.setFreeFont(&FreeSansBoldOblique9pt7b);
  tft.setTextColor(TFT_RED);
  tft.drawString("NO2", ((tft.width() / 2) + (tft.width() / 2) / 2)   , 70 , 1);
  tft.setTextColor(TFT_GREEN);
  tft.drawString("ppm", ((tft.width() / 2) + (tft.width() / 2) / 2) + 30 , 120, 1);
display Humidity and % label name
//Humi
tft.setFreeFont(&FreeSansBoldOblique9pt7b);
  tft.setTextColor(TFT_RED) ;
  tft.drawString("Humi", (tft.width() / 2) - 1 , (tft.height() / 2) + 40 , 1);
  tft.setTextColor(TFT_GREEN);
  tft.drawString("%", (tft.width() / 2) + 30, (tft.height() / 2) + 70, 1);
display Ethyl and ppm label name
//Ethyl
tft.setFreeFont(&FreeSansBoldOblique9pt7b);
  tft.setTextColor(TFT_RED) ;
  tft.drawString("Ethyl", ((tft.width() / 2) + (tft.width() / 2) / 2)   , (tft.height() / 2) + 40 , 1);
  tft.setTextColor(TFT_GREEN);
  tft.drawString("ppm", ((tft.width() / 2) + (tft.width() / 2) / 2) + 30 , (tft.height() / 2) + 90, 1);
Display output
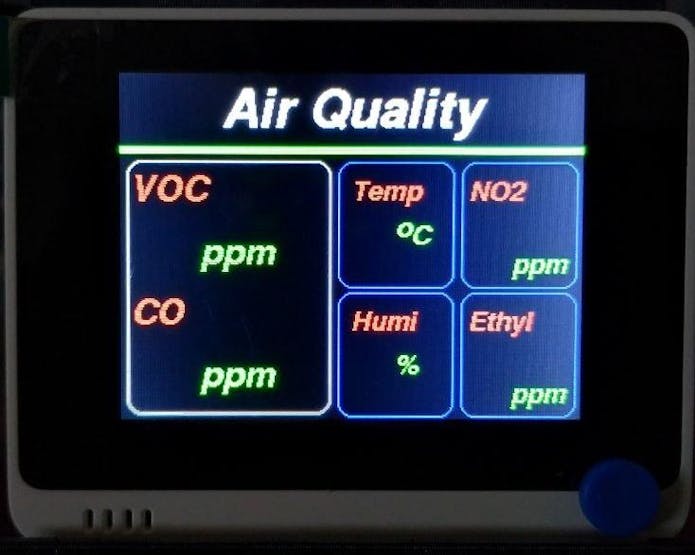
Now we converted our design into code. 🥳
Step 4: Display sensor readings
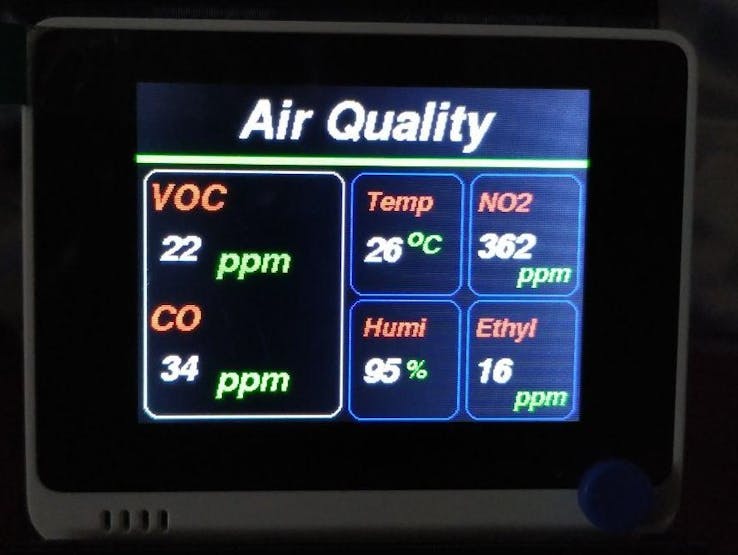
Next, we can display the sensor readings within the UI we developed. The Final Code
#include <TFT_eSPI.h>
#include <Multichannel_Gas_GMXXX.h>
#include <Wire.h>
#include "DHT.h"

GAS_GMXXX<TwoWire> gas;

TFT_eSPI tft;
TFT_eSprite spr = TFT_eSprite(&tft);  //sprite

unsigned int no2, c2h5ch, voc, co;


#define DHTPIN 0
#define DHTTYPE DHT11

DHT dht(DHTPIN, DHTTYPE);


void setup() {
  Serial.begin(115200);
  tft.begin();
  tft.setRotation(3);

  gas.begin(Wire, 0x08);

  dht.begin();


  //Head
  tft.fillScreen(TFT_BLACK);
  tft.setFreeFont(&FreeSansBoldOblique18pt7b);
  tft.setTextColor(TFT_WHITE);
  tft.drawString("Air Quality", 70, 10 , 1);

  //Line
  for (int8_t line_index = 0; line_index < 5 ; line_index++)
  {
    tft.drawLine(0, 50 + line_index, tft.width(), 50 + line_index, TFT_GREEN);
  }


  //VCO & CO Rect
  tft.drawRoundRect(5, 60, (tft.width() / 2) - 20 , tft.height() - 65 , 10, TFT_WHITE); // L1

  //VCO Text
  tft.setFreeFont(&FreeSansBoldOblique12pt7b);
  tft.setTextColor(TFT_RED);
  tft.drawString("VOC", 7 , 65 , 1);
  tft.setTextColor(TFT_GREEN);
  tft.drawString("ppm", 55, 108, 1);

  //CO Text
  tft.setFreeFont(&FreeSansBoldOblique12pt7b);
  tft.setTextColor(TFT_RED);
  tft.drawString("CO", 7 , 150 , 1);
  tft.setTextColor(TFT_GREEN);
  tft.drawString("ppm", 55, 193, 1);


  // Temp rect
  tft.drawRoundRect((tft.width() / 2) - 10  , 60, (tft.width() / 2) / 2 , (tft.height() - 65) / 2 , 10, TFT_BLUE); // s1

  tft.setFreeFont(&FreeSansBoldOblique9pt7b);
  tft.setTextColor(TFT_RED) ;
  tft.drawString("Temp", (tft.width() / 2) - 1  , 70 , 1); // Print the test text in the custom font
  tft.setTextColor(TFT_GREEN);
  tft.drawString("o", (tft.width() / 2) + 30, 95, 1);
  tft.drawString("C", (tft.width() / 2) + 40, 100, 1);


  //No2 rect
  tft.drawRoundRect(((tft.width() / 2) + (tft.width() / 2) / 2) - 5  , 60, (tft.width() / 2) / 2 , (tft.height() - 65) / 2 , 10, TFT_BLUE); // s2

  tft.setFreeFont(&FreeSansBoldOblique9pt7b);
  tft.setTextColor(TFT_RED);
  tft.drawString("NO2", ((tft.width() / 2) + (tft.width() / 2) / 2)   , 70 , 1); // Print the test text in the custom font
  tft.setTextColor(TFT_GREEN);
  tft.drawString("ppm", ((tft.width() / 2) + (tft.width() / 2) / 2) + 30 , 120, 1);

  //Humi Rect
  tft.drawRoundRect((tft.width() / 2) - 10 , (tft.height() / 2) + 30, (tft.width() / 2) / 2 , (tft.height() - 65) / 2 , 10, TFT_BLUE); // s3

  tft.setFreeFont(&FreeSansBoldOblique9pt7b);
  tft.setTextColor(TFT_RED) ;
  tft.drawString("Humi", (tft.width() / 2) - 1 , (tft.height() / 2) + 40 , 1); // Print the test text in the custom font
  tft.setTextColor(TFT_GREEN);
  tft.drawString("%", (tft.width() / 2) + 30, (tft.height() / 2) + 70, 1);


  //c2h5ch Rect
  tft.drawRoundRect(((tft.width() / 2) + (tft.width() / 2) / 2) - 5  , (tft.height() / 2) + 30, (tft.width() / 2) / 2 , (tft.height() - 65) / 2 , 10, TFT_BLUE); // s4


  tft.setFreeFont(&FreeSansBoldOblique9pt7b);
  tft.setTextColor(TFT_RED) ;
  tft.drawString("Ethyl", ((tft.width() / 2) + (tft.width() / 2) / 2)   , (tft.height() / 2) + 40 , 1); // Print the test text in the custom font
  tft.setTextColor(TFT_GREEN);
  tft.drawString("ppm", ((tft.width() / 2) + (tft.width() / 2) / 2) + 30 , (tft.height() / 2) + 90, 1);


}

void loop() {

  // VOC

  voc = gas.getGM502B();
  if (voc > 999) voc = 999;
  Serial.print("VOC: ");
  Serial.print(voc);
  Serial.println(" ppm");

  spr.createSprite(40, 30);
  spr.fillSprite(TFT_BLACK);
  spr.setFreeFont(&FreeSansBoldOblique12pt7b);
  spr.setTextColor(TFT_WHITE);
  spr.drawNumber(voc, 0, 0, 1);
  spr.pushSprite(15, 100);
  spr.deleteSprite();

  //CO

  co = gas.getGM702B();
  if (co > 999) co = 999;
  Serial.print("CO: ");
  Serial.print(co);
  Serial.println(" ppm");

  spr.createSprite(40, 30);
  spr.setFreeFont(&FreeSansBoldOblique12pt7b);
  spr.setTextColor(TFT_WHITE);
  spr.drawNumber(co, 0, 0, 1);
  spr.setTextColor(TFT_GREEN);
  spr.pushSprite(15, 185);
  spr.deleteSprite();

  //Temp

  float t = dht.readTemperature();
  //int tem = round(t);
  int tem = t;
  Serial.print("Temperature: ");
  Serial.print(tem);
  Serial.println( "*C");

  spr.createSprite(30, 30);
  spr.setFreeFont(&FreeSansBoldOblique12pt7b);
  spr.setTextColor(TFT_WHITE);
  spr.drawNumber(t, 0, 0, 1);
  spr.setTextColor(TFT_GREEN);
  spr.pushSprite((tft.width() / 2) - 1, 100);
  spr.deleteSprite();

  //NO2
  no2 = gas.getGM102B();
  if (no2 > 999) no2 = 999;
  Serial.print("NO2: ");
  Serial.print(no2);
  Serial.println(" ppm");

  spr.createSprite(45, 30);
  spr.setFreeFont(&FreeSansBoldOblique12pt7b);
  spr.setTextColor(TFT_WHITE);
  spr.drawNumber(no2, 0, 0, 1);
  spr.pushSprite(((tft.width() / 2) + (tft.width() / 2) / 2), 97);
  spr.deleteSprite();


  //Humidity
  float h = dht.readHumidity();
  if (h > 99) h = 99;
  Serial.print("Humidity: ");
  Serial.print(h);
  Serial.println( "%");

  spr.createSprite(30, 30);
  spr.setFreeFont(&FreeSansBoldOblique12pt7b);
  spr.setTextColor(TFT_WHITE);
  spr.drawNumber(h, 0, 0, 1);
  spr.pushSprite((tft.width() / 2) - 1, (tft.height() / 2) + 67);
  spr.deleteSprite();

  //C2H5CH
  c2h5ch = gas.getGM302B();
  if (c2h5ch > 999) c2h5ch = 999;
  Serial.print("C2H5CH: ");
  Serial.print(c2h5ch);
  Serial.println(" ppm");

  spr.createSprite(45, 30);
  spr.setFreeFont(&FreeSansBoldOblique12pt7b);
  spr.setTextColor(TFT_WHITE);
  spr.drawNumber(c2h5ch, 0 , 0, 1);
  spr.pushSprite(((tft.width() / 2) + (tft.width() / 2) / 2), (tft.height() / 2) + 67);
  spr.deleteSprite();


  delay(2000);
}
Here. we are reading the sensor values and displaying it with 2-sec delay.code reviewReading and displaying the VOC value
// VOC

  voc = gas.getGM502B();
  if (voc > 999) voc = 999;
  Serial.print("VOC: ");
  Serial.print(voc);
  Serial.println(" ppm");

  spr.createSprite(40, 30);
  spr.fillSprite(TFT_BLACK);
  spr.setFreeFont(&FreeSansBoldOblique12pt7b);
  spr.setTextColor(TFT_WHITE);
  spr.drawNumber(voc, 0, 0, 1);
  spr.pushSprite(15, 100);
  spr.deleteSprite();
Reading and displaying the CO value
//CO

  co = gas.getGM702B();
  if (co > 999) co = 999;
  Serial.print("CO: ");
  Serial.print(co);
  Serial.println(" ppm");

  spr.createSprite(40, 30);
  spr.setFreeFont(&FreeSansBoldOblique12pt7b);
  spr.setTextColor(TFT_WHITE);
  spr.drawNumber(co, 0, 0, 1);
  spr.setTextColor(TFT_GREEN);
  spr.pushSprite(15, 185);
  spr.deleteSprite();
Reading and displaying the Temperature value
//Temp

  float t = dht.readTemperature();
  //int tem = round(t);
  int tem = t;
  Serial.print("Temperature: ");
  Serial.print(tem);
  Serial.println( "*C");

  spr.createSprite(30, 30);
  spr.setFreeFont(&FreeSansBoldOblique12pt7b);
  spr.setTextColor(TFT_WHITE);
  spr.drawNumber(t, 0, 0, 1);
  spr.setTextColor(TFT_GREEN);
  spr.pushSprite((tft.width() / 2) - 1, 100);
  spr.deleteSprite();
Reading and displaying the NO2 value
//NO2
  no2 = gas.getGM102B();
  if (no2 > 999) no2 = 999;
  Serial.print("NO2: ");
  Serial.print(no2);
  Serial.println(" ppm");

  spr.createSprite(45, 30);
  spr.setFreeFont(&FreeSansBoldOblique12pt7b);
  spr.setTextColor(TFT_WHITE);
  spr.drawNumber(no2, 0, 0, 1);
  spr.pushSprite(((tft.width() / 2) + (tft.width() / 2) / 2), 97);
  spr.deleteSprite();
Reading and displaying the Humidity value
//Humidity
  float h = dht.readHumidity();
  if (h > 99) h = 99;
  Serial.print("Humidity: ");
  Serial.print(h);
  Serial.println( "%");

  spr.createSprite(30, 30);
  spr.setFreeFont(&FreeSansBoldOblique12pt7b);
  spr.setTextColor(TFT_WHITE);
  spr.drawNumber(h, 0, 0, 1);
  spr.pushSprite((tft.width() / 2) - 1, (tft.height() / 2) + 67);
  spr.deleteSprite();
Reading and displaying the C2H5CH value
//C2H5CH
  c2h5ch = gas.getGM302B();
  if (c2h5ch > 999) c2h5ch = 999;
  Serial.print("C2H5CH: ");
  Serial.print(c2h5ch);
  Serial.println(" ppm");

  spr.createSprite(45, 30);
  spr.setFreeFont(&FreeSansBoldOblique12pt7b);
  spr.setTextColor(TFT_WHITE);
  spr.drawNumber(c2h5ch, 0 , 0, 1);
  spr.pushSprite(((tft.width() / 2) + (tft.width() / 2) / 2), (tft.height() / 2) + 67);
  spr.deleteSprite();
Output Display
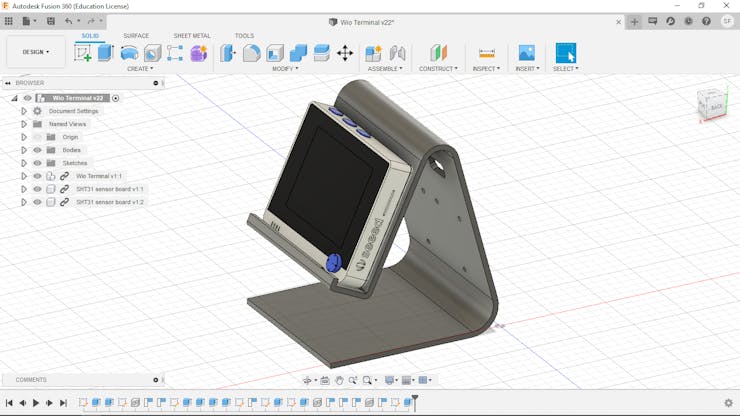
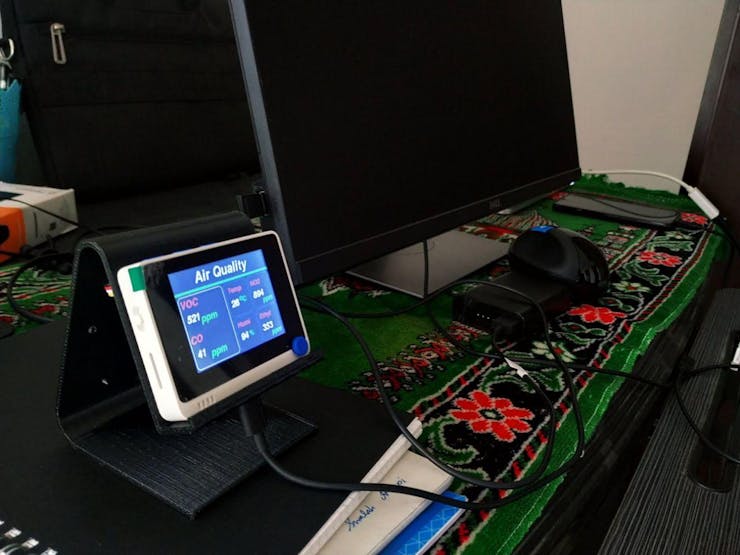
Step 5: Design Enclourse/Stand
I used Autodesk Fusion360 to design the stand.
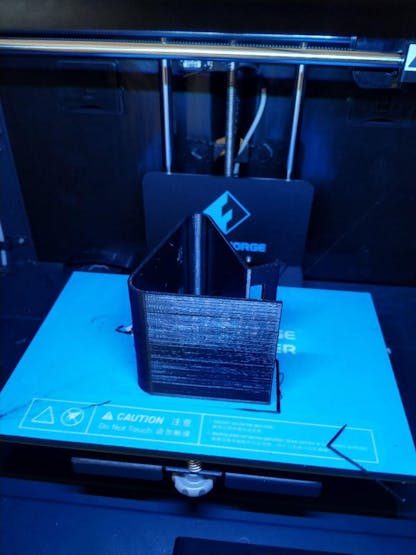
Step 5: 3D Print Enclourse/Stand
I used black ABS filament to print the stand.
Step 6: Assembling

The final part is, assembling
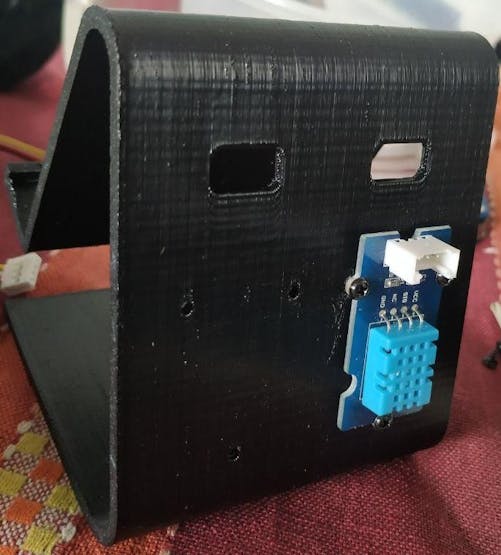
. First I connected DHT11 and screwed.

_yGJTb0UMWO.jpg?auto=compress%2Cformat&w=740&h=555&fit=max)
Step 7: Hero Shot!
Future PlanAir Quality Terminal Project is not completed yet I was planning to push the data to cloud and do some analytics base on the value. 😎. Please share your valuable comment and feedback!