
Play chrome's dino game physically 🦕.
TL;DR: In this project, we are going to play the chrome dino game physically with the help of machine learning and embedded electronics.
Introduction
Due to the 2nd wave of a global pandemic, I was kept inside my house without doing much physical activity, Last month I got an Intestinal gas related issue and consulted a doctor, and he mentioned doing small physical activities will help avoid these kinds of problems, I tried to use a mobile application that helped to do physical activities without equipment, I also invited my little nephews to do exercise with me, but they are not interested. Then I thought of doing something fun and burn the calory, that's how the project born.
This project both fun and help us to burn some calory to make us healthy during the pandemic. 🤗
How It's played?
1. Connect Wio Terminal to Computer
2. Open Dino chrome://dino/
3. Connect Wio Terminal
l4. Jump 🙌
How It's working
The Seeed Studio Wio Terminal is attached to the user body/Placed in the pockets, and it runs EdgeImpluse based tinML model for inferencing, When the User Jump, The Wio Terminal read data from the inbuilt accelerometer and run the edge Impluse based Inferencing inside the Wio terminal and decide the user activity, here it's idle or jump. If it's a Jump activity the wio terminal will simulate keystrokes send to the computer via HID Interface.

How to build one?
Thanks to Tiny Machine learning platform Edge Impulse studio and Wio terminal for making the project easier. The project is a combination of machine learning and embedded electronics, and I will explain step by step to make this project your own.
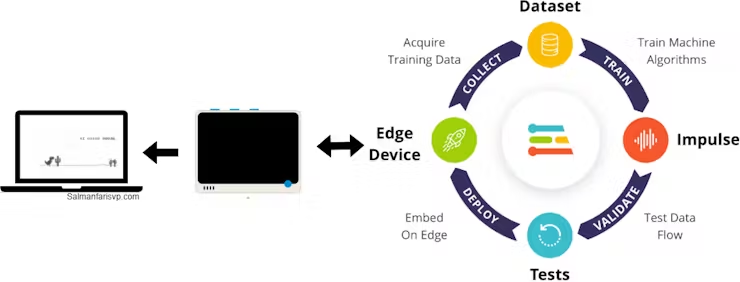
First, we need to collect the data, Then we need to train the data set with a specific ML algorithm, after that, we will create an Impulse, Then with the Impulse, we will extract features and create an inferencing model and finally, we load inferencing model to Wio Terminal and inference raw signal and classify.
Don't worry if you can't catch up with all of them, I'll explain each setup one by one.
Step 1: Data Collection 📚
Since it's a machine learning project, the first setup is to collect sufficient data and create a dataset, In this particular scenario, We need accelerometer data from the Wio terminal. Data collection was a bit tedious job, but since we have EdgeImpluse it easy.
Step 1.1: Create EdgeImpluse account
First, we need to create an edge impulse account. for that go to https://studio.edgeimpulse.com/login select Sign Up, or if you already have an account enter Username/Email and password.

Step 1.2: Create Edge
Impulse ProjectAfter creating an account, we need to create an edgeImpulse project. For that click your profile and select Create a new project or use this URL

Then provide a project name, then click Create new project

Next, you can see the studio page, which means you successfully created an edge Impulse project 🎉

Step 1.2: Connect Wio TerminalHere
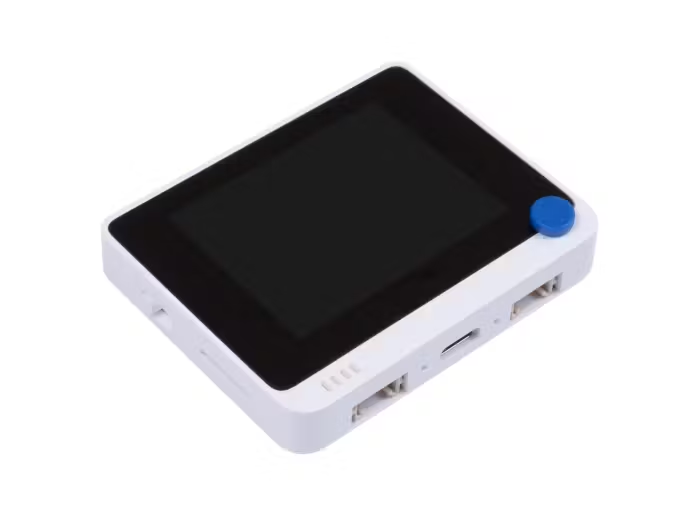
we are using SeeedStudio Wio Terminal as our edge device to collect dataset and inference machine learning model.
The Seeed Wio Terminal is a development board from Seeed Studios with a Cortex-M4 microcontroller, motion sensors, an LCD display, and Grove connectors to easily connect external sensors. Seeed Studio has added support for this development board to Edge Impulse, so you can sample raw data and build machine learning models from the studio. The board is available for 29 USD directly from Seeed.
You can find a great guide from Seeed studio to explain how to use edge impulse with Wio Terminal here in the Wio Terminal Edge Impulse Getting Started.Anyway, I'll show an overview of how to connect the Wio Terminal.
Step 1.2.1: Upload EdgeImpulse UF2 Firmware
Connect Wio Terminal to your computer. Entering the bootloader mode by sliding the power switch twice quickly.

An external drive named Arduino should appear on your PC. Drag the downloaded Edge Impulse uf2 firmware files to the Arduino drive. Now, Edge Impulse is loaded on Seeeduino Wio Terminal!
Step 1.2.2: Connect Wio Terminal using WebUSB
Select Connect using WebUSB
Choose Wio Terminal Port and Click Connect.

Connected successfully 🎉

Step 1.3: Start Collecting Date
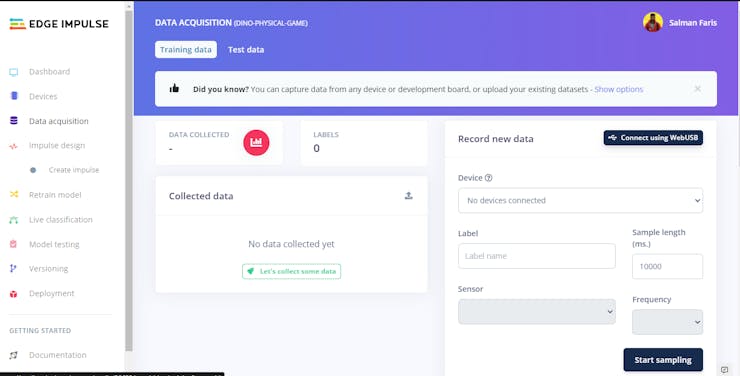
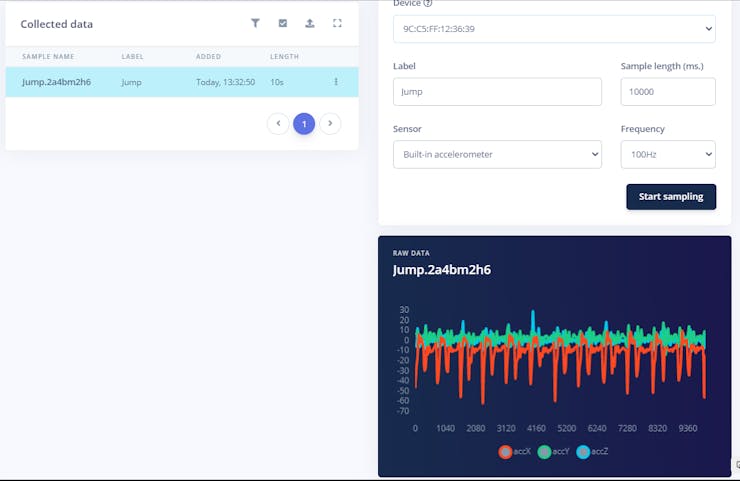
To collect data we need to choose the right sensor, label data, provide sample length in milliseconds and provide the frequency of the incoming data. the right.Here are the parameters, You can see that label is Jump so I need to record jump data from the sensor parameters.

After that click sample, since we provided 10000 milliseconds as sample length, it will start with10-sec Built-in Accelerometer data.

So when sampling attaches the Wio Terminal in your body and Jump for 10 seconds.
After collecting, you can see the Raw data and the sample list
Like this, we need to collect 18 samples of Jump and Idle raw data. (more data is better, and try to equalize all the datasets otherwise model will underfit or overfit)
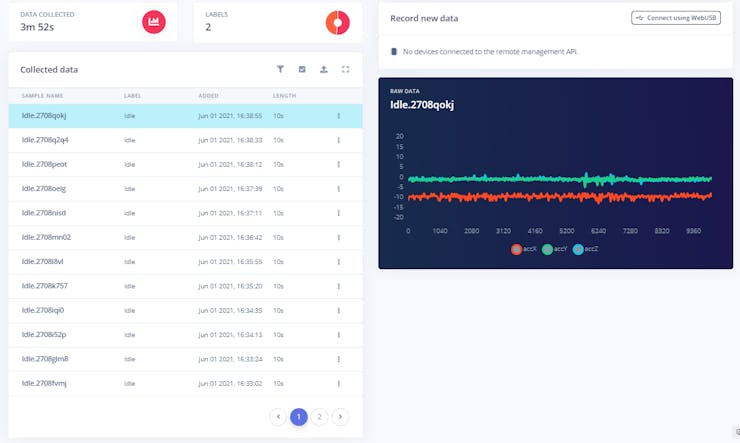
We are now successfully collected Raw data 🎉
Step 2: Split Training and Testing Data Set ✂️
In order to build a better ML model we need to provide quality data and to test the quality of the model we need scale, It's not good to test the model with the same trained data, so to measure the model accuracy we need to random raw data from the collected data set and mark it as test data and isolate from train data and at the end when modelling complete we use this test data set to measure the model accuracy.
Training Set: You can extract features and train to fit a model and so on.
Testing Set: Measure the model accuracy by predicting the data set.
In Edge Impluse studio we can easily randomly split the data into training and testing data set.Goto Project dashboard and click Rebalance dataset

You'll get a warning message, If it's ok for you like Yes, rebalance

Now you can see the Test data

and if it's not balanced, you can move each dataset manually.

Step 2: Impulse Design ✨
An impulse takes the raw data, slices it up in smaller windows, uses signal processing blocks to extract features, and then uses a learning block to classify new data. Signal processing blocks always return the same values for the same input and are used to make raw data easier to process, while learning blocks learn from past experiences. In our Impulse Design, There are three steps we need to take care
- Create Impulse - Select Data series, processing block, learning block and output features
- Select & Build Processing block (Spectral Features)
- Select & Build Learning block (Neural Network Classifiers)
Step 2.1: Create Impulse
First, we need to select the parameters such as window size in the data series, processing block and learning block Finlay select the Output features which is labels.
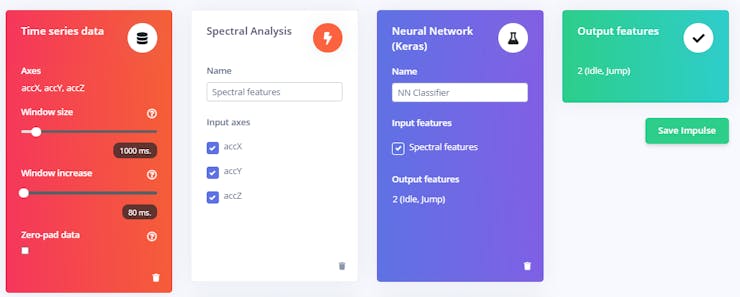
In this project, I used Window size 1000 ms and Spectral Analysis as processing block, Since it's great for analyzing repetitive motion, such as data from accelerometers. Extracts the frequency and power characteristics of a signal over time and for the learning block, I chose Neural Network (Keras) For learns patterns from data and can apply these to new data. Great for categorizing movement or recognizing audio.
Step 2.1: Build processing block - Spectral Analysis
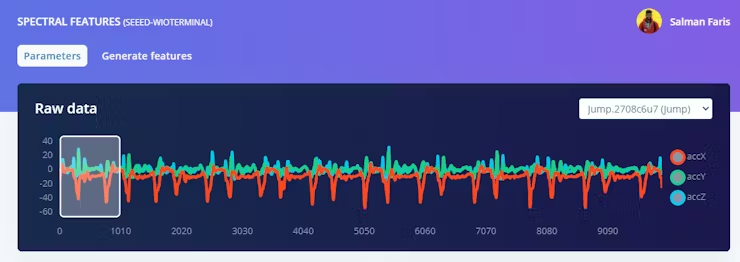
In our project, we are using Spectral Analysis as a processing block, Since it's great for analyzing repetitive motion, such as data from accelerometers. To configure your signal processing block, click Spectral features in the menu on the left. This will show you the raw data on top of the screen (you can select other files via the drop-down menu), and the results of the signal processing through graphs on the right. For the spectral features block you'll see the following graphs:
- After filter - the signal after applying a low-pass filter. This will remove noise.
- Frequency domain - the frequency at which signal is repeating (e.g. making one wave movement per second will show a peak at 1 Hz).
- Spectral power - the amount of power that went into the signal at each frequency.

A good signal processing block will yield similar results for similar data. If you move the sliding window (on the raw data graph) around, the graphs should remain similar. Also, when you switch to another file with the same label, you should see similar graphs, even if the orientation of the device was different.

Once you're happy with the result, click Save parameters. This will send you to the 'Feature generation' screen. In here you'll:
- Split all raw data up in windows (based on the window size and the window increase).
- Apply the spectral features block on all these windows.

Click Generate features to start the process.

Step 2.3: Select & Build Learning block (Neural Network Classifiers) / Configuring the neural network
With all data processed it's time to start training a neural network. Neural networks are a set of algorithms, modelled loosely after the human brain, that is designed to recognize patterns. The network that we're training here will take the signal processing data as an input, and try to map this to one of the four classes.
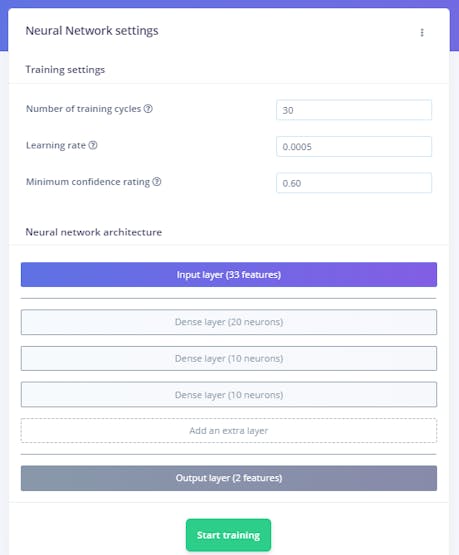
With this Neural network architecture, I started the training. we can add more extra dense layers if we want to.
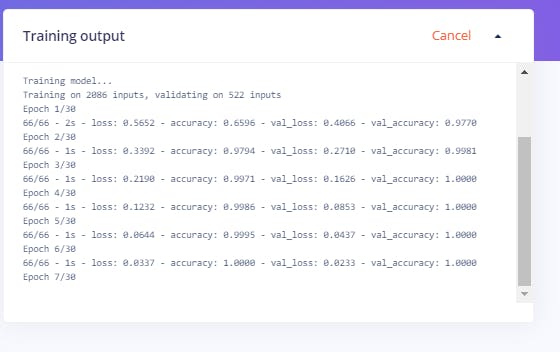
once we click the Start Training, based on the number of training cycles it will take that much epoch to train the neural network.
an epoch refers to one cycle through the full training dataset
We can see the model training performance once training completed.
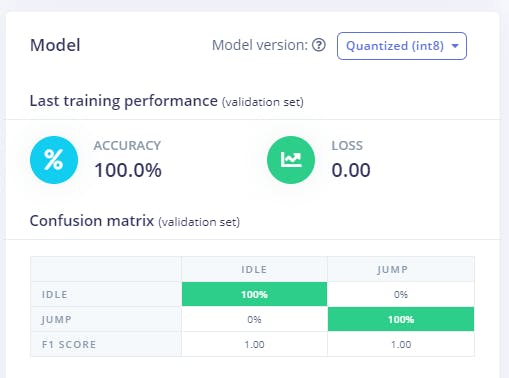
here we got a very good performance result since it's only two labels.
Step 3: Live classification 🔍.
From the previous training section we know how our model will be performing, but how well would the network perform on new data? Click on Live classification in the menu to find out.
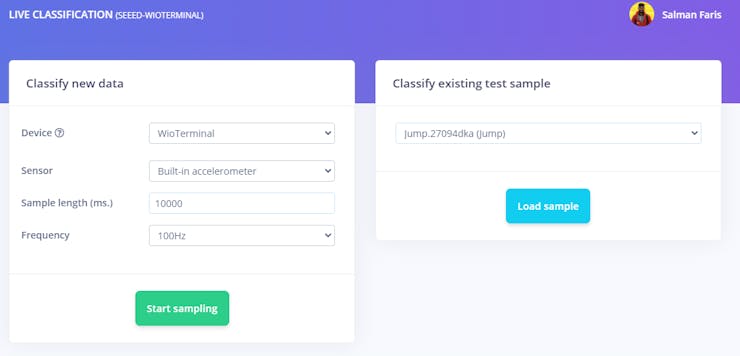
Connect the device and click start sampling, or you can choose a simple from the previous list.

You can see the live classification result. from a 10 sec, it found 107 Jump nd 5 as Idle and one motion in uncertain which mean it can't describe.

we can also see them in the graph where the live sample lives and see the training data and classified data.
Step 4: Test Data Classification 🧪.
In the first data collection part, we actually selected some data samples as test data, to see our model performance. In the model testing tab, click Classify all to start classification.
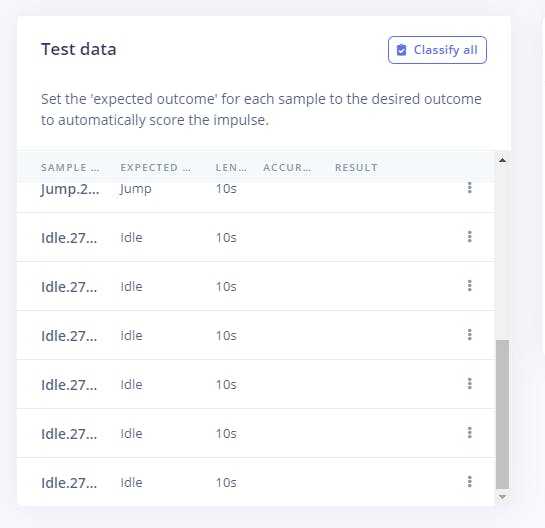
You can see that the mode tests are pretty much accurate.

Step 5: Model Deployment ✔️.
we can download the Impulse model in different ways.

Since we have Wio Terminal, I chose Arduino Library.
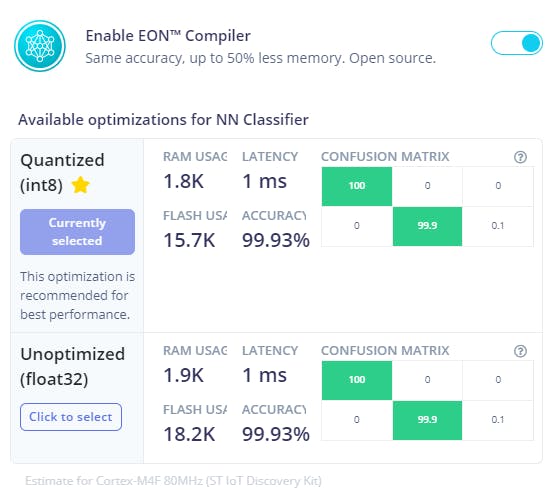
The EON can make Neural Networks in Up to 55% Less RAM and 35% Less ROMEON achieves its magic by compiling your neural networks to the C++ source code. This is different from other embedded neural network runtimes, like TensorFlow Lite for Microcontrollers, which have a generic interpreter, and then load your model at runtime. By compiling the neural network to source code you thus don't need the interpreter, can more easily shift data into ROM, and the linker knows exactly which operations are being used, being able to eliminate a lot more code. You can read more here : https://www.edgeimpulse.com/blog/introducing-eon

After click builds, the model is building in the background and it will download automatically once completed.
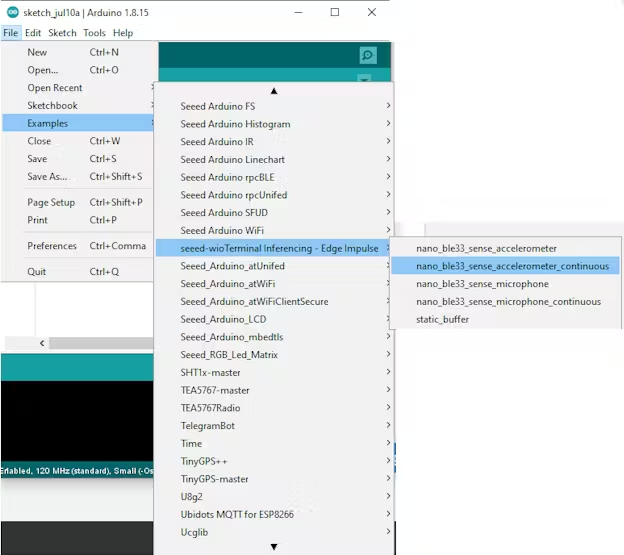
Step 5.1 Install Arduino library
Add this library through the Arduino IDE via:Sketch > Include Library > Add .ZIP Library...Examples can then be found under:File > Examples > seeed-wioTerminal_inferencing .
Step 5.2 Upload Examples Sketch to Wio Terminal
Select right port and board, then click upload.

After uploading the sketch, It immediately starts Sampling and Inferencing. You can open serial monitor to see the results.

Step 6: Add Keyboard Libraries To Play Dino game 🎮
Now we built an embedded device that can read accelerometer data and give predictions about Jump or Idle. In order to play theDino game, we only need to send one keystroke which can be aspacebar or enter key, so we can simulate that keystroke with the Wio Terminal when a person Jump and it completes the project.
I used Keyboard Library for Arduino, This library allows an Arduino board with USB capabilities to act as a keyboard.I modified the code by adding a condition.
if (result.classification[1].value > 0) {
Serial.println("Jumped...................");
Keyboard.write(KEY_UP_ARROW);
delay(100);
}
Full Code
/* Includes ---------------------------------------------------------------- */
#include <seeed-wioterminal_inference.h>
#include"LIS3DHTR.h"
LIS3DHTR<TwoWire> lis;
#include "Keyboard.h" //keyboard library

/* Constant defines -------------------------------------------------------- */
#define CONVERT_G_TO_MS2    9.80665f

/* Private variables ------------------------------------------------------- */
static bool debug_nn = false; // Set this to true to see e.g. features generated from the raw signal

/**
  @brief      Arduino setup function
*/
void setup()
{
  // put your setup code here, to run once:
  Serial.begin(115200);
  while (!Serial) {
  }
  Serial.println("Edge Impulse Inferencing Demo");

  lis.begin(Wire1);

  if (!lis.available()) {
    ei_printf("Failed to initialize IMU!\r\n");
    while (1);
  }
  else {
    ei_printf("IMU initialized\r\n");
  }

  lis.setOutputDataRate(LIS3DHTR_DATARATE_100HZ); // Setting output data rage to 25Hz, can be set up tp 5kHz
  lis.setFullScaleRange(LIS3DHTR_RANGE_16G); // Setting scale range to 2g, select from 2,4,8,16g

  if (EI_CLASSIFIER_RAW_SAMPLES_PER_FRAME != 3) {
    ei_printf("ERR: EI_CLASSIFIER_RAW_SAMPLES_PER_FRAME should be equal to 3 (the 3 sensor axes)\n");
    return;
  }
}

/**
  @brief      Printf function uses vsnprintf and output using Arduino Serial

  @param[in]  format     Variable argument list
*/
void ei_printf(const char *format, ...) {
  static char print_buf[1024] = { 0 };

  va_list args;
  va_start(args, format);
  int r = vsnprintf(print_buf, sizeof(print_buf), format, args);
  va_end(args);

  if (r > 0) {
    Serial.write(print_buf);
  }
}

/**
  @brief      Get data and run inferencing

  @param[in]  debug  Get debug info if true
*/
void loop()
{
  ei_printf("Sampling...\n");

  // Allocate a buffer here for the values we'll read from the IMU
  float buffer[EI_CLASSIFIER_DSP_INPUT_FRAME_SIZE] = {0};

  for (size_t ix = 0; ix < EI_CLASSIFIER_DSP_INPUT_FRAME_SIZE; ix += 3) {
    // Determine the next tick (and then sleep later)
    uint64_t next_tick = micros() + (EI_CLASSIFIER_INTERVAL_MS * 1000);

    lis.getAcceleration(&buffer[ix], &buffer[ix + 1], &buffer[ix + 2]);

    buffer[ix + 0] *= CONVERT_G_TO_MS2;
    buffer[ix + 1] *= CONVERT_G_TO_MS2;
    buffer[ix + 2] *= CONVERT_G_TO_MS2;

    delayMicroseconds(next_tick - micros());
  }

  // Turn the raw buffer in a signal which we can the classify
  signal_t signal;
  int err = numpy::signal_from_buffer(buffer, EI_CLASSIFIER_DSP_INPUT_FRAME_SIZE, &signal);
  if (err != 0) {
    ei_printf("Failed to create signal from buffer (%d)\n", err);
    return;
  }

  // Run the classifier
  ei_impulse_result_t result = { 0 };

  err = run_classifier(&signal, &result, debug_nn);
  if (err != EI_IMPULSE_OK) {
    ei_printf("ERR: Failed to run classifier (%d)\n", err);
    return;
  }

  // print the predictions
  ei_printf("Predictions ");
  ei_printf("(DSP: %d ms., Classification: %d ms., Anomaly: %d ms.)",
            result.timing.dsp, result.timing.classification, result.timing.anomaly);
  ei_printf(": \n");
  for (size_t ix = 0; ix < EI_CLASSIFIER_LABEL_COUNT; ix++) {
    ei_printf("    %s: %.5f\n", result.classification[ix].label, result.classification[ix].value);

    if (result.classification[1].value > 0) {
      Serial.println("Jumped...................");
      Keyboard.write(KEY_UP_ARROW);
     delay(100);

    }


  }
#if EI_CLASSIFIER_HAS_ANOMALY == 1
  ei_printf("    anomaly score: %.3f\n", result.anomaly);
#endif
}

#if !defined(EI_CLASSIFIER_SENSOR) || EI_CLASSIFIER_SENSOR != EI_CLASSIFIER_SENSOR_ACCELEROMETER
#error "Invalid model for current sensor"
#endif
Step 7: Final Test 🚀.
Now we completed all things,
- Open Dino chrome://dino/
- Connect Wio Terminal
- Jump 🙌
Thank You.